
AHL LabNote 2-Tips for practitioners for field postmortems
Jan Shapiro, DVM, Dip Path; Maria Spinato DVM, DVSc, Diplomate ACVP Updated May 2018
Postmortem examination (autopsy, necropsy) of domestic animals is often conducted on farms. The reasons for this procedure could be to confirm a clinical diagnosis, to make a diagnosis in cases that died prior to veterinary care, as a quality control measure for vaccination and other disease prevention or treatment measures, to fulfil the requirements of an insurance claim, or to provide evidence for a medico-legal case.
There are a number of important considerations prior to tackling a field postmortem. These include the special sampling and documentation required for legal and insurance cases and cases involving poisoning. Particularly in medico-legal cases, ensure that the postmortem can be conducted and observations and conclusions drawn with complete objectivity, as this will affect the credibility of the results to the animal owner or recipient of the postmortem report. Pathogen dissemination, particularly of zoonotic agents, and disposal of the carcass and body parts should be considered in the decision to proceed with the postmortem, the choice of location and the protective clothing worn. In the case of suspected reportable diseases, the Canadian Food Inspection Agency must always be contacted prior to starting. Note that since 2015, there have been significant changes in the rabies program. Rabies is still a federally reportable disease, but suspect cases are not reported to CFIA , but to the local Public Health officer or OMAFRA, depending on whether there has been human or animal exposure.
The 3 B’s of the field postmortem are:
1. Be prepared- Set aside time to do the job well. Have on hand and ready to use appropriate equipment, which could include:
|
|
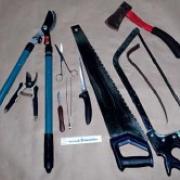
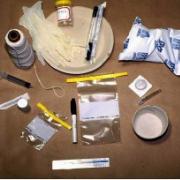
- a dedicated clean postmortem kit (see photo) and a container and disinfectant for cleaning instruments before they are removed from the farm
- sampling supplies for histology, microbiology, etc.
- a supplementary source of light (if the area is poorly lit, you could miss lesions)
- ice packs and containers for preserving the samples until they reach the point of shipping
- a waterproof disinfectable or disposable ground sheet to place the carcass on
- resources such as the AHL User’s Guide
- a digital or other type of camera can provide images to supplement written postmortem observations. These are particularly important for documentation in insurance and medico-legal cases.
2. Be systematic - Follow the same procedure and examine tissues in the same order for each postmortem. This ensures that nothing is missed, and that incidental or secondary lesions are not over-interpreted.
3. Be thorough - Doing a problem-oriented postmortem does not mean that the other body systems do not need to be examined. A checklist may be a useful guide to ensure that all systems have been examined and observations are recorded.
In performing a postmortem, many abnormal findings may appear to be lesions. These non-lesions could be due to autolysis, freezing artefact, or could be normal species differences or age-associated features. Try to become familiar with these non-lesions if you will be conducting field postmortems often.
Sampling Tips:
As a general rule, sampling for microbiological tests should be done before there is widespread contamination of the site with intestinal tract content. For samples collected for microbiological tests, especially for bacterial culture, there should only be one tissue type per container, as cross contamination between tissues in a container can make interpretation of results challenging or misleading.
Sample containers should be well-sealed, leakproof and clearly labelled. Intestinal tract content should be collected in screw-cap plastic containers as other types of containers may explode when the sample heats.
Assistance from an observer in collecting and labelling samples, and even recording or photographing your findings will ensure that the outside of sample containers stays clean, and that reports are more complete.
When sampling for histology, to reduce the creation of artefacts:
|
|
- minimize the handling of tissue before it is placed in formalin
- cut solid tissues with a knife or scalpel, not scissors, so the tissue edges are not crushed
- ensure frozen tissues are thawed prior to contact with formalin
For optimal fixation:
- tissue sections should not exceed 1.0 cm in thickness
- the formalin-to-tissue volume ratio should be no less than 10:1
Do not under-sample in a problem-oriented postmortem, as there may be regional differences in the lesions depending on the age or stage of disease and the presence of secondary lesions or pathogens. Samples should be taken from the most and least severely affected lesions, and the border areas. It is often the case that the most grossly dramatic lesions are the most chronic, and therefore, the least diagnostic.
The detail that goes into the postmortem report will be determined by the reason for the procedure. However, it should include the unique animal information (age, breed, sex,eartag, markings, etc.), degree of autolysis, body condition and hydration status. Lesions should be described with respect to location, distribution, color, size, shape, consistency or texture, and smell (when appropriate). When additional tests are being done, such as histology, ensure that your postmortem report and a complete clinical history, accompany the samples to the laboratory.
For more details about specimen selection and available tests, please consult the AHL User’s Guide. For more details about shipping, please refer to AHL LabNote 27 entitled Submission Instructions - on our website at www.ahl.uoguelph.ca
File attachments
| Attachment | Size |
|---|---|
| 708.02 KB |