FAQs about the "My Progress" page and academic standing
The first bar (“Progress”) represents an approximate percentage of program requirements you have completed. Each component of a program’s requirements states specific criteria you must meet in terms of either credits or courses. A program can have a combination of many components with a mix of credits and course requirements. For this reason, the percentage of requirement components completed cannot be 100% accurate in expressing the overall completeness of the program. In addition, there may be other requirements for the program that can only be verified by the student’s Program Counsellor for undergraduate and diploma students or the student’s advisor or Graduate Program Coordinator for graduate students. While you may use the progress bar as a guideline, more information may be determined by looking at the My Progress page and reviewing your completed course work against the program’s requirements.
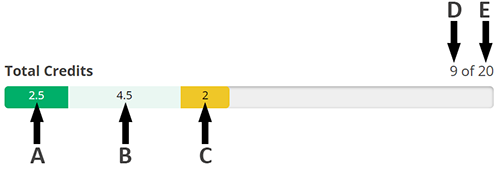
The second bar (“Total Credits”), pictured below, represents the number of credits that the student has completed (A, dark green), in progress (B, light green) and planned (C, yellow), out of the total number of credits required for the program. In the case of graduate students, this number will default to 0 as the total number of credits varies by the individual's program.
The numbers just above the “Total Credits” bar, on the right-hand side, represent the total number of planned, in-progress and completed credits (D) compared to the total number of credits required to successfully complete the program (E). To determine how many credits you will still need to take for your program after successfully completing your in-progress courses, subtract the number of completed and in-progress credits (A + B) from the total number of required credits for your program (E).
Note: Leaving a course planned in a future semester when you are currently registered in it or have already completed it may lead to an inconsistent credit count on the "Total Credits" bar. It is important to update your planned courses/semesters for information to display correctly on the "My Progress" page.
The third bar (“Total Credits from this Institution”) displays the number of completed (dark green), in-progress (light green) and planned (yellow) credits from the University of Guelph, Ridgetown Campus and Guelph-Humber. Transfer credits and credits obtained on a Letter of Permission are not included. The numbers just above the bar, on the right-hand side, represent: 1. the total number of planned, in-progress and completed credits from U of G, Ridgetown and Guelph-Humber and 2. the number of credits (5.00) that must be completed at U of G, Ridgetown and Guelph-Humber to meet Academic Residence Requirements.
Yes, the Progress bars include co-op work term credits in their calculations.
“Credit not Earned” means that you did not fulfil the requirements of the course. Please note that this refers to that particular credit attempt only. If the course has subsequently been retaken and successfully completed, the passed attempt will also appear in the appropriate section.
ALL courses within the requirement need to be completed before the section changes to green.
Another potential reason is that grades have not yet been posted for some of your courses; those courses would still be considered incomplete and show as red.
"My Progress" does not share courses between two specializations because only a maximum of 50% of courses can be double counted in a second specialization. You can request that your Program Counsellor submit an “exceptions and overrides” request to the Office of Registrarial Services to indicate which course(s) can be shared between your two specializations.
No, the “My Progress” page will look the same for part-time and full-time students. When creating your degree plan, part-time students should however note that you can only plan for six years in advance on your Timeline.
Yes, the “My Progress” page includes the requirements for your minor or area of concentration/emphasis.
No, only core programs can be previewed as part of the “View a New Program” feature. To determine the requirements for a new minor, please consult the Academic Calendar for your calendar year. Your calendar year is indicated in the “At a Glance” section at the top of the “My Progress” page.
Once the change has been approved and processed, you will see additional requirements on your “My Progress” page that are associated to the specialization.
If you are a new student who initially accepted an offer into one program but then switched programs before the start of the semester, you will see both programs on your "My Progress" page until the first day of class. After the first day of class, only your current program will continue to display.
Required make-up courses for students who did not complete Grade 12 Physics, Biology and/or Chemistry are displayed in the “Science Distribution - 4U/GR12 Make Up Crs.” section of the “My Progress” page. Students who were admitted lacking Grade 12 Physics should follow the Revised Schedule of Studies and take PHYS 1300. The older PHYS 1020 course normally no longer applies. In most cases, B.Sc. students that were admitted with both Grade 12 Biology and Grade 12 Chemistry can safely ignore this section.
Please also note that students who have taken PHYS 1300 do not need to take PHYS 1070. This substitution will not display automatically on the “My Progress” page, but it will be confirmed manually when it comes time to approve B.Sc. students for graduation. If you have any questions, please contact your Program Counsellor.
Only current students can access the “Planning Overview,” “My Progress” and “Plan, Schedule, Register & Drop” links on WebAdvisor. If you recently accepted your offer of admission to the University, there may be a small delay with your status changing from applicant to current student, so you will be temporarily unable to access Student Planning. If you are receiving this error message and you are a new undergraduate or diploma student on the Guelph campus, please contact es@uoguelph.ca. If you are a new graduate student, please contact gradrec1@uoguelph.ca (for colleges COA, LANG, CEPS and CSAHS) or gradrec2@uoguelph.ca (for colleges CBS, OAC and OVC). If you are a Ridgetown student, please contact rcregistrar@uoguelph.ca.
You may see "possible replacement" listed beside a course if you are currently registered in it AND also have that course planned in another semester. By removing the course from the additional semester(s), this message should disappear.
It is important to update your planned courses/semesters for information to display correctly in "My Progress."
You may see the terms “300 level” and “400 level” on the “My Progress” page. They are referring to courses at the 3000 level and 4000 level, respectively.
Some programs have a maximum number of credits at the first-year (1000) level that can be applied towards your degree. The “My Progress” page does not provide a tally of total first-year credits; only a list of your completed courses is displayed. Please remember to count the credits to ensure you do not exceed your program’s limit.
After you log into WebAdvisor, click on the "Academics" icon in the menu on the left and then select "Current Academic Standing."
FAQs about searching for courses
Yes, you can enter the course code in the "Search for courses" field located at the top right of all Course Catalog and Student Planning pages. You can search for a specific course using the full course code (e.g., BIOL*1080), or you can enter the code for the subject area (e.g., BIOL) to view all courses in that subject area.
Because WebAdvisor displays courses for all available campuses by default, you need to use the filters in the Course Catalog to specify your campus. There are two ways to choose your campus:
- Using the Advanced Search, select the campus in the "Location" dropdown.
- After performing a search, select the campus in the "Locations" filter on the left side of the search results page.
After performing your search using the Subject Search or Advanced Search, you can use the "Course Levels" filter on the left side of the search results page to view courses for a specific year/level.
To search for all courses offered through Distance Education, type "DE01 OR DE02" in the "Search for courses" field located at the top right of all Course Catalog and Student Planning pages. After the search results load, you can use the filters on the left side of the page to specify the semester, campus, etc.
Information in the course description about when and how a course is offered should only be used as a guide. If the “Offering(s)” section of the course description indicates “Also offered through Distance Education format,” this may not apply to all semesters, and the course may only be available through face-to-face delivery in some semesters. If you would like to know more about when the course is usually offered through DE, please contact the department that organizes the course. The department is indicated in the course description.
FAQs about degree/diploma planning and registering for courses
A planned course is one you intend to take in a future semester. You must register for a section of the course during the course enrolment period for that semester in order to take the course and have access to the course materials on CourseLink. When you are planning your courses, you will be notified of any prerequisites and restrictions (e.g., restricted to students in a certain program) for the courses, but you will not be prevented from adding courses to your plan if you don’t have the prerequisites or meet the restrictions. Once it comes time to register, you will not be able to enrol in a course if you don’t have the prerequisites or meet the restrictions on the course.
You can create your degree/diploma plan anytime. It is important to understand that you are not registering in these courses but rather you are “planning” to register for the course in the term to which you have added the planned course. You are not obligated to register for a planned course nor are you billed for the planned course until you register. You can add, remove or move planned courses into any path that you want. For help planning your courses, watch the Creating a Plan video.
You can register for courses for a given semester anytime during the course enrolment period for that semester; see the dates for your course enrolment period. For help registering for courses, watch the Registering for Courses video.
Although courses will normally be offered in the semester(s) indicated, the University cannot guarantee that all courses will be offered in the exact semester(s) indicated. The course timetable for a semester is posted approximately two weeks before course enrolment begins. If your planned course is not offered, you will need to choose a different course. We recommend you check your “My Progress” page to see what other courses you could take for your degree/diploma. You should also update your timeline in the “Plan, Schedule, Register & Drop” section accordingly by moving the planned course that’s not offered this semester to a future semester. You may wish to contact the department that offers your planned course for information about when they expect that course to be offered next.
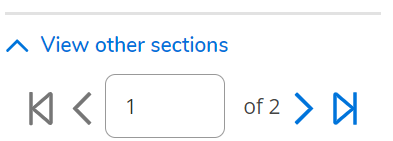
As a first step, please make sure that you have viewed all sections of the course. You may have missed sections that still have seats available. When you're on the "Plan, Schedule, Register & Drop" page of WebAdvisor, the left panel only shows six sections at a time. You need to use the arrows shown in the screenshot below to view the other sections.
If you are using the Subject Search or the Catalog Listing view of the Advanced Search, make sure you scroll all the way down the list of sections for the course.
If you have searched through all sections and there are no seats available, continue to monitor WebAdvisor as some spaces may be added or another student may drop the course. You may also wish to visit your Program Counselling office's website for more information.
UNIV*7100 will be automatically added to your record by the Office of Graduate and Postdoctoral Studies (OGPS) at the beginning of your first semester. After it has been added by OGPS, it will appear on your "My Progress" page. You do not need to plan and register for it.
Yes, Student Planning allows you to drop one section and register for another section simultaneously. For instructions, read the Dropping Courses or Changing Sections help guide, or watch the video tutorial.
IMPORTANT NOTE: if there is a registration issue with the course section you’re trying to add (e.g., no seats available or a restriction on the course that you do not meet), you will not be successfully registered in it, BUT your current course section will still be dropped. Remember you can drop a course up until the last day of classes each semester; however, you can only add or change course sections during the designated course selection period.
On the “Schedule” tab of the “Plan, Schedule, Register & Drop” page, click on the X next to the course or section names in the left-hand panel to remove the planned course or section from your timetable.
For macOS users, the scroll bar may not appear in the Course Details window. You will need to scroll downwards using your dial until you see the "Add Course to Plan” button at the bottom of the window.
There are two potential reasons that the "Register" and "Register Now" buttons are not displaying on the "Plan, Schedule, Register & Drop" page:
- Your course selection window hasn't opened yet. Visit the Course Selection Windows webpage to determine when you can start registering for courses.
- You haven't selected a section. Before you can register for a course, you first need to select/plan a section – even if the course only has one section and includes graduate courses (e.g., UNIV-7500, UNIV-7510 and UNIV-7520). On the "Plan, Schedule, Register & Drop" page, click on the "View other sections" drop down under the course in the left panel and then click on the desired section. A window will pop up; click on "Add Section" at the bottom right. The section should now show up in yellow on your timetable, or below the timetable if it doesn't have a scheduled meeting time. There should be a "Register" button for each individual course on the left and a "Register Now" button should show up at the top right to register for all courses at once. Read the Registering for Courses help guide for more details and screenshots or watch the Registering for Courses video tutorial.
The waitlisting feature is not currently available. Select another open section that fits your schedule and then continue to monitor Student Planning for availability in your desired section. Space may become available if another student drops that section.
This message indicates that enrolment in the course is restricted to particular programs or specializations. For details about course restrictions, click on the course name in the left-hand panel of the“Plan, Schedule, Register & Drop” page. If you meet the restrictions, you will be registered in the course despite the warning message. To confirm that you are registered, check the registration status of the course under the course name in the left-hand panel. It will say "Registered" if you met the restrictions and were successfully registered. It will still say "Planned" if you did not meet the restrictions and were not successfully registered.
Additional help with course selection (e.g., course selection windows, Course Waiver Request Forms, course restrictions, part-time vs. full-time course load, etc.) is available on the Course Selection FAQ page.
Course selection information for graduate and Ridgetown students is available at the links below:
FAQs about the timetable and exam schedule
On the “Schedule” tab of the “Plan, Schedule, Register & Drop” page, your planned and registered course sections are displayed in a timetable to help identify any conflicts. Lectures, labs/seminars and exams are displayed in these colours:
- Yellow: lectures, labs and seminars of planned courses
- Green: lectures of registered courses
- Purple: labs or seminars of registered courses
- Red: lectures, labs and seminars of conflicting courses
- Blue: final exams of planned or registered courses (Guelph campus only)
For more information about what the different colours on Student Planning represent, take a look at the Colour Coding Identification infographic.
Distance Education (DE) courses without scheduled class time are listed below your timetable on the “Planning Overview” and “Plan, Schedule, Register & Drop” pages until their final exam times are posted (two to three weeks before classes begin). DE courses without a final exam will continue to show below your timetable, but DE courses with a final exam will no longer show there. After the exam schedule is posted, you can still view your DE courses in the list of courses to the left of the timetable on the “Plan, Schedule, Register & Drop” page. You can also view and print a full list of your courses by clicking the “Print” button above the timetable.
UNIV*7510 (full-time) or UNIV*7520 (part-time) will be listed below your timetable on the “Planning Overview” and “Plan, Schedule, Register & Drop” pages. Please ensure that you are registered in the course, and it is not just a planned course. A registered course is indicated in green and will have a checkmark. You can also view and print a full list of your courses by clicking the “Print” button above the timetable.
Once the final exam schedule has been posted on WebAdvisor, you can view your schedule on the “Schedule” tab of the “Plan, Schedule, Register & Drop” page. Select the appropriate semester. Exams are shown in the timetable in blue; however, this timetable represents a single week, and your final exams may be spread over multiple weeks. For complete exam details (displayed in a list format), click on the “Print” button above the timetable. Although final exams are displayed on the same timetable as your classes, final exams only occur after classes have ended, on the dates indicated when you click on the "Print" button.