We continue to build content for this page.
Thank you for your patience.
- Mail
- Calendaring and Meetings
- Avoid "Do Not Send a Response" Option when Responding to Meeting Requests
- Respond to Meeting Requests from Your Inbox, Not Your Calendar
- Avoid Responding to Meeting Requests from Your Mobile Device
- Always Select "Remove from Calendar" Upon Receiving a Meeting Cancellation
- Sending an Attachment in a Calendar Invitation
- Modify Calendar Events from the Same Device
- When Changing a Meeting, Send Updates to Everyone
- Contacts and Lists
- Use Global Address List (not Contacts) When Creating a Contact List
- How to Avoid Error Messages when Sending an Email or Creating a Contact List
- How to Avoid Pitfalls by Setting the "To:" Field to Default to the Global Address Book
- Creating a Contact List with Bulk Users
- Office 365 Distribution Groups
- Delegates and Permissions
- Searching
- General
Adding Template Phrases to Gryph Mail
Template Phrases allow you to use pre-set or custom email templates so you can quickly respond to common email questions without having to retype the same email over and over again. You can quickly add in a salutation, and a signature and send the email in an instant.
In Gryph Mail, the Template Phrases add-in is automatically disabled and will need to be turned on before you can use it. To enable Template Phrases, follow the steps below.
In The Outlook Web App
Adding Template Phrases to Gryph Mail
- Open up your Gryph mail and select the 'Settings' gear.

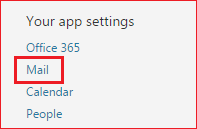
- Once the Settings sidebar opens up, scroll down to the bottom until you see 'Your App Settings'. and click on the 'Mail' link.
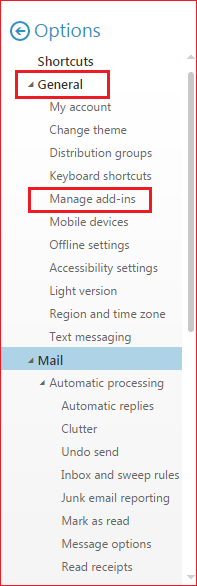
- Once that has opened, on the left side bar click on 'General' and under that drop down menu, select 'Manage add-ins'.
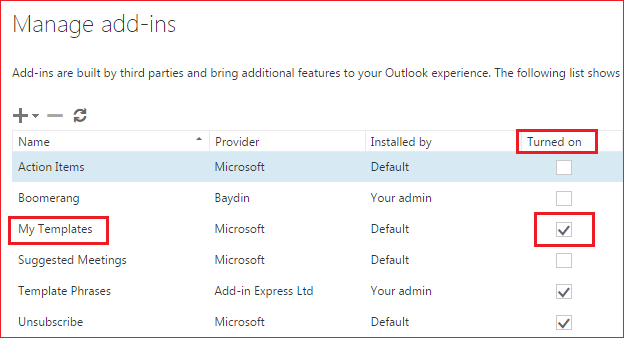
- Under the Manage Add-ins page, locate 'My Templates' under the name option. If you scroll across, you should see a check mark in the box to confirm that it is turned on. If there is no check mark, simply click the box to turn it on.
You will need to log out of Gryph Mail and log back in again to see Template Phrases as an option in the Add-ins.
Add and Edit Templates
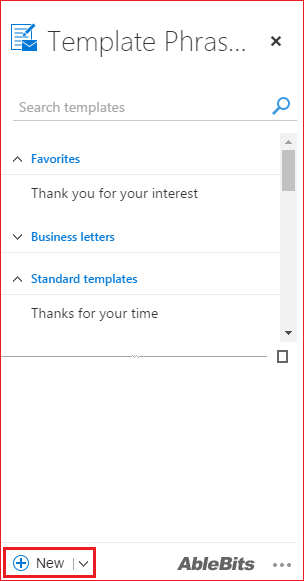
- Click on the 'New' Option in Outlook to open up a new Email. In the bottom left corner, you should see an icon for Template Phrases. Click on that to open up the add-in.

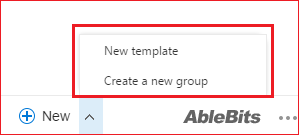
- When you click on the button, you will see the 'Template Phrases' box pop up on the right side of your screen. It should already have templates included in it, but if you want to edit or add any, it is a very simple process. First, click on 'New' in the bottom left corner (se below), and select 'New Template'.
- Now you can enter the name of the Template in the 'Title' field. This helps to make it easier for you to distinguish it from the other templates, and make it easy to choose.
- You can also choose what folder you would like the template to be placed under the drop down menu.
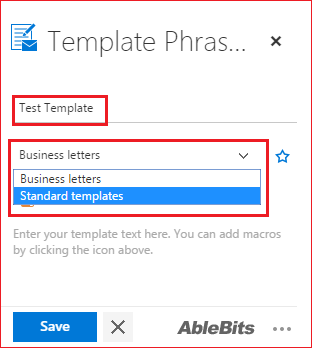
- If you want to create a new group for your templates, simply click on the '^' or upwards arrow next to the New bar and select Create a new group.
- You can then decide what to title your group, and it should appear within your list of templates.
- Next, you want to enter the actual text of the template. You can either copy or paste the body of the email, or you can manually type out a new template reply in the box.
- Click Save and you should see the template in your list. If you do not want to save it, click Cancel and it will discard any changes you have made.
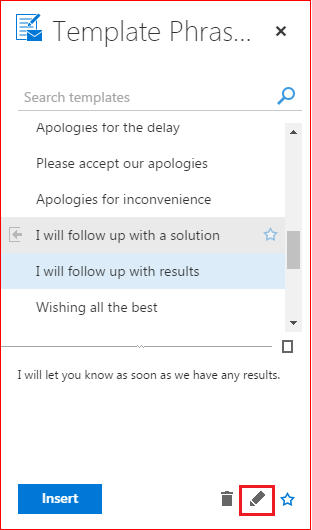
- You can also update or edit templates simply by selecting it in the list, and clicking on the "Edit"icon that resembles a pencil in the bottom left corner of the window.
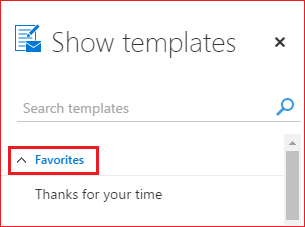
Mark Templates as Favourites
If you notice that you start to use a template more often than the other ones, you can mark it as a 'favourite' to allow easier access to it.
- Select the template you want to make your favourite
- Click on the 'Star' icon to the left of the template to add it to your favourites.
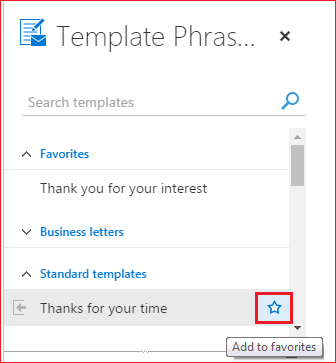
- You will now see it listed under your 'Favourite' group at the top of the window.
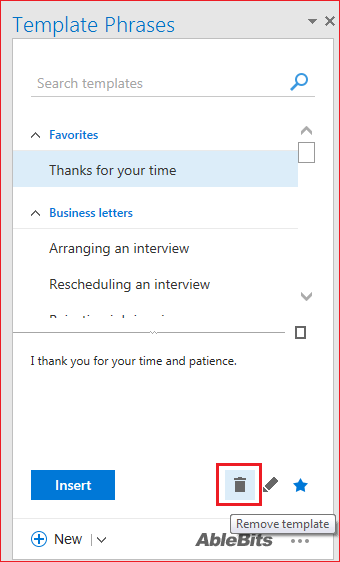
Deleting unused Templates
If there are certain templates that you will never use, you can easily delete them. Simply single-click on the relevant template, and then click the trash bin that appears in the bottom right-hand corner.
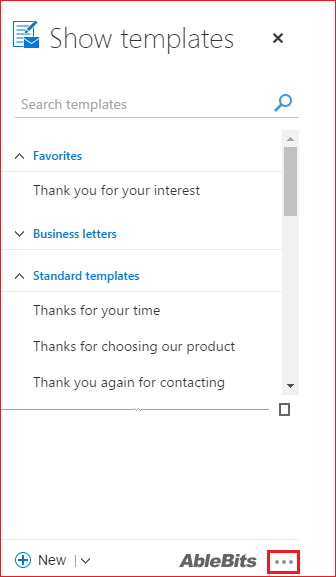
Back up and Import or Export your Templates
How to Import your Templates:
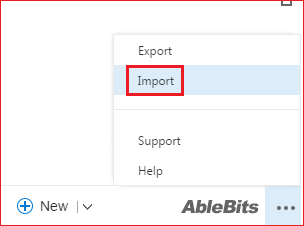
- Click on the Menu icon with three dots in the bottom right corner of your window to expand options available in Template Phrases.
- Click Import, and locate the file containing the templates that you would like to upload into your own template phrases. These files are usually saved as a '.data' or a '.ptd' file type.
- You will now see your imported templates in a separate folder. It should have the same name as the top folder within the file.
How to Export your Templates:
- Click on the 'Menu' icon with three dots in the bottom-right corner of your screen.
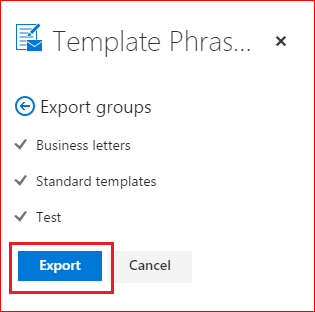
- Click on 'Export' from the menu. All of your template groups will be selected by default. You can clear the check boxes by clicking on them to deselect any groups that you do not wish to be exported.
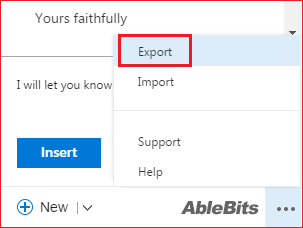
- Click 'Export' to download the .ptd file with all of your templates included within it.
Using Macros in Template Phrases
Macros help to personalize templated emails by automating routine steps such as subject, address field, date, or the name of a contact. This will often make it easier to send emails to individuals, especially mass emails that only need a few details changed depending on the recipient. There are many different options you can choose from when inserting macros into an email template.
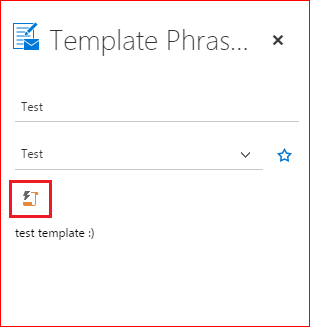
- To start, we need to insert a macro into the template. To insert macros, start by editing a pre-existing template or creating a new one. When creating the body of the template, click on the icon below showing a scroll with a lightning bolt overtop of it to open the list of macros.
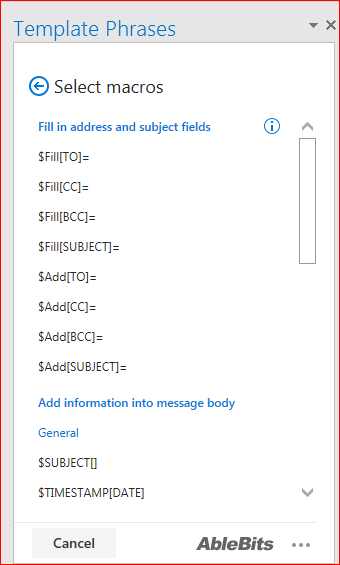
- This will open the 'Macro' section of the Template Phrases add-in. This gives you the option to choose from a variety of macros with different features and functions.
- A very common macro to use is the $WHAT_TO_ENTER[ text for replacement ] which allows individuals to customize a macro and fill in whatever information pertains to that email.
- You now have the ability to customize your email with macros to increase functionality and save yourself time. Below is an example of a macro that you may use to reduce the amount of time spent re-typing the entire email to multiple individuals.
"Hello $WHAT_TO_ENTER[Email First Name]:
I had $WHAT_TO_ENTER[FacultyFullName]'s password changed to: $WHAT_TO_ENTER[Password].
Could you verify to see if it works before sending it out."
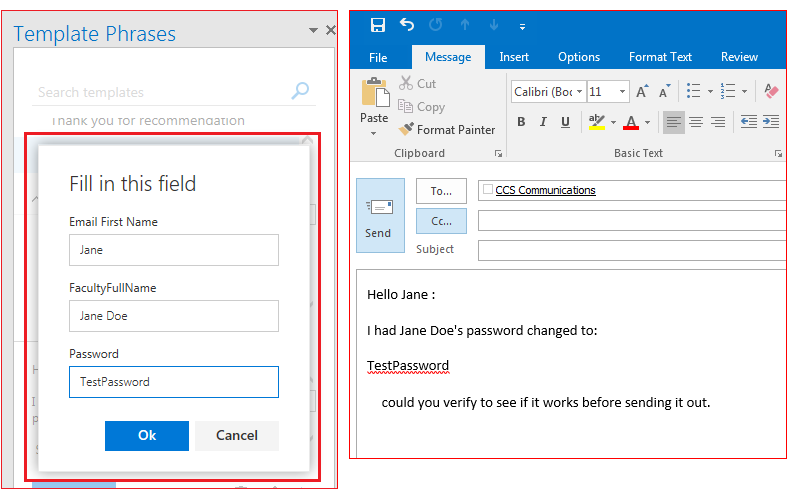
It would end up popping up with the window below, which allows you to enter the custom information into each separate field.
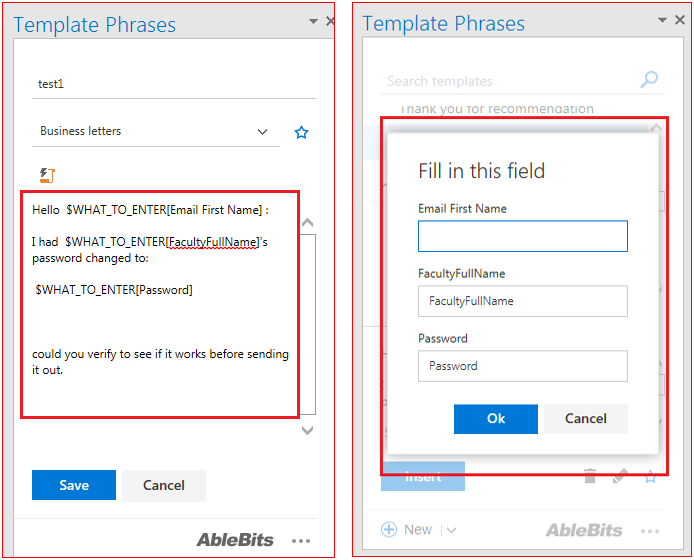
In this case, you can just enter the required information into the appropriate boxes and hit OK. The information will be inserted into your email body in the correct format, and you can manually edit it from there if need be.
Macro descriptions
There are two main groups of macros: the first group is for filling in the subject and address fields, the second one is for inserting information into the message body. Below you can find the description of what each macro does:
Subject and Address fields
$Fill[TO]= This macro will fill in the TO address field with the email address you enter after the equals sign. If you use a template with this macro when you have other addresses in the field, it will remove them and replace them with the email in the template. Use “$Add[TO] below to avoid this. You may use this as a shortcut to typing in an individual’s full email address.
$Fill[CC]= This macro will fill in CC address field with the email address you enter after the equals sign. If you use a template with this macro when you have other addresses in the field, it will remove them. Use “$Add[CC] below to avoid this.
$Fill[BCC]= This macro will fill in BCC address field with the email address you enter after the equals sign. If you use a template with this macro when you have other addresses in the field, it will remove them. Use “$Add[BCC] below to avoid this.
$Fill[SUBJECT]= This macro will fill in the SUBJECT field with the text you enter after the equals sign. It will replace the subject you have when using a template with this macro. Use “$Add[SUBJECT] below to avoid this.
$Add[TO]= This macro will add the email address you enter after the equals sign to the emails already in the TO address field. It will not remove any email addresses already listed in the field.
$Add[CC]= This macro will add the email address you enter after the equals sign to the emails already in the CC address field.
$Add[BCC]= This macro will add the email address you enter after the equals sign to the emails already in the BCC address field.
$Add[SUBJECT]= This macro will add text you enter after the equals sign to the one already in the SUBJECT field.
Note: Please make sure to use either all 'ADD' macros or all 'FILL' macros in one template. We suggest sticking to one or the other, because we cannot control the order in which they applied to the email.
Adding information into the message body
General
$SUBJECT[] inserts the contents of the Subject field into your email.
$TIMESTAMP[DATE] inserts the current date into your email.
$TIMESTAMP[DAYOFWEEK] inserts the current day of the week into your email.
$TIMESTAMP[TIME] inserts the current time into your email.
$WHAT_TO_ENTER[ text for replacement ] prompts you to enter the necessary text and pastes it instead of the macro every time you use a template. For example, if you add $WHAT_TO_ENTER [Company] to the template, each time you insert it you'll see a dialog box that will let you enter the company name. This is often the most common macro because it allows the most customization options.
Recipient information
$TO[ADDR] adds the email addresses from the TO field into your message body.
$TO[FULLNAME] takes the full names of the contacts in the TO field.
$TO[FIRSTNAME] pulls the first names from the TO field.
$TO[LASTNAME] lists the last names from the TO field.
Sender information
$FROM[ADDR] inserts the email address of the FROM field into your message body.
$FROM[FULLNAME] adds the full name of the FROM field.
$FROM[FIRSTNAME] takes the first name in the FROM field.
$FROM[LASTNAME] pastes the last name of the FROM field.
Carbon copy recipient information
$CC[ADDR] adds the email addresses from the CC field into your message body.
$CC[FULLNAME] takes the full names of the contacts in the CC field.
$CC[FIRSTNAME] pulls the first names from the CC field.
$CC[LASTNAME] lists the last names from the CC field.
Blind carbon copy recipient information
$BCC[ADDR] adds the email addresses from the BCC field into your message body.
$BCC[FULLNAME] takes the full names of the contacts in the BCC field.
$BCC[FIRSTNAME] pulls the first names from the BCC field.
$BCC[LASTNAME] lists the last names from the BCC field.
Email Recovery in Office 365 [1]
The following information explains how to recover deleted emails from Microsoft Office 365.
- Office 365 accounts are not backed up by Computing and Communications Services (CCS).
- You can back up your emails manually by saving them to a "PST" file. For more information, please visit this Microsoft page [2] for instructions.
- Items are retained in your Deleted Items folder for 90 days.
- After 90 days, items are moved automatically into your Recoverable Items folder, where they are retained for another 30 days.
- After 30 days within Recoverable Items, they are permanently deleted and cannot be recovered by CCS or Microsoft.
- Your mailbox size is 50GB, and for most users this is ample space. It is recommended that you do not empty your Deleted Items folder, that way you will have 90 days to easily recover anything that is deleted. Merely click on the Deleted Items folder and drag the items into the desired folder.
- After 90 days, items are moved to Recoverable Items for 30 more days until permanently purged. Follow the steps listed below in this document to recover it from within the Recoverable Items folder.
- If you are missing a message and you cannot find it in your Deleted Items or the Recover Deleted items folder, you can conduct a search on all of the folders and narrow your search by using Advanced Search Queries (ASQ).
- For example, if you are looking for an email that was sent from jsmith@uoguelph.ca, you can type in the search field "From:jsmith@uoguelph.ca" or if you are looking for an email that was sent to jsmith@uoguelph.ca, you can type "To:jsmith@uoguelph.ca" into the search field. For more information about the AQS, please visit this Microsoft page. [3]
- If the mail folder is deleted, the Recover Deleted Items process in Outlook Web App (OWA) will only restore the messages within the folder (the folder structure can only be restored using the Outlook Desktop client). In OWA, the messages will be restored to your inbox regardless of which folder they were deleted from. In the Outlook Desktop Client, you can drag the folder from the Deleted items and place it into any folder you wish.
- If a Calendar (or a Calendar item) is deleted, it can only be recovered by using the Outlook Desktop Client. Please see below for instructions on how to recover deleted Calendars or Calendar items in Outlook.
- It is not possible to recover any deleted items for clients who are configured with POP3.
- Microsoft does not have the ability to restore messages if you were unable to restore them using the processes listed below.
Recover Deleted Items from the "Recovery items" folder using the Outlook Web App (OWA)
When you delete a message, it is moved into the Deleted Items folder. The message remains in the Deleted items folder for 90 days, or until they are manually removed from the "Deleted Items" folder.
Once removed from the Deleted items folder, they are then moved into a "Recoverable Items" folder.
To recover items from the Recoverable Items folder, follow the steps listed below.
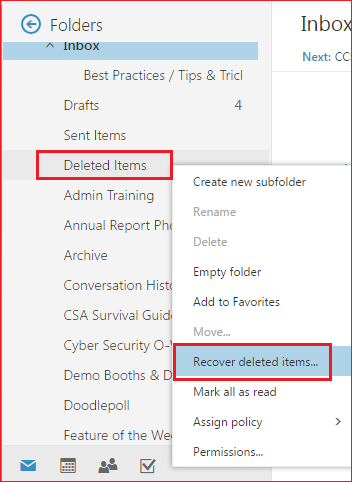
- Login to your Office 365 Account via https://mail.uoguelph.ca
- On the list of your folders, look for the "Deleted Items" folder and right-click on it.
- Click on "Recover deleted items".
- You will be brought to a screen that allows you to choose all the mail that you can recover. You can either do a search or scroll down and look for emails by date. Once you have selected the items that you want to recover (Click the check box to the left of the message), click on 'Recover' located at the top of your page. The items will be moved to their default location.
- Messages will go into your Inbox.
- Calendar items will go into your Calendar.
- Contacts go to your Contacts folder.
- Tasks will be moved into your Tasks folder.
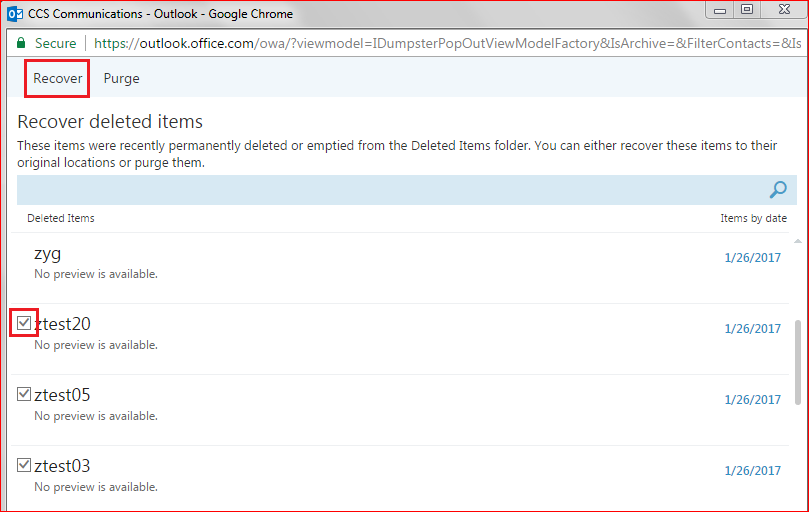 If you select Purge, the items will be deleted permanently with no option for recovery.
Recover email from the "Recovery Items" folder using Outlook Desktop Client (Outlook 2016)
- Open Outlook and select the 'Mail' icon.
- Click on Folder in the top bar, and select "Recover Deleted Item" (please note that Outlook must be set as Exchange Account in order to see the 'Recover Deleted Items', option. Make sure your profile is set with this configuration here [4].
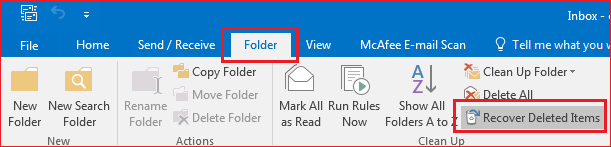
- Click on the message you want to recover, and then click OK.
- The message will be moved out of the deleted folder into the appropriate folder (as per above).
Recover Other Items from the Outlook Desktop Client (Calendar, Contact Folder, etc.)
- Open Outlook
- Click on the "..." menu at the bottom, and select 'Folders.'
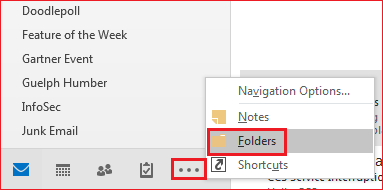
- Expand the Deleted Items folder by clicking on it.
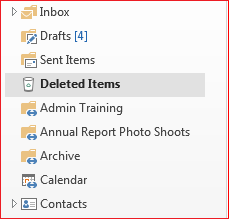
- You should see the Calendar that you have deleted in there. Calendar items will be displayed alongside messages but with the Calendar icon on the right (as the arrow shows at the bottom picture).
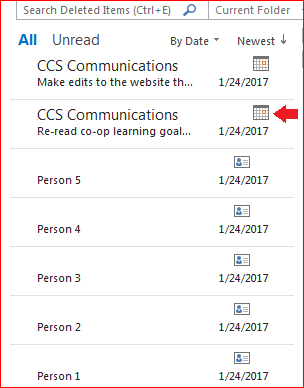
- Drag and drop the meeting from the Deleted Items folder, on to your Calendar folder.
- If you cannot find the meeting or the appointment in your deleted items, click on 'Recover Deleted Items' and look for it there.
Common Keyboard Shortcuts for Outlook
If you find that you are performing the same functions within Outlook multiple times throughout the day, you might find that using Outlook’s keyboard shortcuts will help you work more efficiently and effectively. This Microsoft page [5] contains many different Keyboard Shortcuts that are commonly used within Outlook 2016. They help to increase functionality, and improve the efficiency in performing tasks within Outlook 2016.
Calendaring and Meetings
Avoid "Do not send a response" Option when Responding to Meeting Requests
When accepting or declining a meeting request, avoid clicking on "Do not send a response." While your intent may be not to clutter the inbox of the meeting organizer, they will not receive necessary information on who is attending the meeting.
Respond to Meeting Requests from Your Inbox, Not Your Calendar
It is not recommended to accept or decline a meeting request directly through your calendar. This can cause errors in your calendar, and the meeting organizer may not receive the necessary information.
Avoid Responding to Meeting Requests from Your Mobile Device
CCS has seen some issues when users accept/decline meeting requests on mobile devices. It is always best respond from your laptop/computer.
Always Select "Remove from Calendar" Upon Receiving a Meeting Cancellation
If you have accepted meeting invitation and that meeting is subsequently cancelled by the meeting organizer, it will not automatically be removed from your calendar. It is marked in your calendar as “Cancelled: Meeting Title”. In order for this item to be removed from your calendar, you must select the “Remove from Calendar” action item at the top of the cancellation email that you receive.
Sending an Attachment in a Calendar Invitation
If you wish to send an attachment in a calendar invitation, consider storing the attachment via OneDrive and sharing the file. This is the simplest way for attendees to view the document without taking up space in their inbox. It also allows for updates to be made to the document without having to resend the meeting request. Ensure that your meeting request includes the link to the shared file.
Modify Calendar Events from the Same Device
For best results, when modifying a calendar event, be sure to make your edits from the same device and the same version of Outlook (desktop version or Outlook Web App) on which you created it.
When Changing a Meeting, Send Updates to Everyone
If you are a meeting organizer and you change any details of your meeting, you should always send the updates to everyone. If you modify the date/time of a meeting, or cancel/delete the meeting without sending the update, invitees will not be informed of this change – this change will not automatically occur in their calendars. If you add a new person to the meeting and think others are interested in the attendee list, it is best to send that information to all invitees.
Contacts and Lists
Use Global Address List (not Contacts) When Creating a Contact List
When creating a contact list, be sure to select the Global Address List when selecting the list members. The Contacts folder may use a format that is not compatible with Microsoft Exchange and will cause an error, and it also may be outdated.
In Outlook Web App:
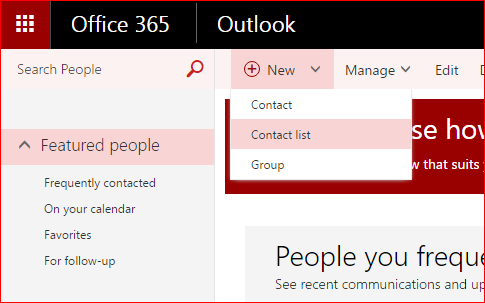
- Go to the App Launcher (nine dots in top left corner) and click on ‘People’.
- Go to ‘New’ and select “Contact List”
- Under “List name” create a name for the contact list.

- Under “Add members” enter the name of a person, and then when the possible matches appear, click “Search Directory” and choose the correct name from that list. This ensures you are adding the person directly from the Global Address List. That person will now be added to your contact list.
- To view the contact list in its entirety, click "Contacts” along the left-hand column and find the name of your contact list.
In Outlook 2016 (desktop version):
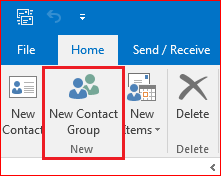
- Click the People icon in the bottom left of your screen.
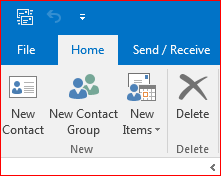
- Select 'New Contact Group' in the top left.
- Name your contact list.
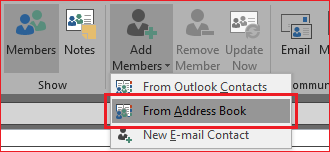
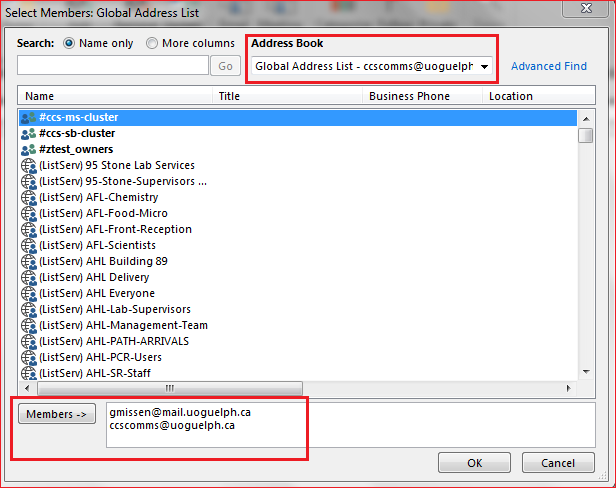
- Select ‘Add Members’ (drop down list at top) and select ‘From Address Book’.
- Pop-up box will appear. From the “Address Book” drop-down list on the right, select ‘Global Address List’.
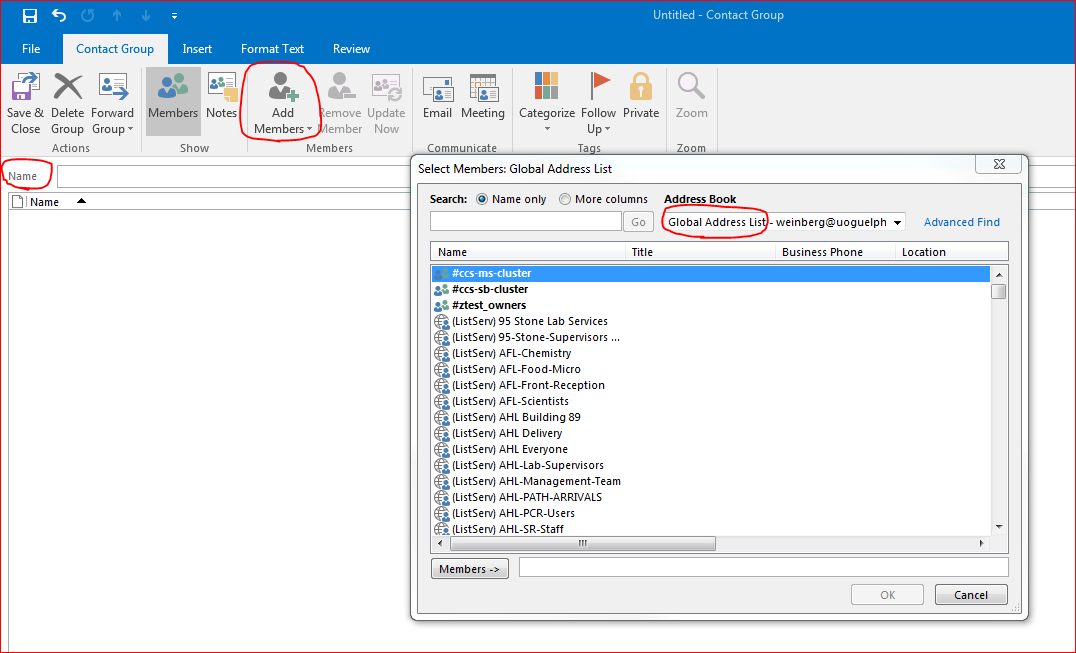
- Enter the names of your members, double click on the name when it appears, and click 'OK'.
How to Avoid Error Messages when Sending an Email or Creating a Contact List
Please note this information is relevant to staff, faculty and graduate students who migrated from Zimbra to Office 365. It is not relevant to the undergraduate population who migrated from Google to Office 365. A common problem is the way the old email system (Zimbra) displayed email addresses is different than the format in Office 365. For example, in Zimbra, an email address may contain symbols such as " " " or For example: "John Smith" <jsmith@uoguelph.ca> as shown below in Outlook Web App.
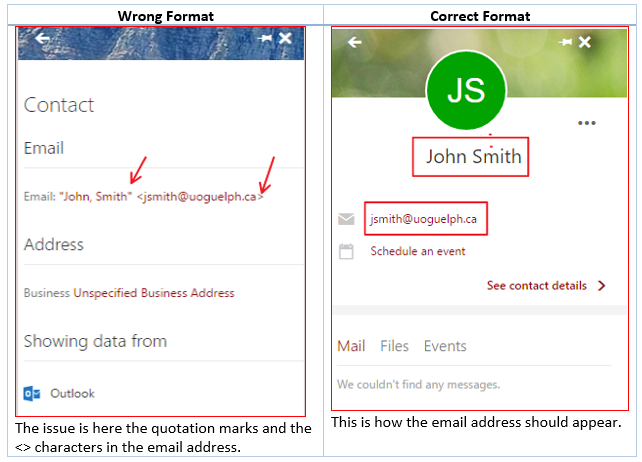
Sometimes the incorrectly formatted email address can be associated with a contact, and this may cause problems. For these types of contacts, click the "X" to remove them from the auto-fill.
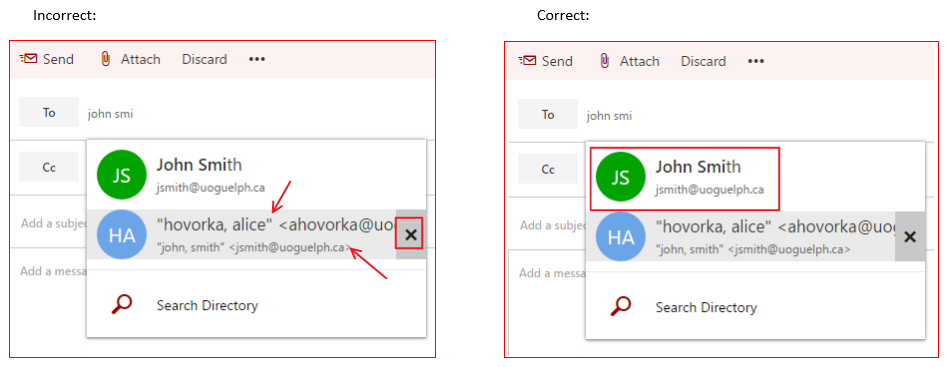
In the example above, the first contact is the correct John Smith. It shows the first and last name correctly and the email address with no " " or <> symbols.
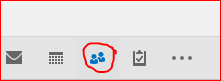
To begin creating a contact list in the Outlook Web App, click on the People icon in the bottom left of your screen.

Then click the down arrow beside "New" at the top of your screen, and select "Contact List".
The trick is, when creating Contact Lists, you must select your group members from the Directory, and NOT from your personal contacts. If the contacts are imported from your personal contacts, they may contain those symbols discussed above (""<>). If you are using contact names that have those symbols in them, the Contact List cannot be saved. You must delete and re-add that contact using the "Search Directory" feature. That way you can ensure you are adding the contact from the Directory and not from your contact list that as imported from Zimbra.
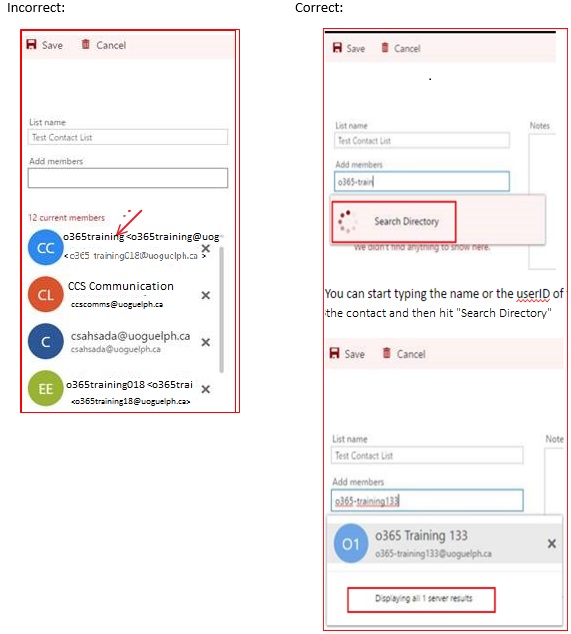
Once you "Search Directory", it will display the unique contact from the Global Address List. Please note that it will say, "Displaying All Server Results" at the bottom which means that this is the correct email address (there should only be one).
Avoid Pitfalls by Setting the "To:" Field to Default to the Global Address Book in Outlook Desktop Client
This will ensure that you are using the correct email address for all contacts, and will help to avoid error messages when sending emails and creating contact lists. Follow these steps:
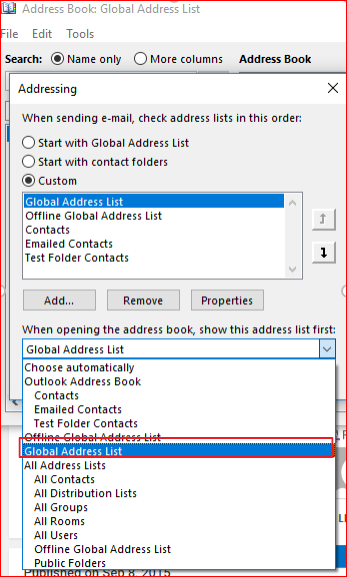
- Open your Outlook Desktop Client and click the Address Book in the Tool Bar:

- Click Tools, and then select Options.
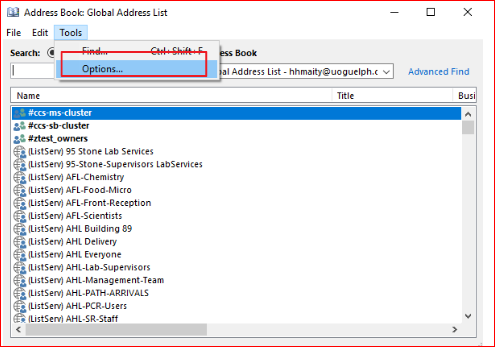
- Where you see "When opening the address book, show this address list first," select "Global Address List".
How to Create a Contact List with Bulk Users in Outlook Desktop Client
In the Outlook 2016 Desktop client, you can create a contact list with as many contacts as you want in a few simple clicks as long as you have those contacts saved in an excel sheet. You can also grab them from an email conversation.
Creating a Bulk Contact List from an Email Conversation
- Open Outlook Desktop client and click the People tab in the bottom left corner of your screen.

- Click New Contact Group in the toolbar
- Enter the name of your contact list under the Name field.
- Click Add Members and choose from your Address Book.
- Under Address Book, make sure Global Address List - Your Email Address is selected.
- Copy and paste the email addresses of the users you want to add to the group in the Members field.
- Click OK and your group will be created with the correct contact from the Global Address List.
Creating a Bulk Contact List from an Excel Spreadsheet
If you have a lot of contact information that you keep saved in an Excel spreadsheet, you can import it straight into Outlook and place the contacts within their own separate contact group. With a contact group, you can send emails and meeting invitations to people without having to individually add each person's name every time.
Outlook 2016 cannot automatically create a contact group from a list of contacts in Excel. But, you can do it by following the steps below.
Step 1: Save your contact information from Excel in a file format that Outlook can import (For Example: a CSV File)
- Open Excel. In your workbook, click the specific worksheet or page with the contact information you want to import to Outlook 2016.
- Click File in the top left corner, then click Save As.
- Choose where on your computer you want to save your file to.
- In the Save as type box, choose CSV (Comma delimited) (*csv.), give it a file name, and click the Save button.

- If Excel gives you the message, "The selected file type does not support workbooks that contain multiple sheets," click OK. The messages refers to a limit of the CSV file; Don't worry, nothing will happen to your original workbook (the .xlsx file). This message only appears if you have multiple worksheets in your Excel document.

- When Excel tells you "Some features in your workbook might be lost", click Yes to save the current worksheet as a CSV file. The original workbook in Excel (the .xlsx file) closes, but once again, no changes are made to it.

- Close the CSV file as well as Excel. Your next step starts with opening Outlook 2016.
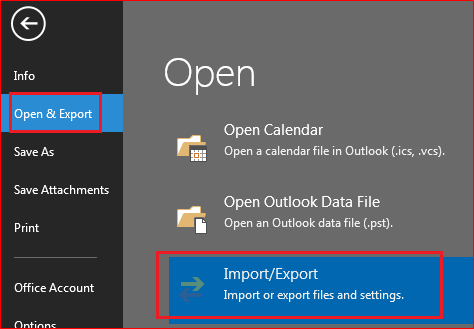
Step Two: Start the Import
- In Outlook, click File, find Open & Export on the left hand side and then choose the Import/Export option.
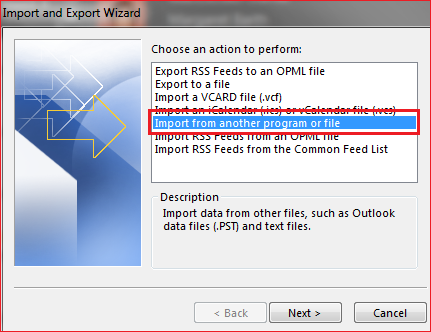
- This opens the 'Import and Export Wizard.' Choose Import from another program or file and then click Next.
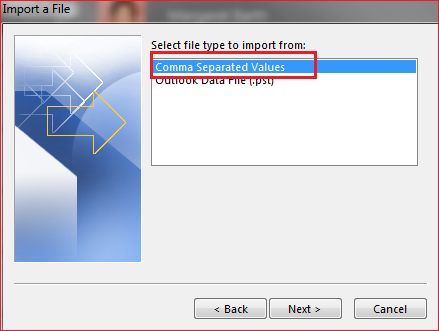
- Choose Comma Separated Values and click Next.
- Click Browse and locate the new CSV file you just saved as the file to import into Excel.
- Under Options, choose if you want to replace duplicates (existing contacts), create duplicate contacts, or to not import duplicates. Here are a few things to consider when deciding:
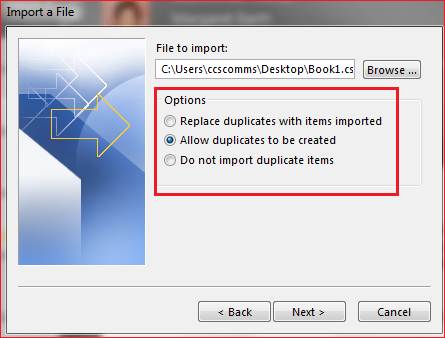
- Replacing duplicates will delete any existing contacts if Outlook finds a match for the contact's name or other type of personal information. If you already have information on some of the same contacts in Outlook, choose to create duplicates instead so you will not lose any of your important contact information.
- Creating duplicates are usually the safer option. You can always clean up any duplicate contacts in your address book later.
- If you're confident that the information for existing contacts in Outlook is the same as the contacts listed in your import file, you can choose not to import duplicates. Outlook 2016 will import only new contacts from the spreadsheet then.
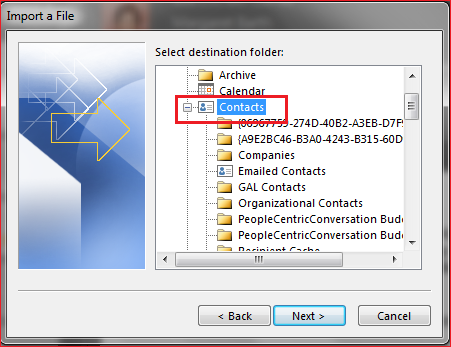
6. Click Next and choose where in Outlook 2016 you want to store your new contacts. The Contacts options should be selected by default, but you can manually select any place to save your contacts.
7. Click Next, and then make sure the check box next to Import "MyFile.csv" is selected.
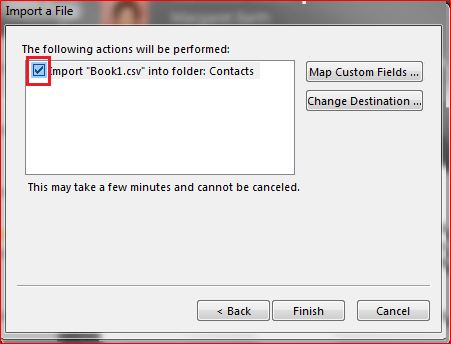
8. Do not click Finish yet, because you need to "map" some of the columns in your Excel file to the correct contact fields in Outlook. What does this mean? The way you have contact information labelled in your Excel spreadsheet may be different than how it is categorized in Outlook. For example, your column may say, "Cell phone", but Outlook calls it "Mobile Phone".
Step Three: Map your CSV File Columns to Outlook Contact Fields
- Click the Map Custom Fields button. The Map Custom Fields box will then appear.
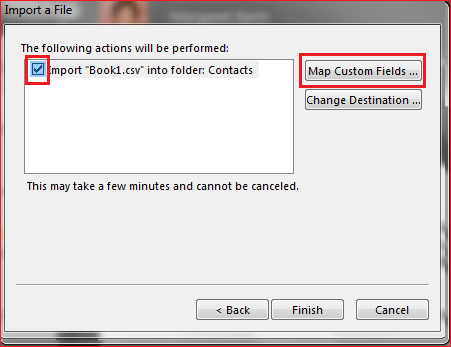
- Under From, a box shows the column names from your CSV import file.
- Under To, you see the standard fields that Outlook uses for contacts. If one matches a column in the CSV file, you'll see the column under Mapped from.
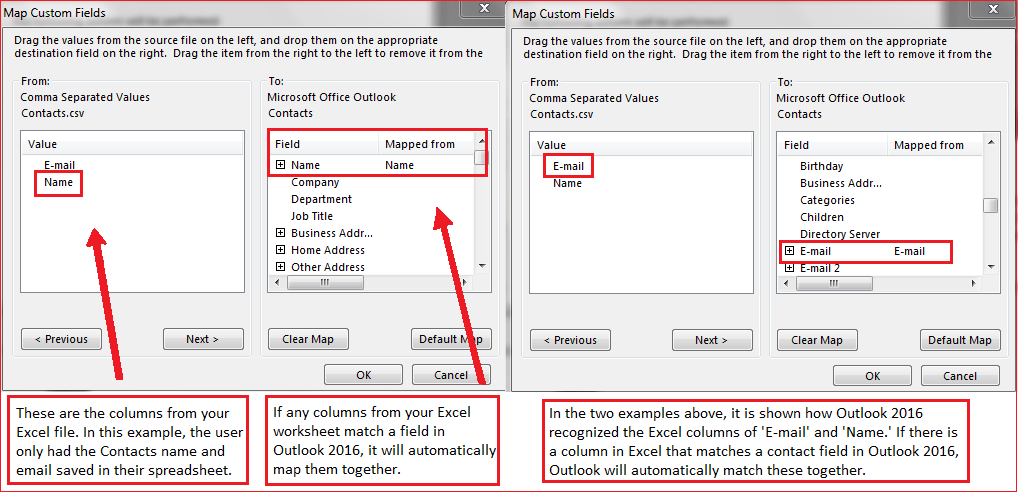
- You'll probably need to do some manual mapping as well. For example, in your import file (The Excel worksheet) the contact's mobile number is a column named Cell Number. This doesn't have an exact match in Outlook. Instead, Outlook uses the field titled 'Mobile Phone'. You will have to manually map them together, since Outlook does not recognize the term 'Cell number.'
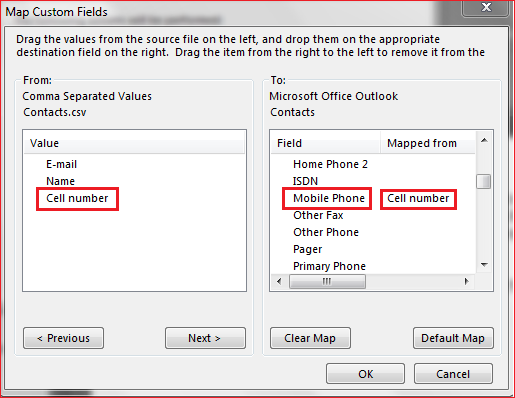
- Drag the appropriate value (for example, Cell Number) from the pane on the left and drop directly on top of Mobile Phone in the right pane. Cell Number will not appear in the Mapped from column.
- One at a time, drag the rest of the values from the left pane to the appropriate Outlook fields in the right pane. For example, you might drag Address to either Home Street or Business Street, depending on the type of address for your contacts.
- Click OK and Finish. Your contacts are now successfully imported into Outlook 2016! To create a contact group for these contacts, go to the next step.
Step Four: Create your Contact Group
To create a contact group from your imported Contacts is very similar to creating most Contact Groups in Outlook 2016.
- First, click People in your bottom left corner.
- Under My Contacts, pick where you want to add the contact group. For this example, click Contacts.
- Click Home > New Contact Group.

- On the Contact Group tab, in the Name box, type a name for the new contact group.
- Click Add Members > From Outlook Contacts.
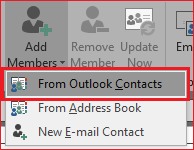
- Hold down CTRL, click on all the contacts you have imported from your Excel spreadsheet, and then click Members to add them to your new contact group.
- Click OK. Then, click Save and Close.
Respond to Meeting Requests from Your Inbox, Not Your Calendar
It is not recommended to accept or decline a meeting request directly through your calendar. This can cause errors in your calendar, and the meeting organizer may not receive the necessary information.
Distribution Groups
An Office 365 Distribution Group can be used to quickly email a group of U of G internal users. Each Distribution Group is defined by an email address that distributes the emails to all members of that specific Distribution Group.
While there are a number of options to create these types of groups (e.g., Contact List), a Distribution Group has additional functionality compared with a Contact List. See the table below for a comparison.
|
|
Distribution Group |
Contact List |
|
Set-up |
CCS provides the initial set up |
Individual users can create these simple groups within the “People” area of your Office 365 account |
|
Email address |
Is assigned an official email U of G address groupname@group.uoguelph.ca [6]
Email address appears in U of G Global Address List |
No official group email address; just comes from your own email address |
|
Moderation and permissions |
Allows for just one or many members to be group administrators
Administrators can approve/reject messages as well as members |
No moderation or permissions |
Requesting an Office 365 Distribution Group
The first step is to contact the CCS Help Centre and request a Distribution Group. The Help Centre can be reached at 58888help@uoguelph.ca [7] or x58888.
Managing Distribution Groups that you own
- Log in to Outlook Web Access
- Go to Settings in the top right corner (the gear icon)
- Select the Mail option.
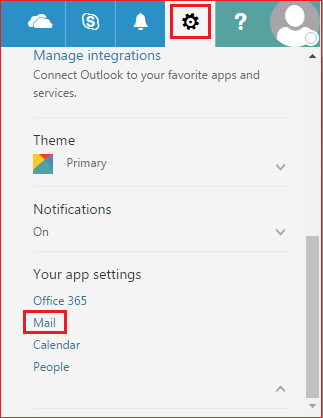
- Click on General on the left side of the screen.
- Select Distribution groups.
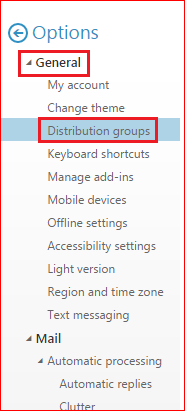
- Look for the Distribution Group you want to modify under Distribution groups I own.
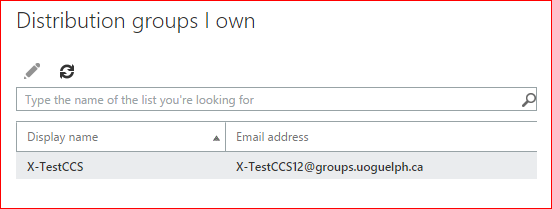
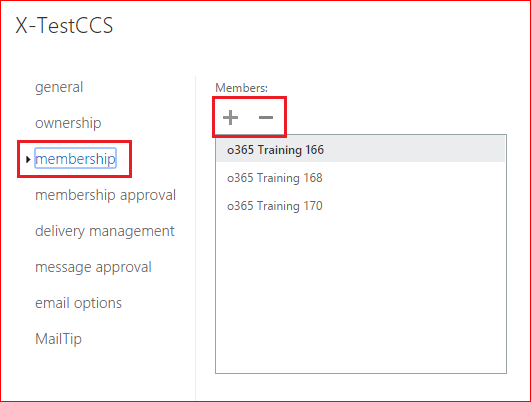
- Double click on the Distribution Group, and go to Membership.
- To Add a member, click on the ( + ) sign and search for the user within the directory.
- To Remove a member, click on the ( - ) sign.
- Click Save after you are finished adding or removing users to the group.
More information about the other options (membership approval, delivery management, etc.) can be found online on the Microsoft site [8].
Set up a Moderated Distribution Group
A group moderator can screen messages that are sent to a moderated distribution group before it is sent to all members of the group. If you own a group, you can set up moderation rules for the group.
To configure a moderated distribution group:
- Go to the Settings tab in the top-right corner (the gear icon).
- Choose the Mail option at the bottom of the side bar.
- Click General on the left side of the window.
- Select Distribution groups from under the General tab.
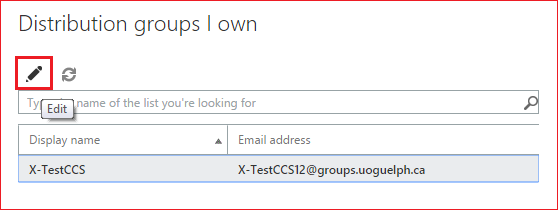
- Select the distribution group that you want to a make a moderated group (it should be listed under Distribution groups I own).
- Select the Edit button.
- Select Message Approval
- Choose the message approval settings you want, and add the group moderators by clicking on the ( + ) icon. To enable group moderators, you must check the box next to "Messages sent to this group have to be approved by a moderator".
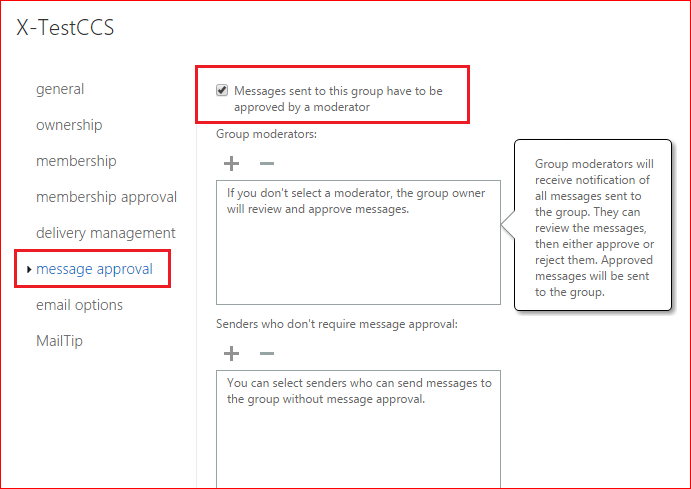
- Select Save to save your changes.
Control Who Can Send to a Group
After you have created a Distribution Group, you can edit it to control who can send messages to the group. By default, only people in the U of G directory are able to send messages to Distribution Groups.
To determine who can send to your Group:
- Go to Settings in the top right toolbar (the icon resembles a gear).
- Choose Mail at the bottom of the window.
- Click General on the left side of the pane.
- Select Distributions groups from under the General tab.
- Select the Distribution Group that you want to change the settings for.
- Select the Edit option.
- Choose Delivery Management on the left hand side of the pop-up window.
- This will open up the Delivery Managment Settings. You can click on the ( + ) to add members. These members will be then be allowed to send messages to that Distribution group.
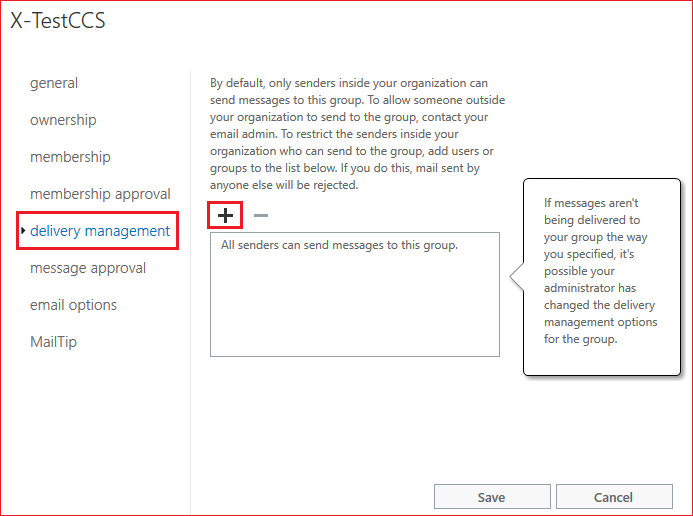
- Select Save to save your changes.
Delegates and Permissions
Limit The Number of Delegates who Have Access to your Calendar
If more than one user must have access to your calendar, carefully consider whether these users need to be Delegates. The main difference is that as a Delegate, users are able to send/respond to meeting requests on your behalf, which is not always desirable. Delegates also receive all meeting accepts/declines which can crowd their inbox. You may want to give some users Reviewer/Editor permission to your folder instead. To give a user Reviewer/Editor permission, follow the steps below. Please note: Reviewer/Editors will not see the details of your private appointments. If you would like them to see these details, please visit the Office 365 Online Training section [9].
In Outlook Web App (Editor permission):
- To share your calendar with a new user: When in Calendar view, Right-click the calendar along the left side. Then click 'Share Calendar', add the person's name under 'Share with' and when their name pops up, select 'Editor' in the drop-down permission menu.
- To edit the permission of those with whom you have already shared your calendar: When in your calendar view, right-click the specific calendar folder on the left side of your screen, and then click 'Permissions'. The names of all those you with whom you have shared your calendar will appear. Use the drop-down menu to the right of the name to edit that person’s role (see role description below). Click ‘Save’.
In Outlook (desktop version) (Reviewer permission):
- When in your calendar, right-click the specific calendar folder (on left side), and then click Properties.
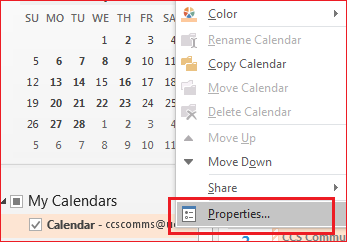
- Click the Permissions tab.
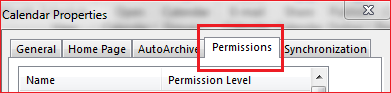
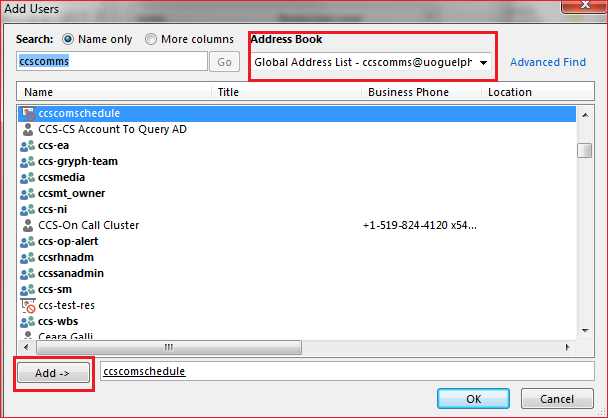
- Click Add.
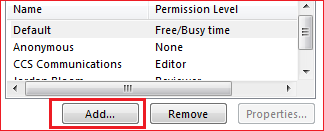
- Enter the name of the user who you want to give Reviewer permissions to (from Global Address List), click Add, and then click OK.
- In the Name box, click on/highlight the user name, go down to ‘Permission Level’ and click ‘Reviewer’.
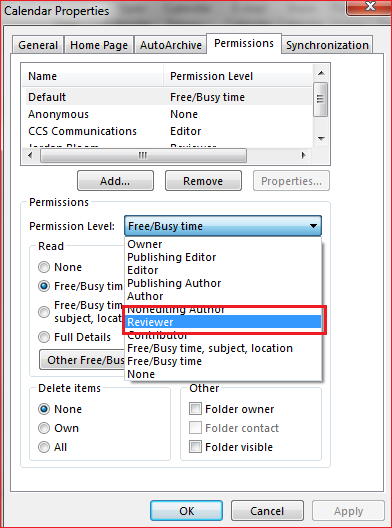
- Click Apply, and then click OK.
Role Descriptions:
Availability only shows the time of items on your calendar and no other details.
Limited details show the time, subject, and location, but no other information.
Full details show the time, subject, location, and other details of all items in your calendar.
You can also give someone permission to edit your calendar by choosing Editor or Delegate.
Editor can edit your calendar.
Reviewer is able to see calendar items but not edit them.
Delegate can schedule meetings on your behalf, receive meeting requests and responses, respond to meeting requests send to you.
Searching
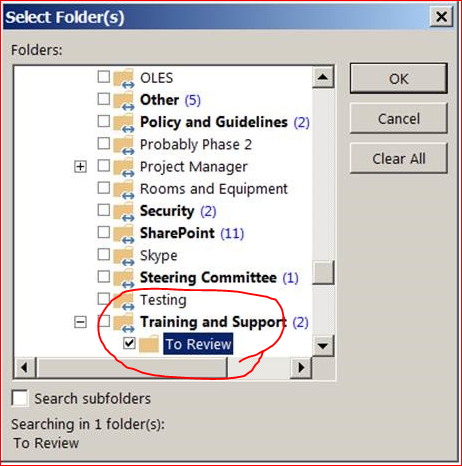
How to Find the Folder Location of a Searched Email
In Outlook 2016 (desktop version):
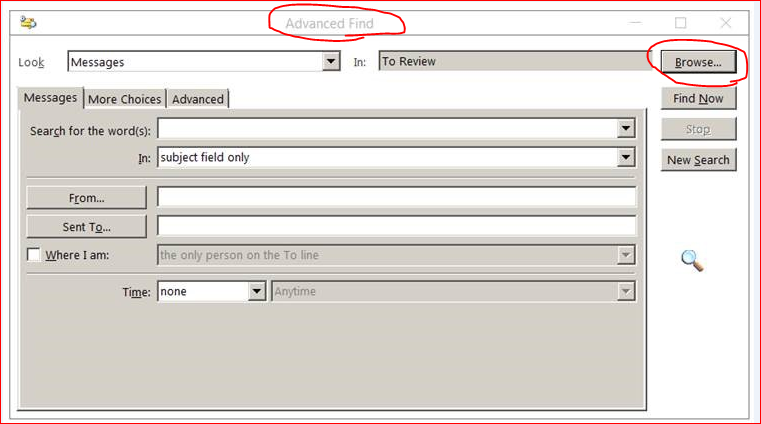
Perform a search for a specific email. From the search results, double click on the desired email. Once in the email, press "CTRL+SHIFT+F" - this is an 'Advanced Find' feature. You will then see a pop-up box with a "Browse" button in the top right. Select "Browse" to find the folder path.
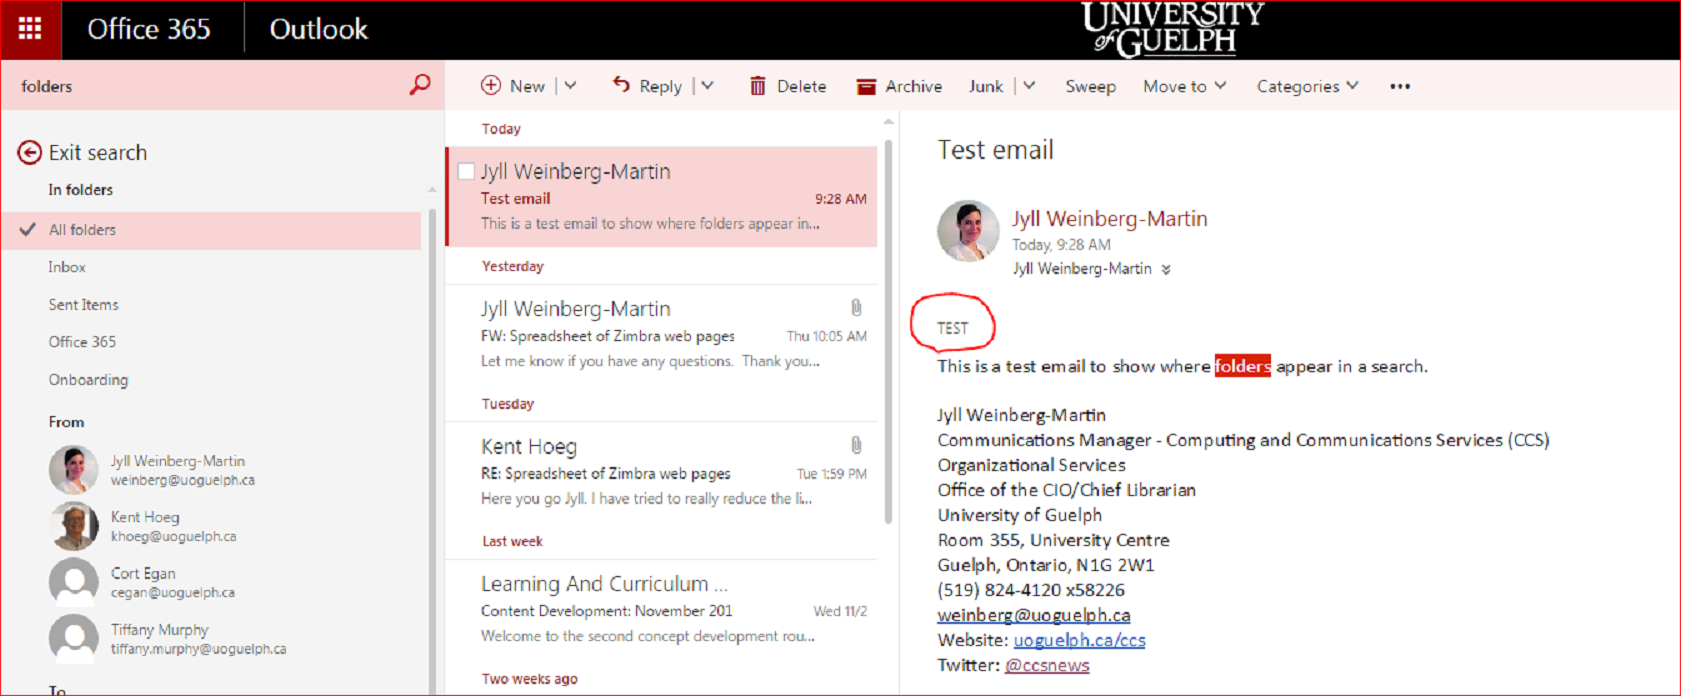
In Outlook Web App:
Outlook Web App does not provide the capability to see the full folder path, but only the folder name. Perform a search for a specific email. Once found, highlight the selected email and the folder name will display under the recipient name/field.
General
Use the Office 365 Portal to Install Office 2016
CCS has seen some problems depending on the version of Microsoft Outlook (desktop version) that people are using. Be sure to install Office 2016 (Mac or Windows) from the Office 365 portal and NOT the CCS Software Distribution site. To access the Office 365 Portal, click on "Office 365" in the top left corner of the top bar in the Outlook Web App (between the App Launcher and the word "Outlook"). On the next screen in the top right, you will then see "Install Office 2016". This is the best way to install Office 2016. Please note that if you are a client of the CCS Managed Desktops service, please contact the CCS Help Centre to request installation.