Introduction
Until the arrival of EthOS on July 25, 2024, University of Guelph REB applications were completed (and amended) using Microsoft Word application forms and supplements. These applications are referred to as ‘legacy protocols’ in the context of U of G’s EthOS implementation because they pre-date the system launch.
As of September 23, 2024, the summary-level details from previously approved, active legacy protocols (and the most recent/current versions of their supporting documents) were migrated into EthOS. This allows researchers to have all their active protocols in one place regardless of how they were created. A centralized repository in EthOS was a key benefit we are happy to have achieved for researchers!
These user materials will explain how to locate and navigate your approved legacy protocols, and how to create amendments or other post-approval activities (renewals, event reports, study closures) for legacy protocols in EthOS.
- Note: Although the legacy protocol form functions much the same as any other EthOS form, please ensure you reference these legacy protocol-specific training materials - which is why all legacy-related training topics have been consolidated for ease of reference in this section.
If you have any questions about how your protocol was migrated and/or how to work with this form in EthOS, please contact RAIMSsupport@uoguelph.ca. You can also consult the EthOS –FAQs for more information.
Please note that new REB applications using the old Microsoft Word forms are no longer accepted and must be submitted through EthOS.
What Legacy Protocols were Migrated?
The Research Ethics Office completed a thorough review of all existing protocols. All active, approved protocols as of August 13, 2024 were in scope for migration. Closed or long-expired protocols were not migrated unless that protocol had only very recently expired.
Note: If your REB application was in-flight using the previous MS Word forms and not yet approved as of August 13, 2024 it will be migrated only once it is approved. You will continue to use the old MS Word forms and email process until your protocol is migrated to EthOS and the Prinicipal Investigator accepts the transfer.
Once migrated, any amendments, renewals, event reports, or closures are to be completed in EthOS.
What is Included in the Migrated Legacy Protocol?
EthOS-generated applications are guided by dynamic prompts and have incorporated the previous supplementary REB forms in their questions and logic. It is not possible to migrate the old MS Word applications section by section as there is no longer a one-to-one match in the structure between these old forms and EthOS. . Accordingly, the EthOS legacy protocol form contains high-level summary information only- but the latest versions of all supporting, approved documents (including the original submission) are included as document attachments.
Contents of a Legacy Protocol
The legacy protocol will be a 'branch' off the main Project just like other EthOS applications. It does not have the same volume of sections and pages as the new EthOS main REB application from, but instead has only one page of summary data
- Legacy REB number (e.g., 24-01-001)
-
Principal Investigator
- Note: Only Co-Investigators and other study team member names - where available - will be visible on your legacy form; emails and department information were not migrated. You will need to update the study team details and share the legacy form following the quick steps in Sharing a Legacy Form below.
- Project Title / Study Title
- Approved date
- Site expiry date
- Supporting documents from your REB file
What Can I Do with a Migrated Legacy Protocol?
Although there are fewer sections, the legacy protocol functions the same way as any other EthOS form. You can:
- See real-time status information
- Share with your study team and collaborators
- View and download attached documents
- View expiry date
-
See the signature and other submission history
- Note: there will be no signatures at the time of migration, although if the form is ever amended, renewed etc. the signature(s) will be visible
-
Correspond with reb@uoguelph.ca from within the application
- Note: although the correspondence feature is available, for any issues with or questions about the migrated content please contact RAIMSsupport@uoguelph.ca
As your study progresses, you can then trigger the following activities against your legacy protocol:
- Amendments
- Renewals
- Event reports
- Study Closure
Where Do I Find My Legacy Protocol?
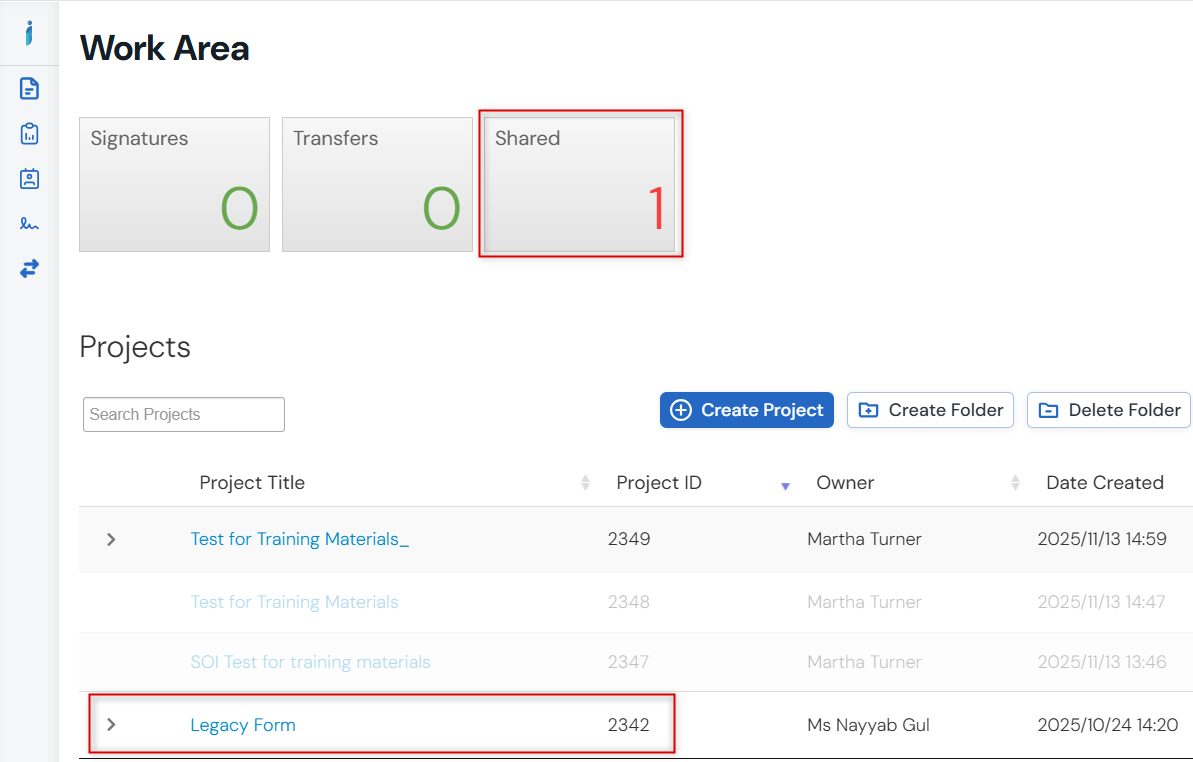
Your legacy protocol will appear in your Work Area’s Projects list alongside all of your other projects.
- Log into EthOS
- In your Work Area, your Projects list displays all your active projects; you can use the Search Projects area to look up your project (we suggest using title) or scroll through
- Your legacy protocol will appear as a Project with an EthOS generated Project ID, which will now be considered the REB Number
-
Expand the project title to see the legacy form as the first ‘branch’ of the project; note that the former REB reference number is listed as the Review Reference
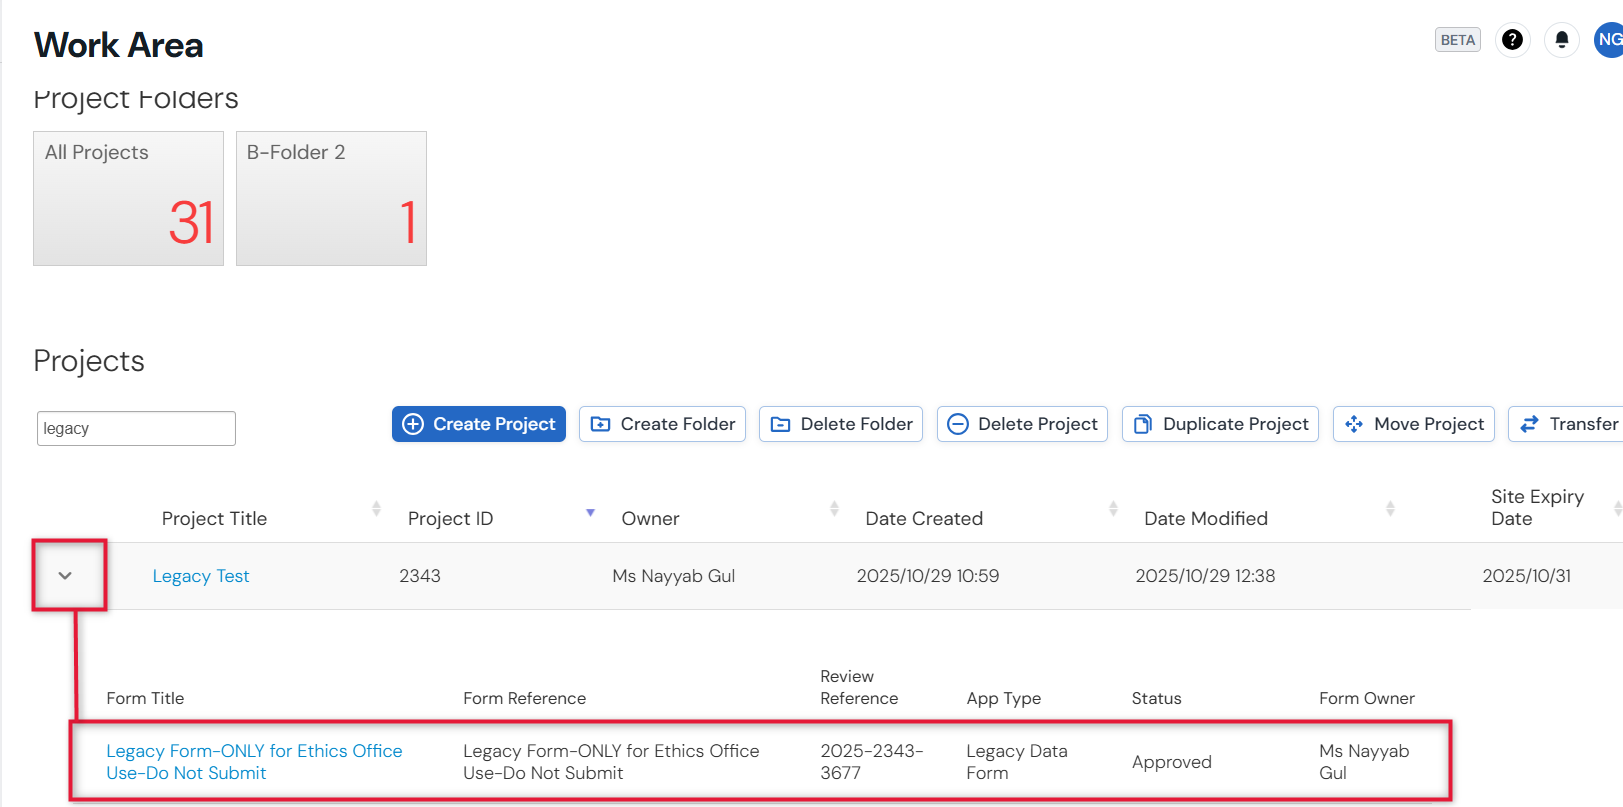
- To open your legacy protocol, click once on the Project Title or Legacy Form line
-
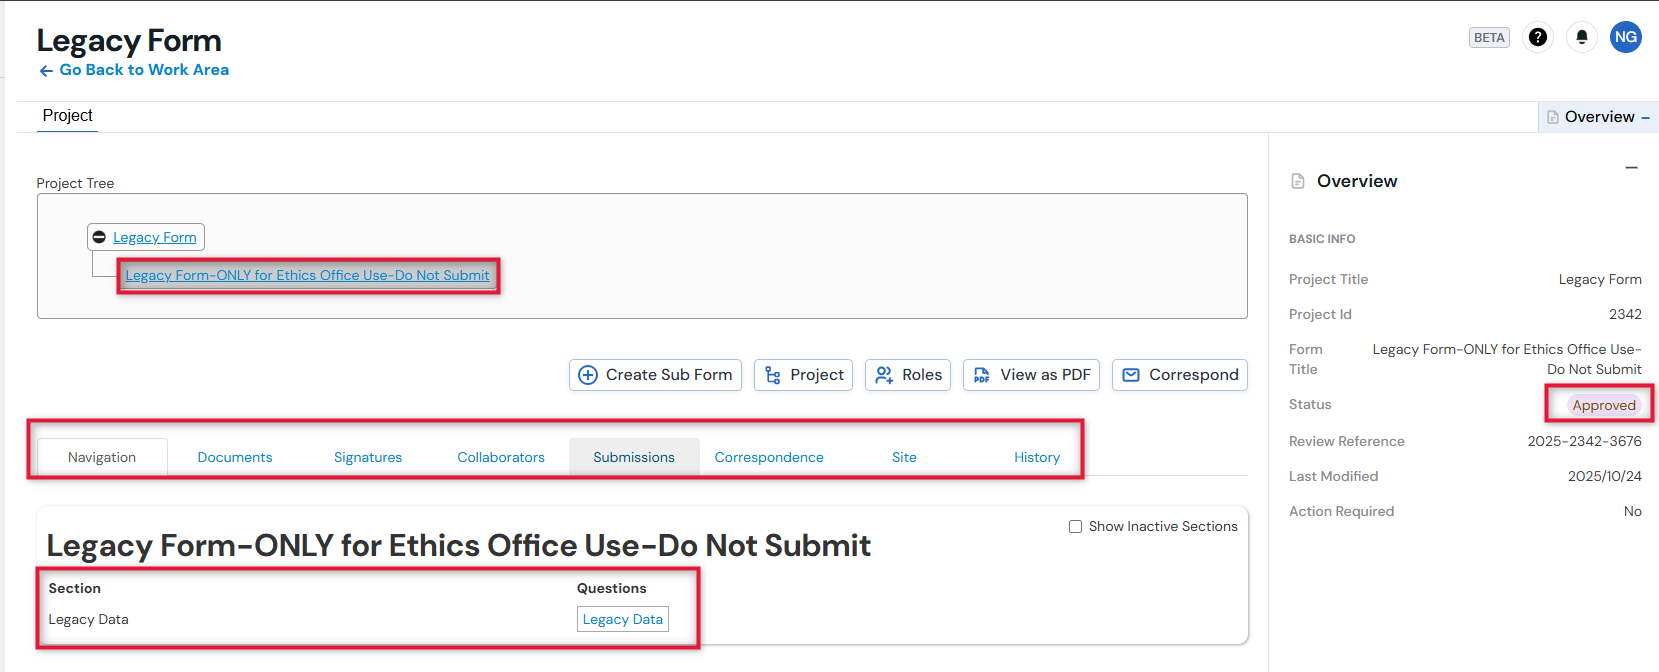
As with other EthOS-generated applications, you can see the status, form tabs, and the available form sections (the Legacy Form only has one section: Legacy Data)
Legacy Data Section
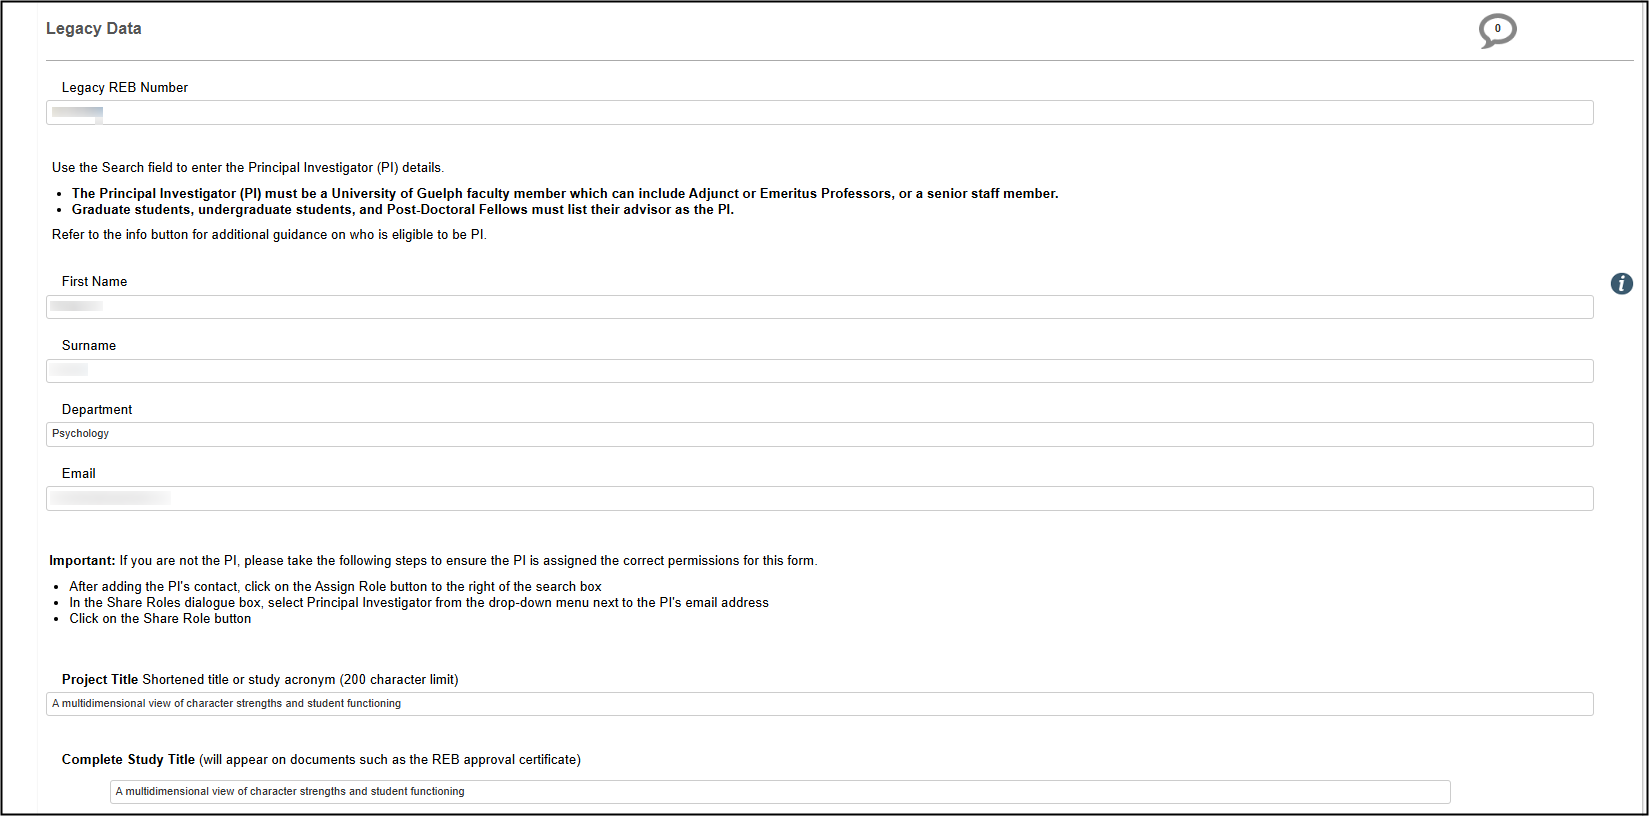
The Legacy Data section is very brief as it only includes summary fields (the full protocol is attached as a document).
Legacy Data includes the Legacy REB Number, Principal Investigator, Project Title, Approval Date, Expiry Date (under the Site tab), and the supporting, current protocol documents, including the main REB application form.
- Note: Only the names of Co-Investigators and students – where available – were migrated; other details such as email address and department were not. You will need to update and share the legacy subform with your current study team members following the steps below in Share a Legacy Form.
Example Legacy Form areas
Downloading Documents
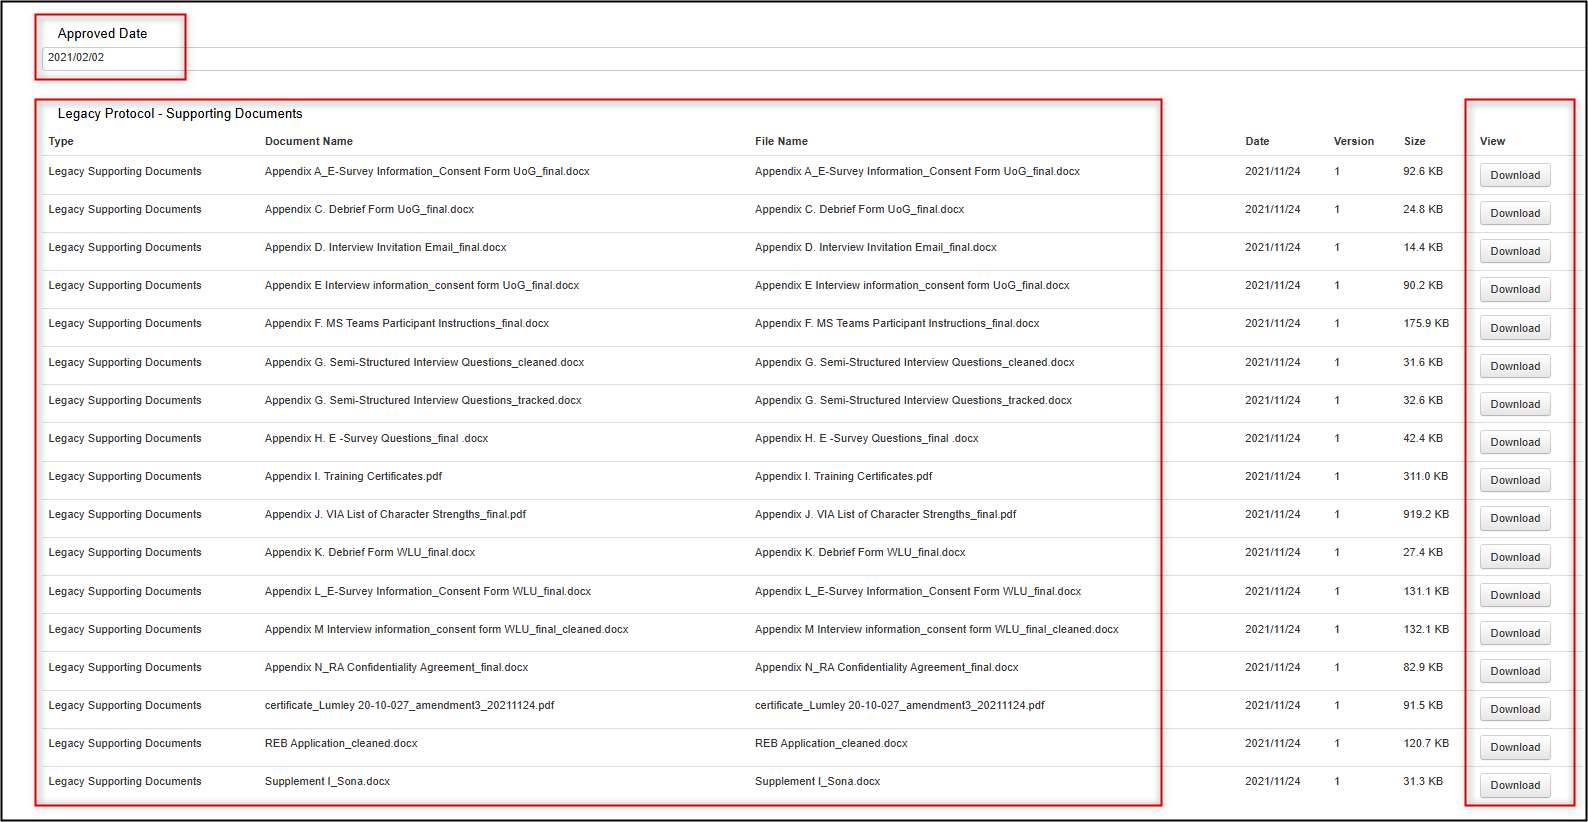
You can download supporting legacy documents from the Documents tab of the legacy form, the Documents button, or from the Legacy Data Supporting Documents section.
From the Documents Tab or Documents Button:
-
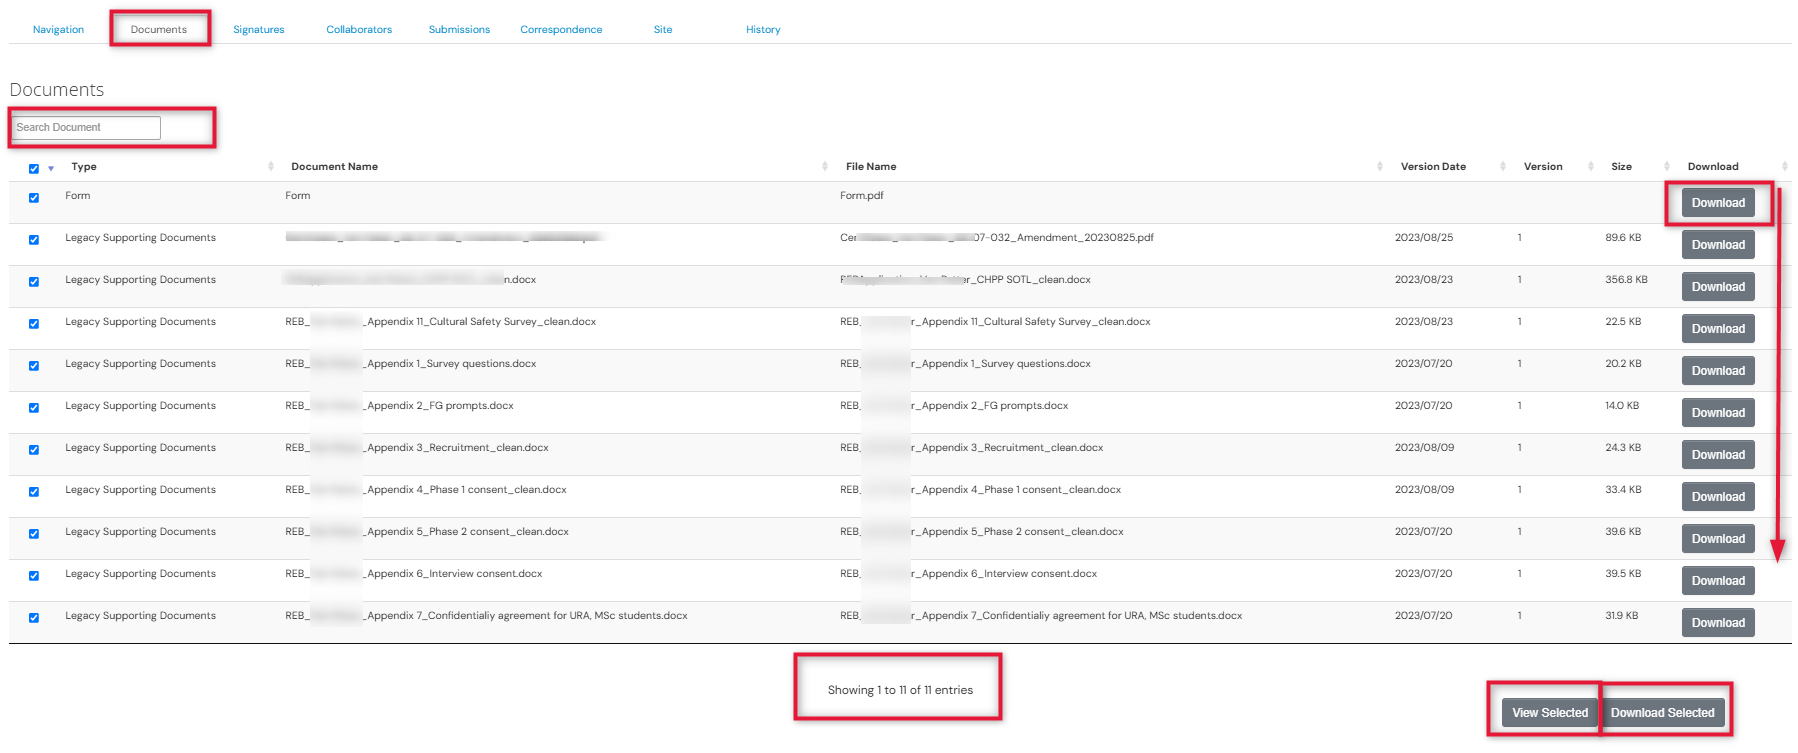
Click on the Documents tab or Documents button (from an opened legacy protocol form) to launch the Form Documents window

- Locate the document in the list (you can search based on Document Name title, but note that you can not do a full-text search of the document contents)
-
Select one or multiple documents (if the list is long, use the right-hand scroll bar)
- You can download each document individually, or download all at once
-
Tip: View Selected allows you to preview the documents in one consolidated browser-based view that you can click through page by page
From the Legacy Data form Supporting Documents Area:
This method does not support searching on Document Title and only allows you to download one document at a time. (See the previous section if you need to search for a document or want to download multiple documents at once.)
- Scroll to the bottom of the Legacy Data form where all the supporting documents are listed
-
Select the document you wish to download
Correcting Migrated Document Uploads
With legacy protocols, you cannot delete and/or re-upload documents on the migrated content unless you instigate an amendment. If you need to upload or correct a document upload, and do not anticipate submitting an amendment in the near future, please contact RAIMSsupport@uoguelph.ca citing the Project Reference number and the support team will correct the error.
- Note: In the case of multiple versions of the same document, only the most recent was included in the migration scope. However, there may be instances where multiple versions of the same document were in fact migrated. As long as the most recent version was included, you do not need to contact the support team.
Viewing Expiry Date
Legacy protocols were migrated with their previous expiry date information. Viewing your legacy protocol’s expiry date is the same as with EthOS-generated approved applications:
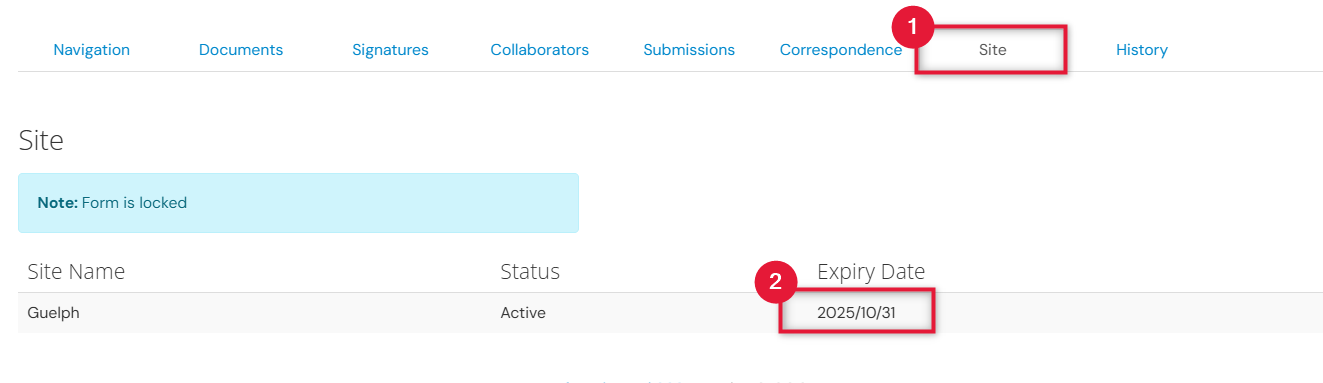
- From the main page, open the Site tab
-
The expiry date is listed as part of the Guelph site
- Note: If you need to submit an annual renewal on a legacy protocol, please consult the Legacy Protocol Annual Renewals, Event Report, and Study Closure steps below.
Share a Legacy Protocol (Assign a Role)
Only the Principal Investigator (PI) was migrated as the legacy protocol form owner. If other study team members need to access the legacy protocol, the PI must grant an appropriate level of access.
Important: As of mid-August 2025, the previous ‘share’ function is no longer in use or recommended. Access to all EthOS forms, including legacy protocols, should be granted using an EthOS role.
Roles are pre-configured permission levels that apply to the entire project and all future subforms (renewals, etc). More information on available roles and how to assign them is available in the Sharing Forms (Assigning Roles) training materials.
However, below is a brief recap and suggested process for giving your study team members access to a legacy protocol.
Review Current Access and the List of Study Team Members
It is best practice to first confirm who currently has access to the legacy protocol and also the list of named study team members. These are two distinct functions - updating one does not automatically update the other – so it is helpful to gather both data points before determining your course of action.
-
To review who has form access: from the main page of the protocol, open the Collaborators tab and review the list of names. You cannot edit permissions from this tab, but it’s a quick and easy way to see the current set of permissions.
- Note: for legacy protocols, the Project Owner and Form Owner is always the Principal Investigator
-
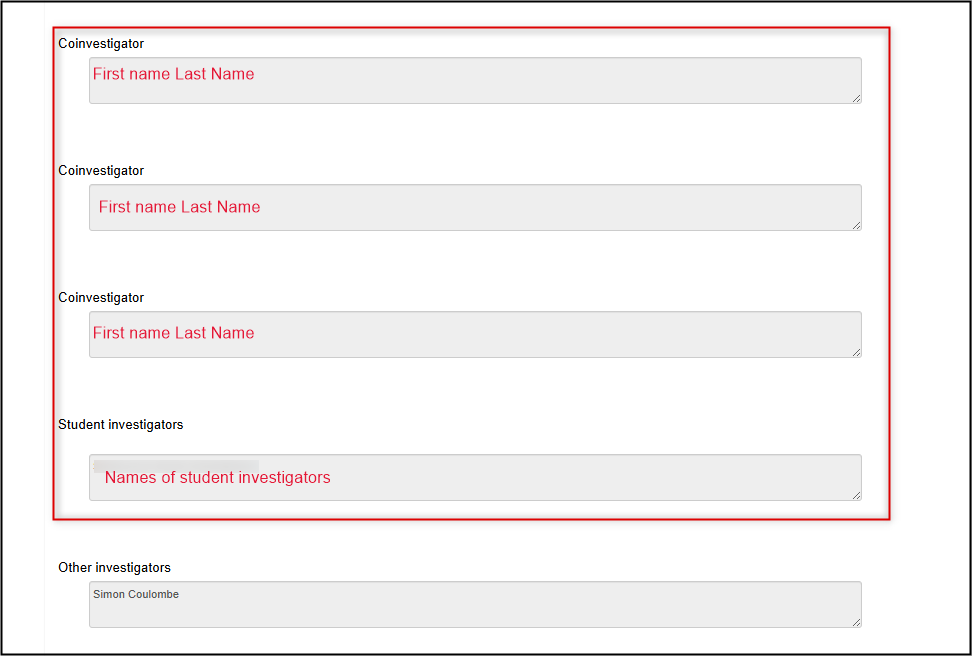
To review the study team members named on the protocol: open the legacy protocol form and scroll to the middle of the page (below the Principal Investigator’s details)
-
Reminder: only the names (not full contact information) of the study team members were migrated, based on the latest information at the time; it is possible that your study team membership has changed (if so, see Step 3)
-
-
After reviewing the current permissions and the study team list, you may need to ‘reconcile’ these by doing one or both of the following:
- Update the list of named study team members: submit a legacy amendment request
- Grant a study team member access to the legacy protocol: assign a role (see below)
Assign a Role
Granting a role will ensure that the study team member has access to the legacy protocol and also any future subforms such as a legacy amendment request, renewal, event report, or closure.
Roles can be granted to any study team member with an active EthOS account.
- From anywhere in the legacy protocol, click on the Roles button
-
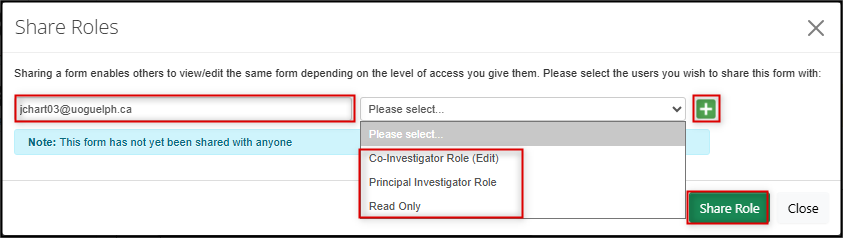
In the Share Roles pop-up window, enter the study team member’s email address and choose one of the available roles from the drop-down menu
- Note: if you do not see an expected search result or are told that the user does not exist in the system, you will not be able to share the form until they activate their account
- Click on the green + button to add more study team members and roles
-
Click on the green Share Role button to grant the assigned access
-
EthOS displays a green Form Shared Successfully banner message and the study team member receives an email confirming that you have shared this form
-
Note: the shared form will appear in the study team member's Projects list and also their Shared tile
-
Important! Remember to also submit a legacy amendment request if your need to assign a role is related to a change in study team membership.
Removing or Changing a Role
- From anywhere in the legacy protocol, click on the Roles button
-
In the Share Roles pop-up window, review the current list of who has been granted what role; click on the grey Remove button to remove access
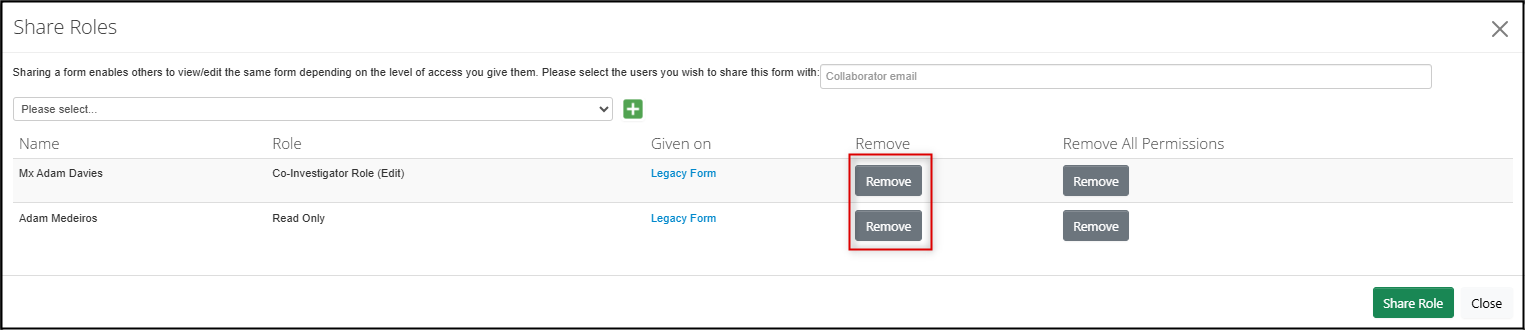
- To change a role, first remove the current role as in Step 2 and then re-assign the correct role
-
EthOS displays a green Role Removed Successfully banner message and the study team member receives an email confirmation for each change
- Note: if access has been removed, the previously shared form will no longer appear in the study team member's Projects list or Shared tile
Important! Remember to also submit a legacy amendment request if your need to remove or change roles is related to a change in study team membership.
Amend a Legacy Protocol
When there is a change to the approved legacy protocol that affects participants at any stage of the research including, but not limited to, changes to the consent form, the addition of study interventions, or changes to measures to protect privacy and confidentiality, you will need to amend the previously approved legacy protocol.
Process Overview
Unlike EthOS-generated applications (which use an 'unlocked' form), to amend a migrated legacy protocol, you will create a Legacy Amendment Request subform off the main project. In this subform, you will outline a summary of the changes you are making and upload any changed or new documents. The PI’s signature is required which triggers automatic submission to the Ethics Office for review and approval.
As with your initial submission, the legacy amendment application is subject to any modification requests after REB review, prior to approval.
Once approved, a new approval certificate is issued for the protocol.
Applicants receive automated notifications from EthOS as the amendment moves through this workflow.
Reminder: do not forget to manually save your responses as you are completing the amendment request subform. EthOS does not auto-save in the way other cloud-based applications do and you could lose any unsaved work if EthOS times out (after 30 minutes).

Create and Submit a Legacy Amendment Request Subform
To amend a legacy protocol:
-
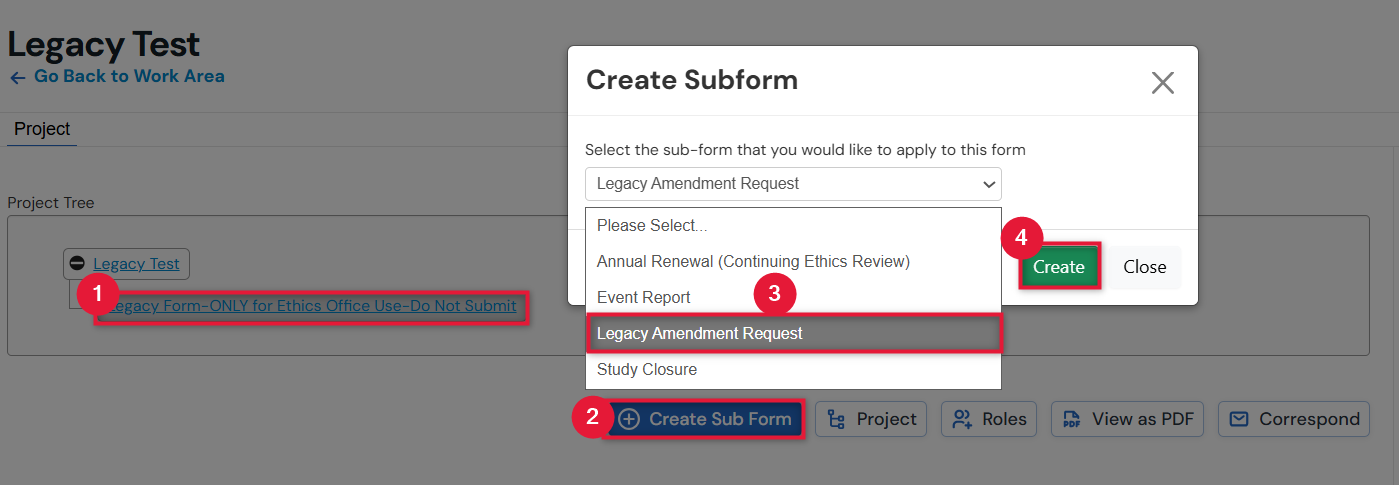
In your EthOS work area, navigate to the legacy protocol you wish to amend, and click once on the title to launch the protocol

-
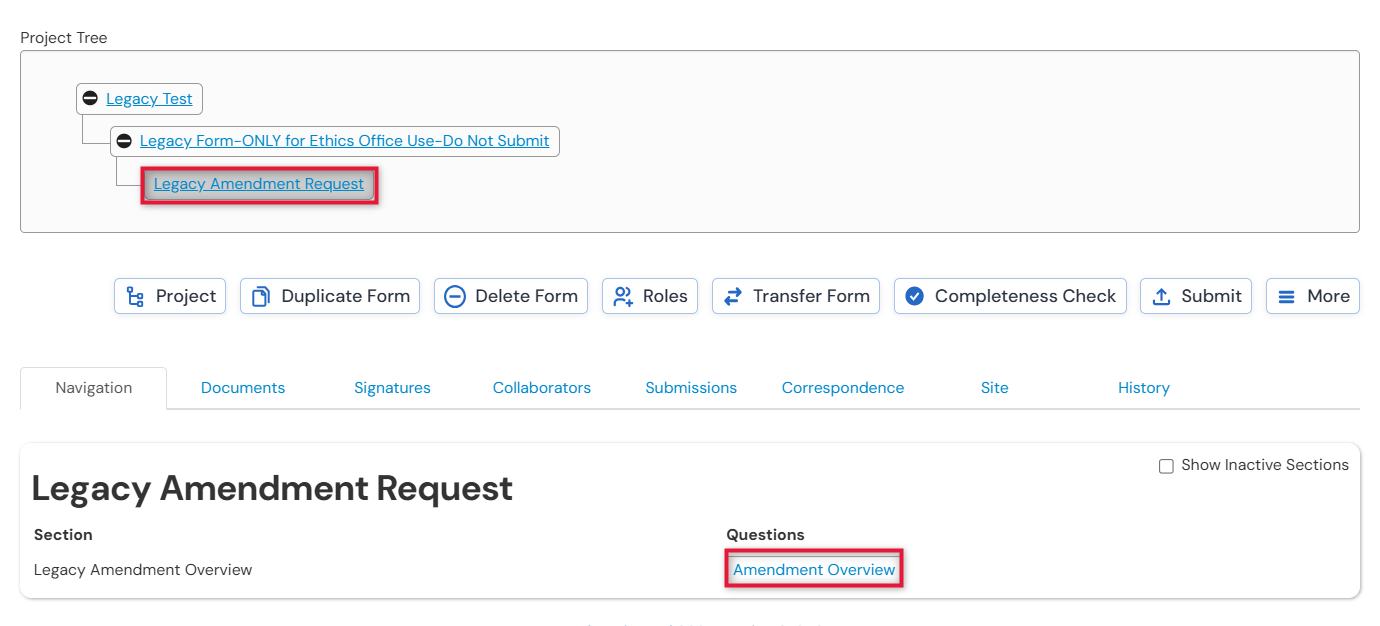
In the Project Tree, make sure you on the Legacy Form (the first branch of your tree) is highlighted; click on the Create Subform button, select Legacy Amendment Request from the drop-down list, and then click on the Create button
-
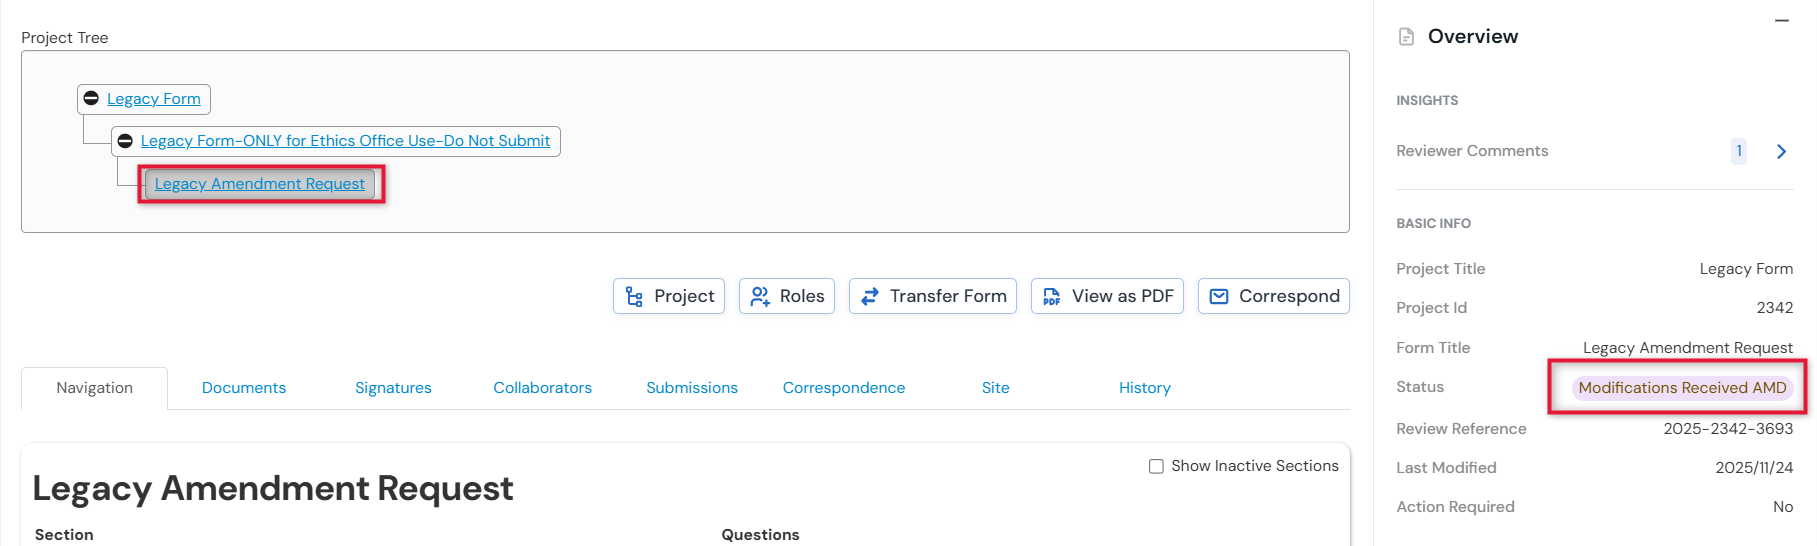
From the Legacy Amendment Request overview page, notice how the amendment is a subform (another branch) from the Legacy Form as part of the overall project hierarchy; click on the Amendment Overview section
- Proceed to answer the questions as per your amendment scenario; the form will dynamically adjust to add new dependent questions where required
-
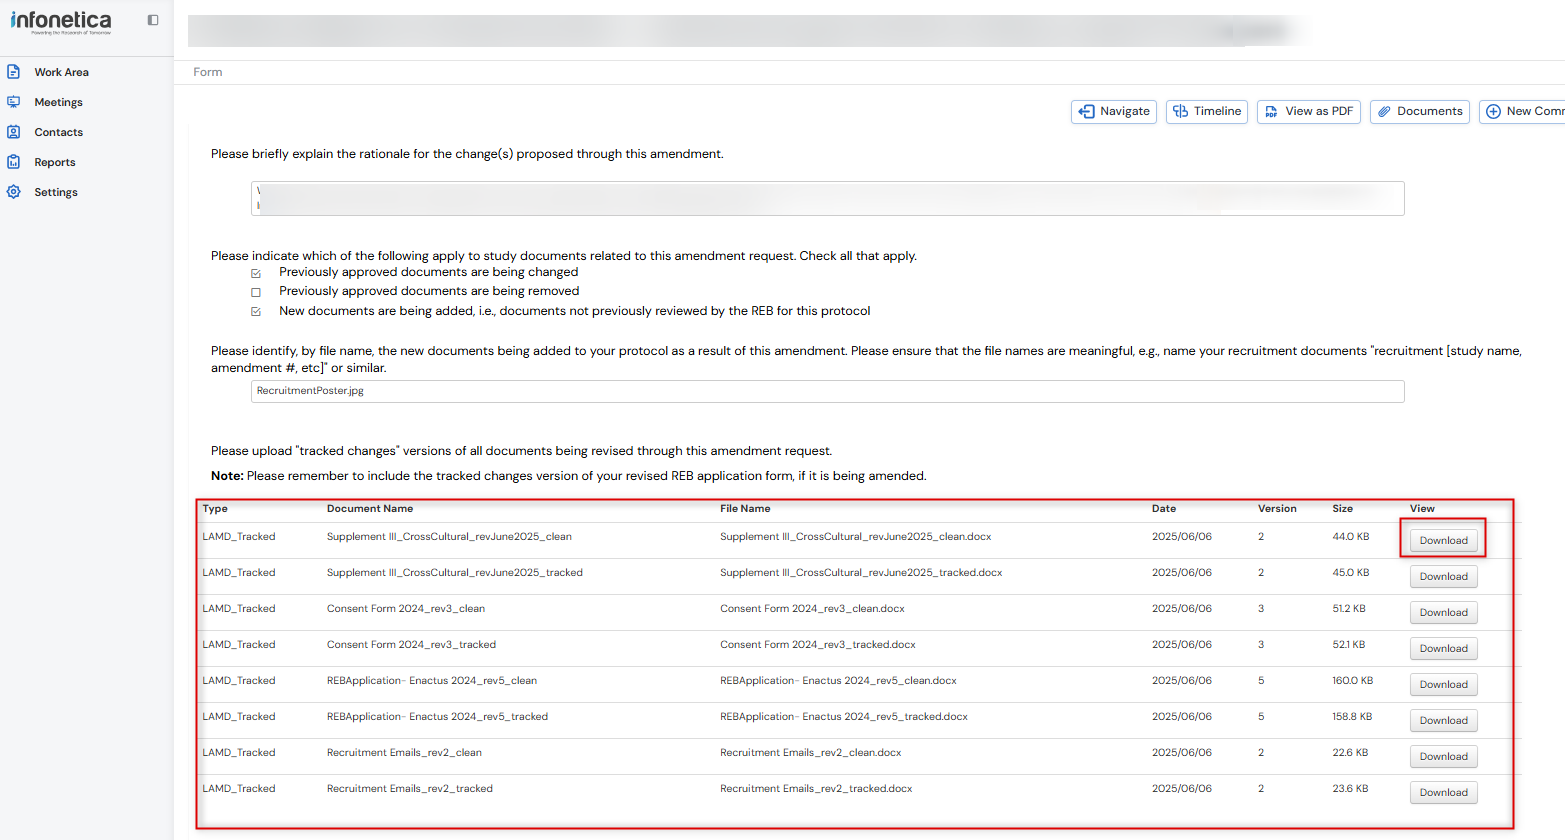
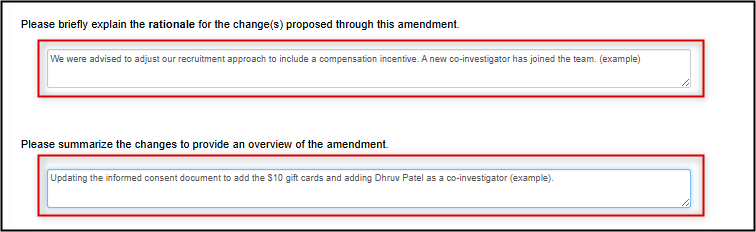
Provide a brief description of both the rationale (why the protocol needs to be amended) and what you plan to change
-
Note: this is a brief description only for ease of future reference; the actual changes still need to be made in the form and/or study documents
-
-
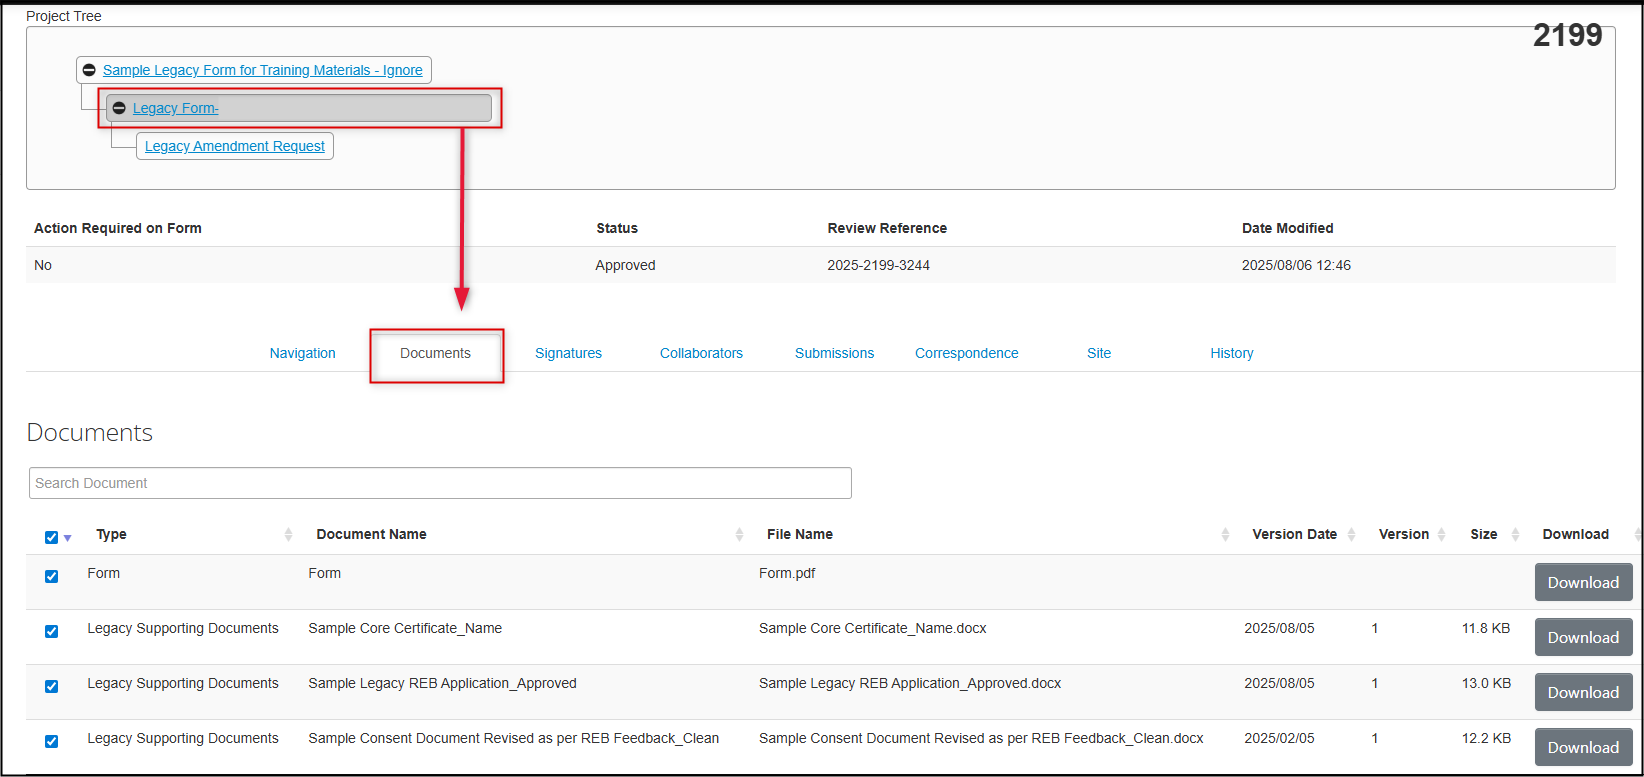
Optional: when you are ready to answer questions about the impacted documents, you may wish to consult the original list of migrated documents
- This can only be done from the parent legacy form (not the Amendment Request subform)
-
Open a second browser window and EthOS session, launch your parent legacy form and open the Documents tab to review and/or download any of the migrated documents
-
Indicate how the existing study documents are impacted by this amendment request
-
If no documents are being changed, proceed to Step 10 of these instructions

-
If no documents are being changed, proceed to Step 10 of these instructions
-
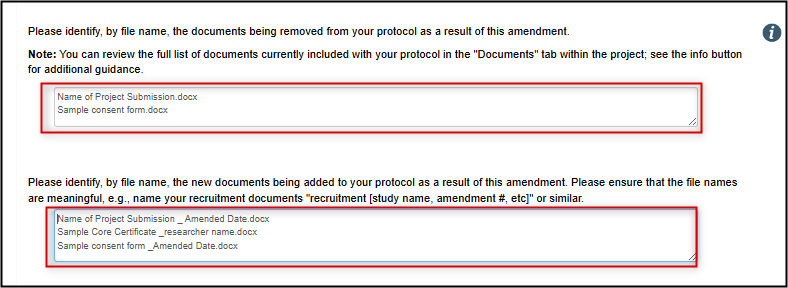
List the documents that are being removed from the protocol and the ones being added as a result of this amendment
-
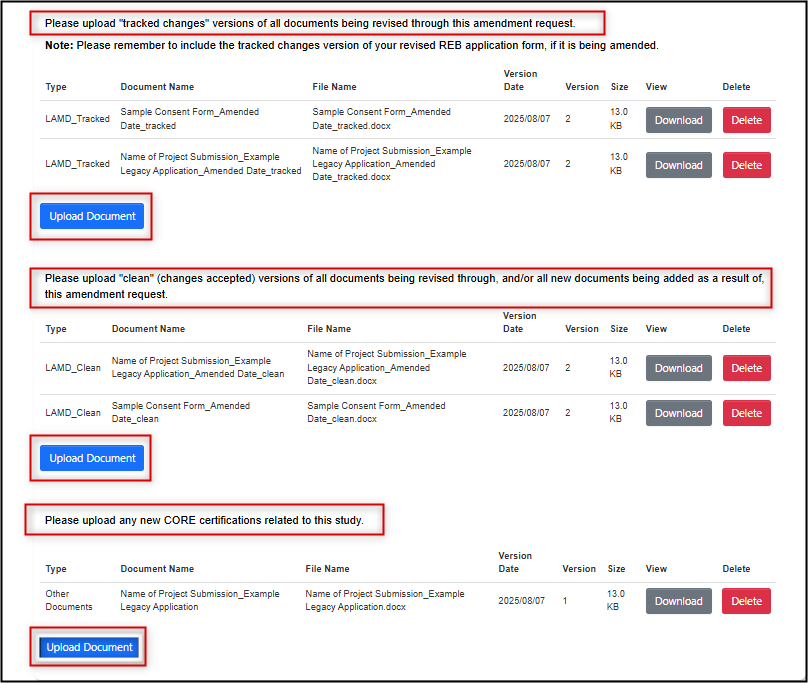
For previously approved documents, upload both the tracked and the clean versions of the amended documents (including the original REB application form); also upload any other new documents and/or CORE certificates
- At this time, EthOS does not support multiple selection for document uploads; upload each document individually
- Please note that for amended study documents, a tracked version alone is not sufficient
-
CORE certificates are uploaded in a separate area below the tracked/clean uploads
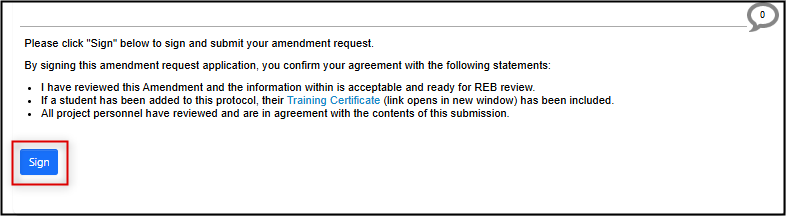
- Once you have answered all the questions and completed your document uploads (if applicable), click Next Page to access the signature step
-
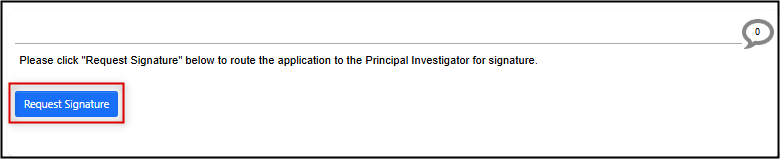
Sign the legacy amendment request (if you are the PI) or request the PI signature
-
Note: all EthOS forms lock automatically when a signature request is triggered
-
-
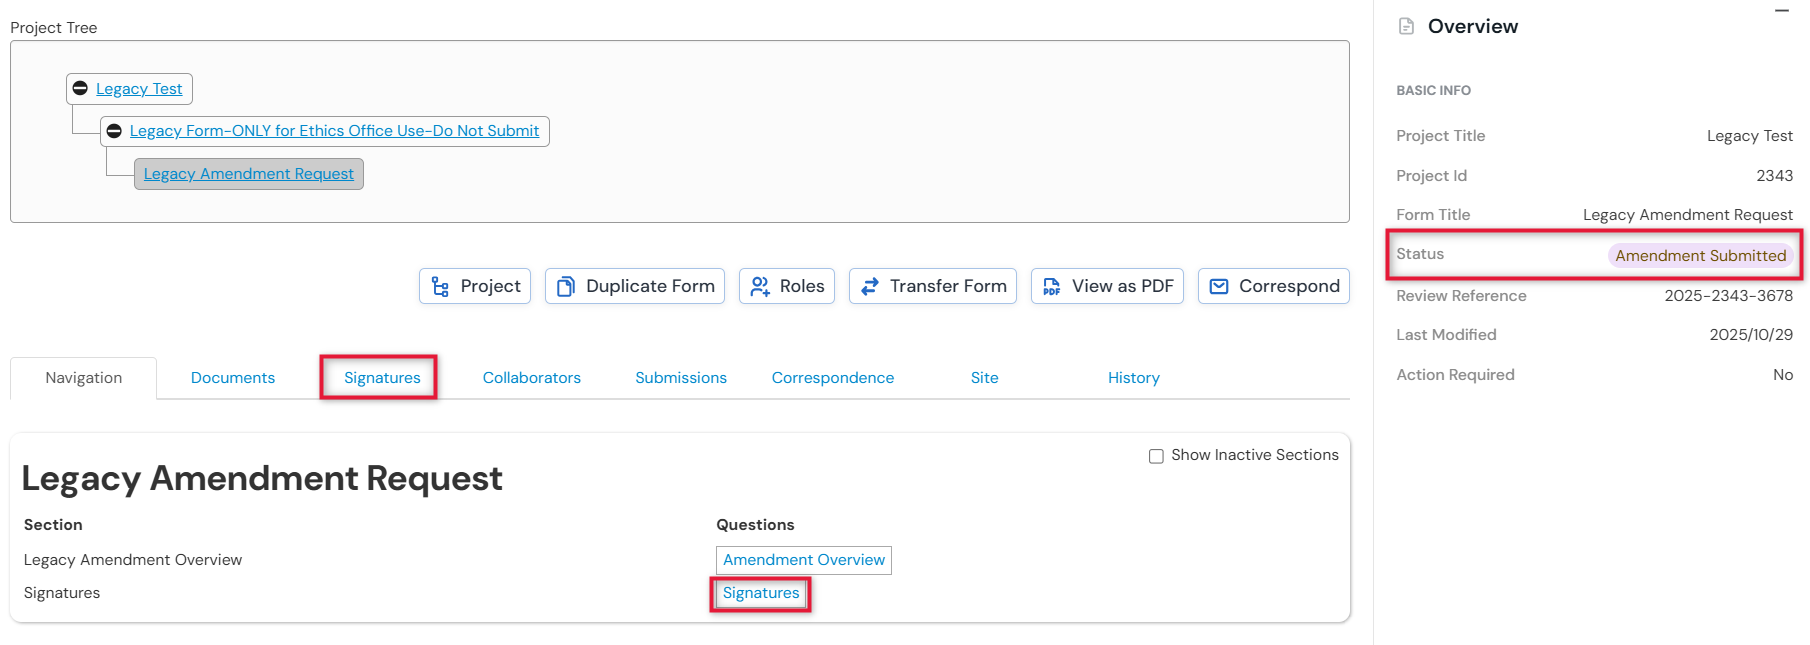
Once signed, the legacy amendment request is automatically submit to the Ethics Office; you receive an email confirmation and the status of the form will change to Amendment Submitted
- Note: it could take up to ten minutes for the status change to take effect; during this time your status will say ‘Submission in Progress’
-
Notice also that the Signatures section on the legacy amendment subform has been created; you will be able to see the status of any received of pending signatures from this section or through the Signatures tab
You have now completed your Legacy Amendment Request.
As with other submissions, the Ethics Office may request clarification or modifications during review of your amendment.
Responding to REB Feedback on a Legacy Amendment Request
Process Overview
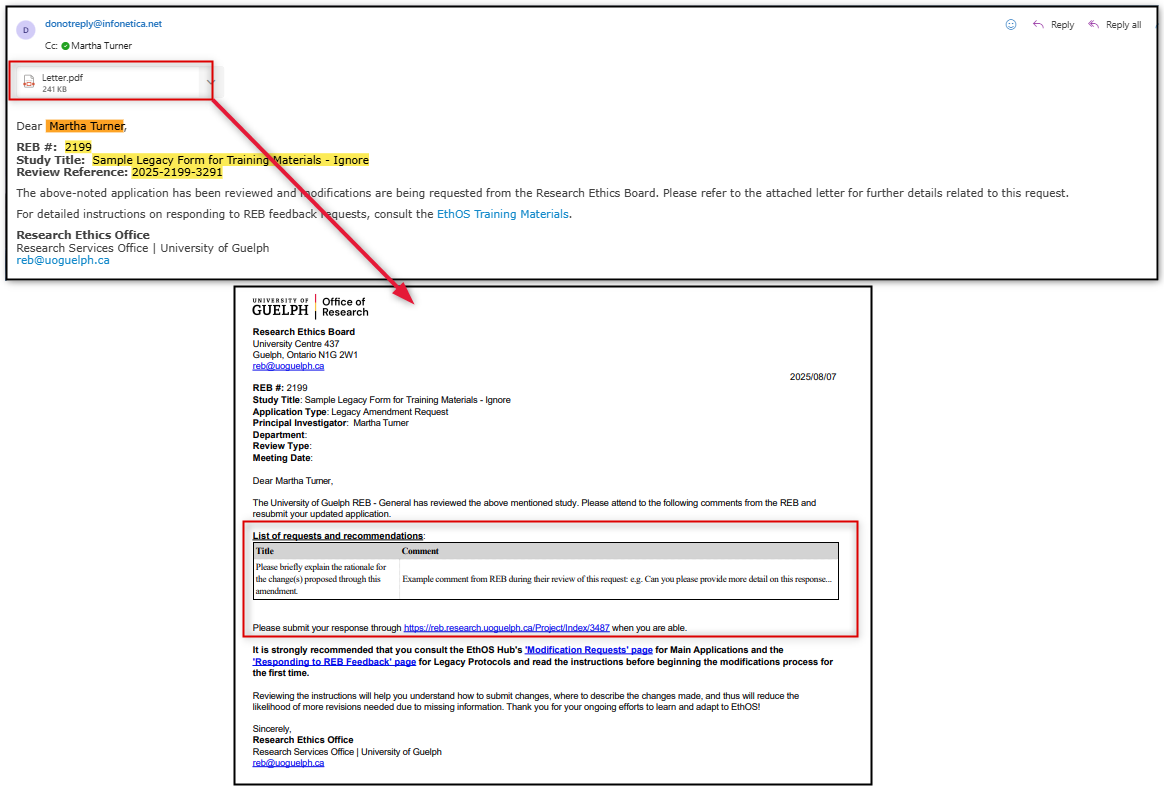
If clarifications or modifications are requested by the Ethics Office on your legacy amendment, you will receive an email notification with a summarized Feedback Letter (as with an EthOS-generated application).
Since there are so few data entry fields on the legacy amendment subform (unlike the main REB application form), responding to a modification request usually only involves adjusting a previously attached document.
Follow the guidance included in the feedback letter, make the document changes, and resubmit the amendment request. If you are not the PI, the revised amendment will be routed to the PI for signature prior to submission.
Steps
-
Open your email and review the Feedback Letter which contains a summarized list of the requested modifications (these comments will also be available to you inside the legacy amendment request subform)
-
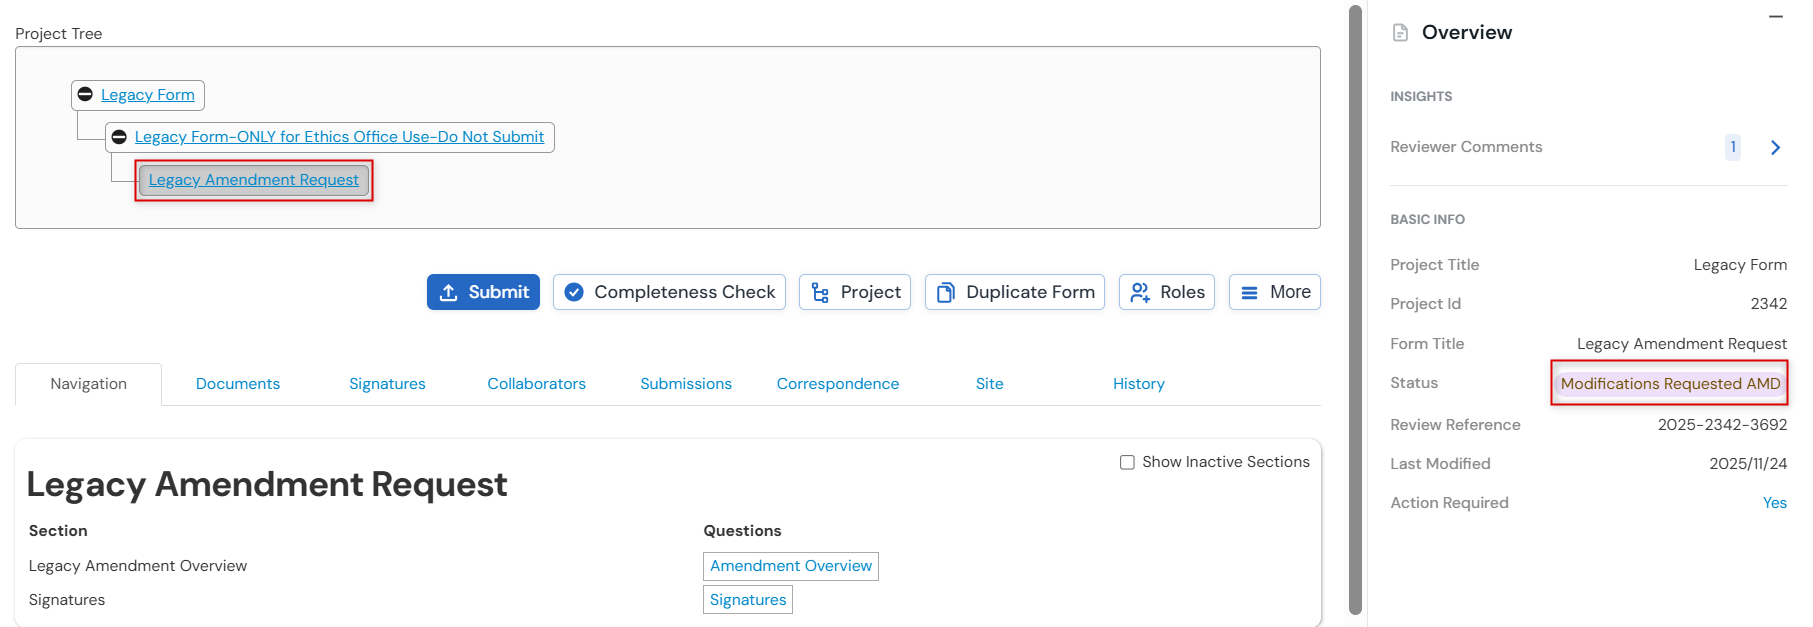
Open the legacy amendment request subform from the link contained in your Feedback Letter (or from your Work Area’s Projects list); notice that the status is Modifications Request AMD
-
Open the Amendment Overview questions; for a reminder of the requested modifications click on the Reviewer Comments in the Overview pane (or in the panel’s comment bubble) and hyperlink directly from the comment to the related question
-
Note: where there are multiple items of feedback, re-open the Reviewer Comments from the Overview pane as needed to remind yourself of the requested modifications

-
Note: where there are multiple items of feedback, re-open the Reviewer Comments from the Overview pane as needed to remind yourself of the requested modifications
-
If the modification requires a change to one of the form responses, make the change directly in the form (example screenshot below)

-
Correcting previous documents and/or adding new documents:
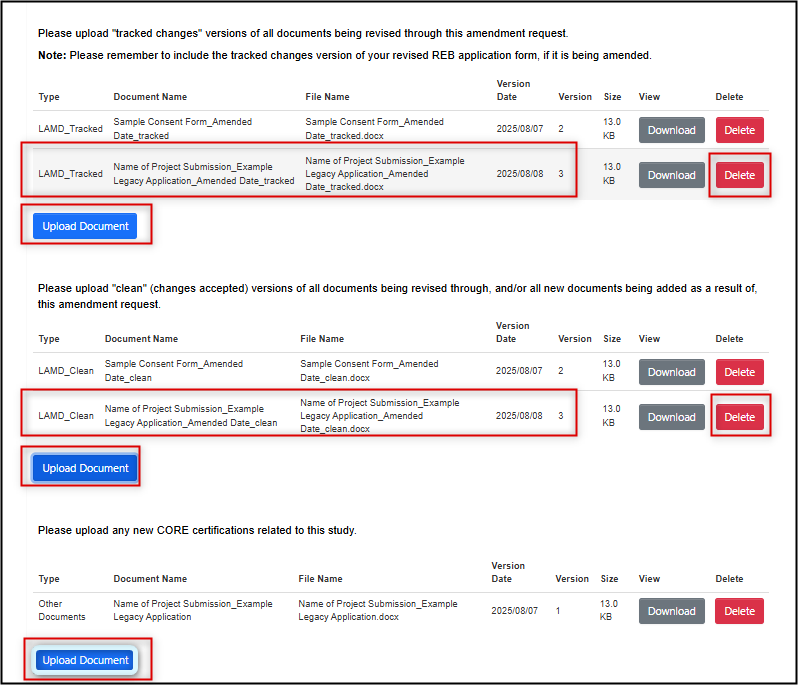
- If the modification request requires a change to a previously attached document, delete it and re-upload the new tracked and clean versions
- If the modification request requires a new document (not originally attached to your legacy amendment), upload this in the ‘clean’ area
-
If the modification request requires any new CORE certificates, upload these in the CORE certificate area
-
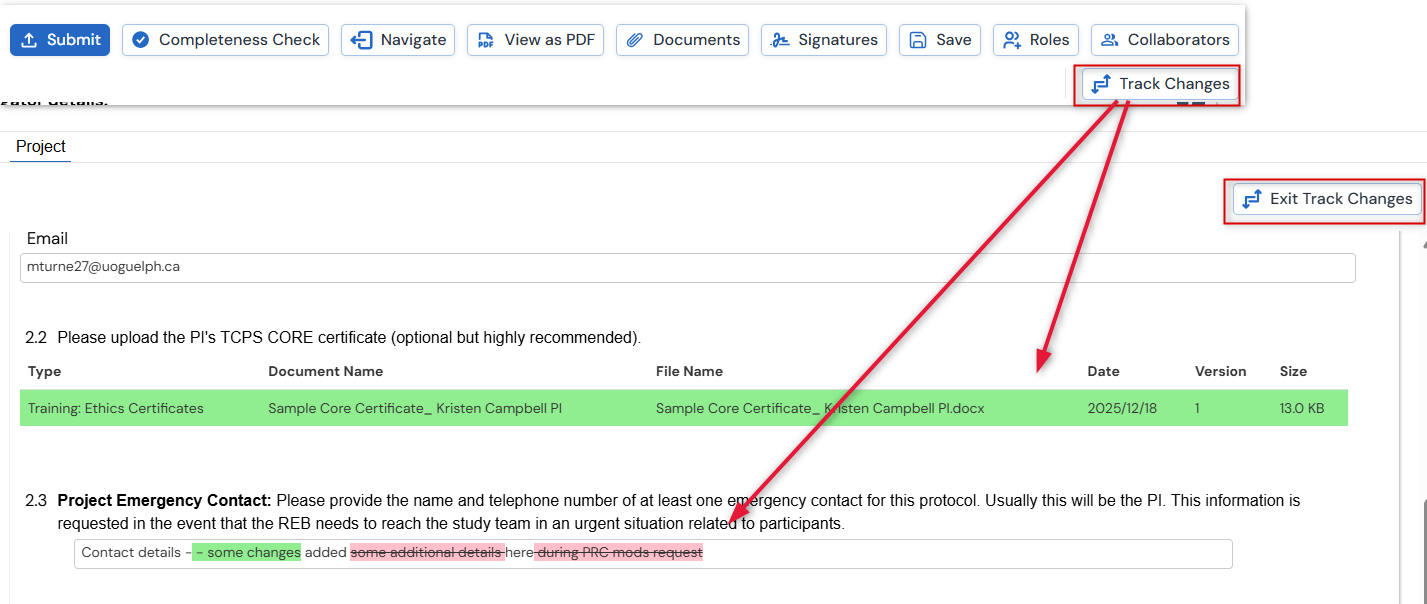
Optional: once you have made a change, you can use the Track Changes button at the top of the form to compare the changes you have just made with your previously submitted legacy amendment
-
Note: In 'Track Changes', green text represents newly added content and red strikethrough text represents any deletions. You can toggle back to edit mode using the Exit Track Changes button.
-
- When you have made all requested modifications and/or responded to the REB's feedback, proceed to the signature step by clicking on the Next Page button
- Sign (or request the signature if you are not the PI); follow the prompts to confirm your signature (or signature request) as needed
-
Upon signature, the status of your legacy amendment changes to Modifications Received AMD (please note that this can take up to ten minutes)
You have now completed the modifications on your Legacy Amendment Request subform. Your revisions will now be reviewed by the Ethics Office and you be notified of any further required changes or approval.
Event Reports, Renewals, and Closures for Legacy Protocols
Process Overview
Once a legacy protocol is in EthOS, you can use EthOS to submit any of the remaining post-approval applications:
- An annual renewal if the study is continuing beyond its current expiry date to ensure that your protocol has continued ethics approval
- A study closure when the research is considered complete, all data has been collected, and no further study activities will be taking place
- An event report when any unanticipated issue or event has occurred that has impacted, or could impact, the protection of the human participants involved in the study
Legacy Protocols and EthOS-generated main form applications use the same subforms for renewals, event reports, and closures.
Like the Legacy Amendment Request subform, the renewal, event report, and closure forms are also subforms and will continue ‘branching out’ from your main legacy project.
The system steps to create each renewal, event report, or closure are all the same, although the questions in each short form will vary. Please note that while some questions are newly added (compared to previous MS Word forms), they are required to ensure our ongoing Tri-Council Policy Statement compliance.
Like all EthOS forms, the Principal Investigator’s (PI’s) signature will be required after which the form is automatically submitted. You will be notified of any further required changes and/or approval.
Expiry Date and Renewal Guidelines
As with EthOS-generated applications, EthOS will trigger an automated reminder alert 4 weeks before the expiry date. Please ensure that you renew (or close) your protocol prior to expiry to remain in compliance with the Tri-Council Policy Statement.
If you have missed renewing the application, EthOS will trigger a reminder alert 2 weeks after the expiry date. Again, please prioritize your prompt attention to either renewing or closing the protocol as soon as any alerts are received. Applications that remain in a post-expiry status for 4 weeks after expiry will be considered out of compliance and there may be funding implications.
The Research Ethics office is here for any support you need so that your study is renewed proactively and avoids any compliance issues.
Create & Submit a Legacy Renewal, Event Report, or Study Closure Subform
The EthOS steps for submitting these applications are the same regardless of the type of subform you are creating.
Since Legacy Protocols and EthOS-generated applications use the same subforms for renewals, closures, and event reports, please see the detailed documentation in the Renewals, Closures, Event Reports materials.
However, abbreviated steps are included below for ease of reference:
- In your Work Area’s Project List, locate the project for which you will create the Annual Renewal, Event report, or Closure
-
From the Project Tree, make sure that the ‘parent’ legacy form is highlighted (this is the form to which the subform applies)

-
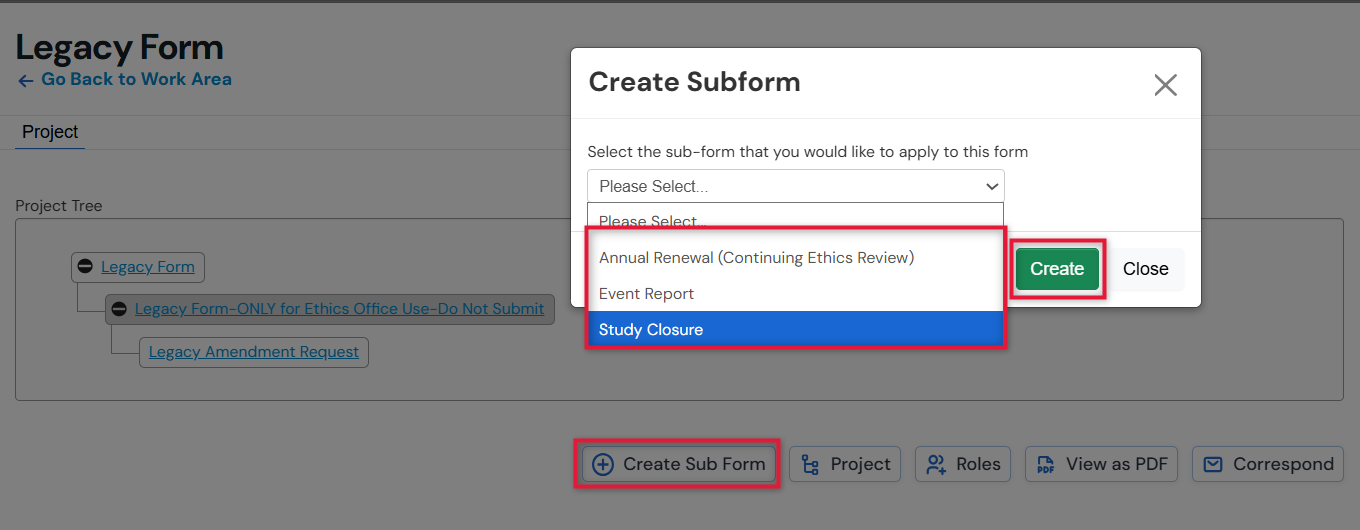
Click on the Create Sub From button, select either Annual Renewal, Event Report, or Study Closure and then click on the green Create button
-
From the drop-down list, select either Annual Renewal, Event Report, or Study Closure and then click on the green Create button

-
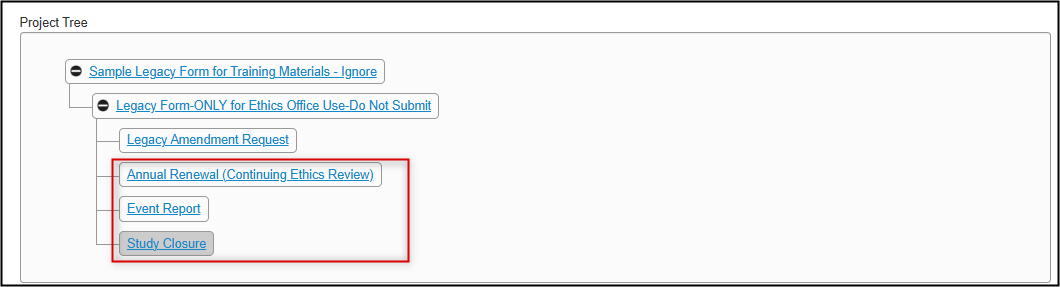
Notice how in the Project Tree, subforms are added as new ‘branches’ below the legacy form
- From your subform, navigate to the first page of questions (you may need to scroll down to find the editable portion)
- Complete the required questions and upload any documents if prompted
- Sign as the Principal Investigator or request the PI signature to submit the form
Once the signature step is complete, the subform is submitted to the Ethics Office and routed for their review and approval. You will continue to receive automated email notifications throughout the approval cycle.
Review a Legacy Subform’s Status
To check on the approval status of any legacy subform (amendment request, annual renewal, event report, or study closure):
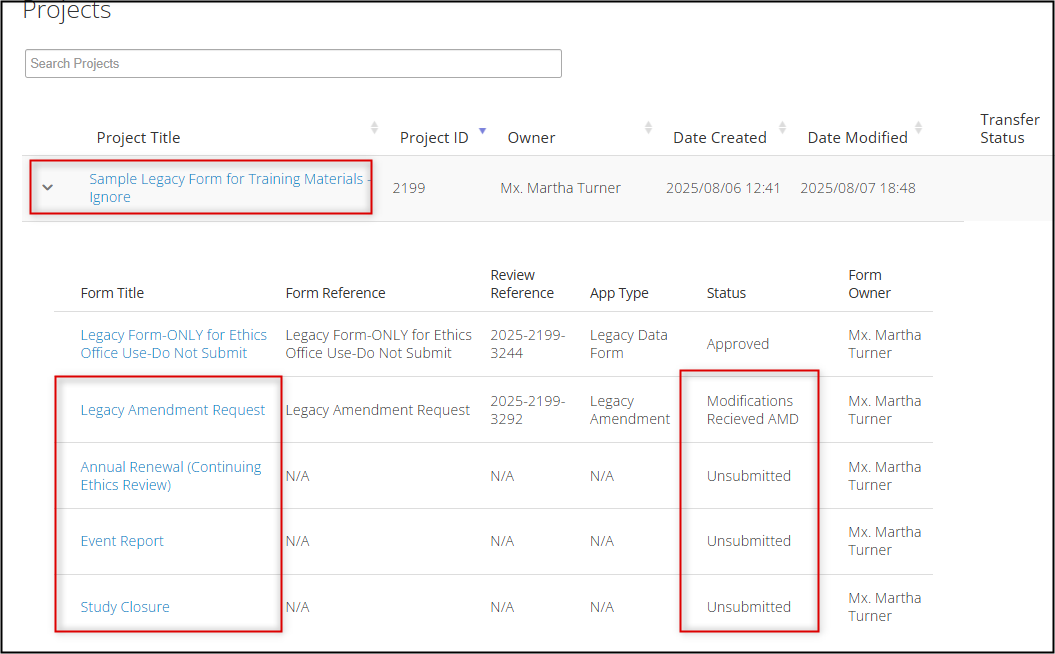
- In your Work Area’s Project List, find the project for which the subform was created
-
Expand the title to see the legacy form and any subforms along with their status and other details
Legacy Subforms Migrated Manually – Accepting Transfers
The initial mass migration of legacy protocols only included active, approved files that were with the Research Ethics office as of August 13, 2024. Applications that were approved after this date are being migrated manually as and when they are approved.
For a manual migration, the Research Ethics office will enter the legacy form data, upload the current set of documents, and then transfer the project and legacy form to the PI.
The PI will receive a notification and the transferred project will appear in your Transferred Projects tile. The only action for the PI will be to accept the transfer.
Please see the Transfer Ownership of a Project materials for how to transfer (Steps 1-4) and accept (Steps 5-7) projects.