Finding Letters or Acknowledgements
Letters or notices are sent to applicants for a variety of reasons. For example, you could receive a Feedback Letter if the REB have requested changes to your application, a Conditional Approval letter outlining the terms of approval or an Approval letter once your protocol is approved. All letters and acknowledgement notices are emailed to you but are also available within the EthOS application form.
- From your Work Area Projects List, locate the project and click on the project title to open the Project Tree
- In the Project Tree, select the form for which you wish to view the letter or acknowledgement notice
- Expand the History tab
- Locate the notification which indicates approval and click on the Download button
Note: If you have a long history, use the Search History bar, e.g. for 'Approval'.
You can also find letters or acknowledgements from the Notifications tile by searching for the project title or number and clicking on the Paperclip (attachment) icon in the notification. See the Basic Navigation - Notifications section for more information.
Creating Folders
EthOS allows you to create folders to organize your projects. For example, you can create folders for different types of projects, or projects that occur within a certain timeframe.
When you first log in to EthOS, you will not have any project folders.
Once created, a folder tile cannot be moved around on your Work Area. Folders will be displayed in order of creation from left to right. If you require your folders to appear in a certain sequence, consider this when determining your folder nomenclature. See Renaming Folders (below) if you need to change a folder name.
To create a new folder:
- Click on the Create Folder button in the actions ribbon
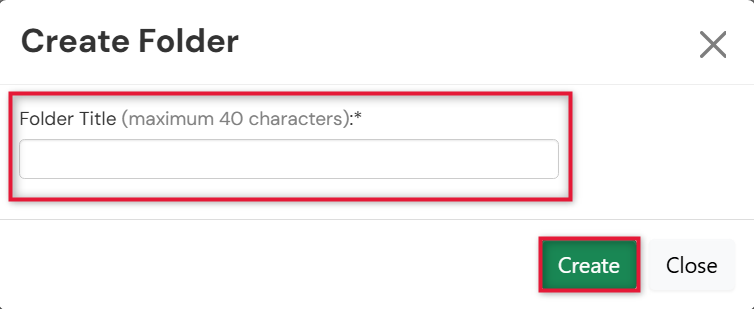
- Type in a Folder Title
-
Click on the Create button
- Note: When you create your first folder, EthOS will create this new folder and an All Projects folder. This ensures that you can always see the complete list of your projects in addition to your sub-organized content.

Renaming Folders
To rename a folder, you must be in the folder you wish to rename.
- Click on the folder you wish to rename
-
Click on the Rename Folder button in the actions ribbon

-
Enter the new name and click on the Rename button in the Rename Folder pop-up window
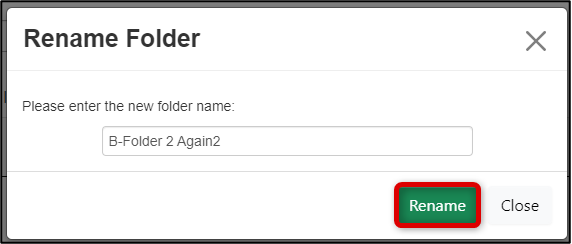
EthOS displays a green banner message indicating the successful change of folder name.
Adding Projects to Folders
Easily add projects to folders or reorganize projects into different folders.
- Select the project from your Work Area Projects list
- Drag the project into the folder tile
Or:
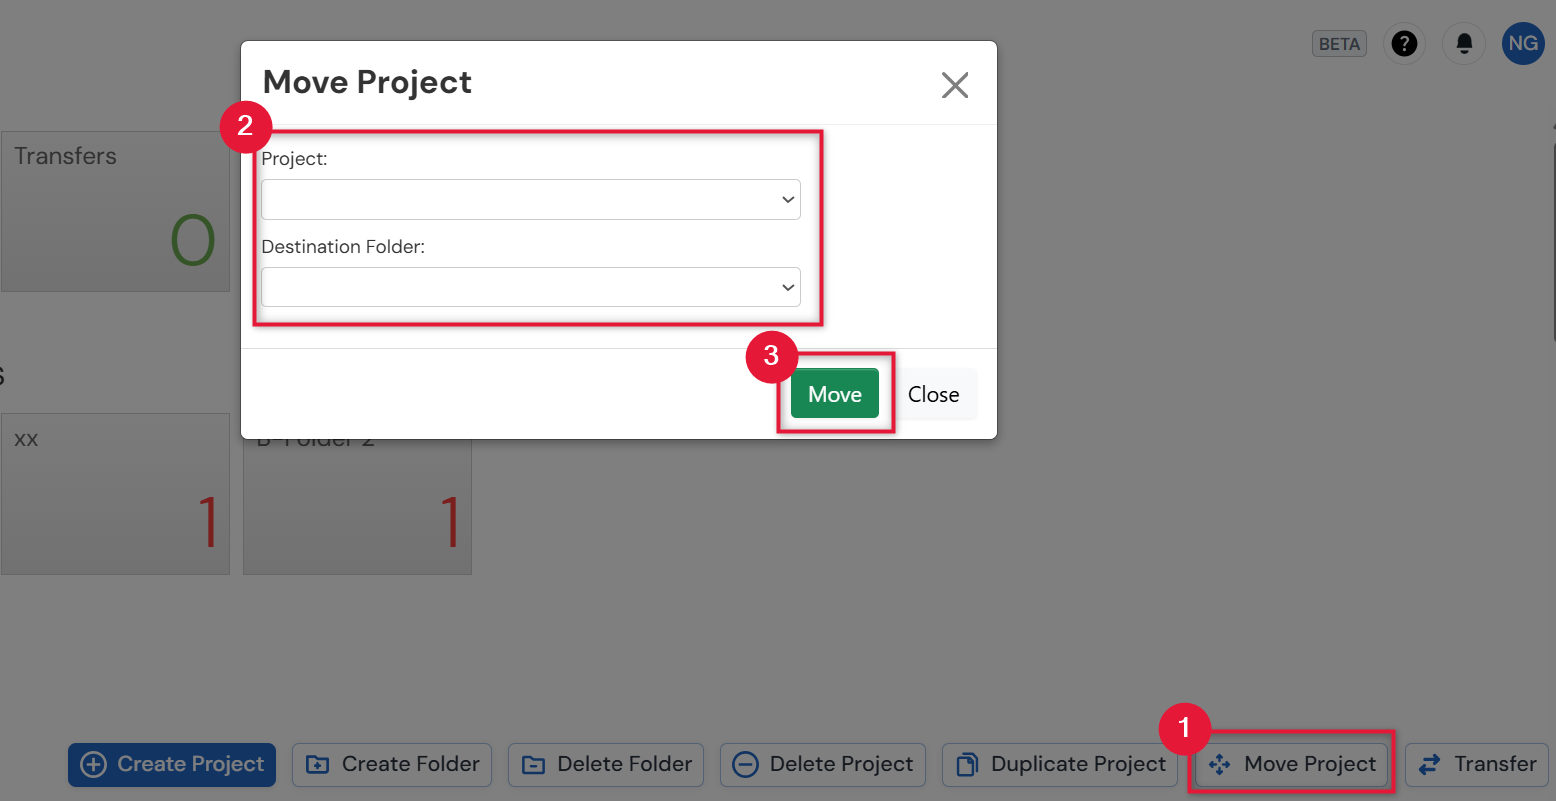
- Click on the Move Project button in the actions ribbon
- Select the Project and Destination folder
-
Click on the Move button
Duplicating Projects
You can duplicate a project in EthOS if you wish to leverage an existing application as the basis for another one. Only duplicate a project if you are creating and submitting a new main application form with similar attributes to a previously generated project. Even then, please always carefully review and adjust all previous responses to align with your new study.
The Duplicate Project feature should only be used to copy a main application form (not including any subforms) created in EthOS. Never duplicate legacy forms.
The duplicated project will include all of the original form’s content with the exception of uploaded documents and any electronic signatures. The duplicated project will not inherit any previous permissions, so you will need to reshare the project if required with other study team members.
Note: If you need to duplicate a particular subform only (e.g. for a subsequent renewal), see the Duplicating Only Subforms steps instead.
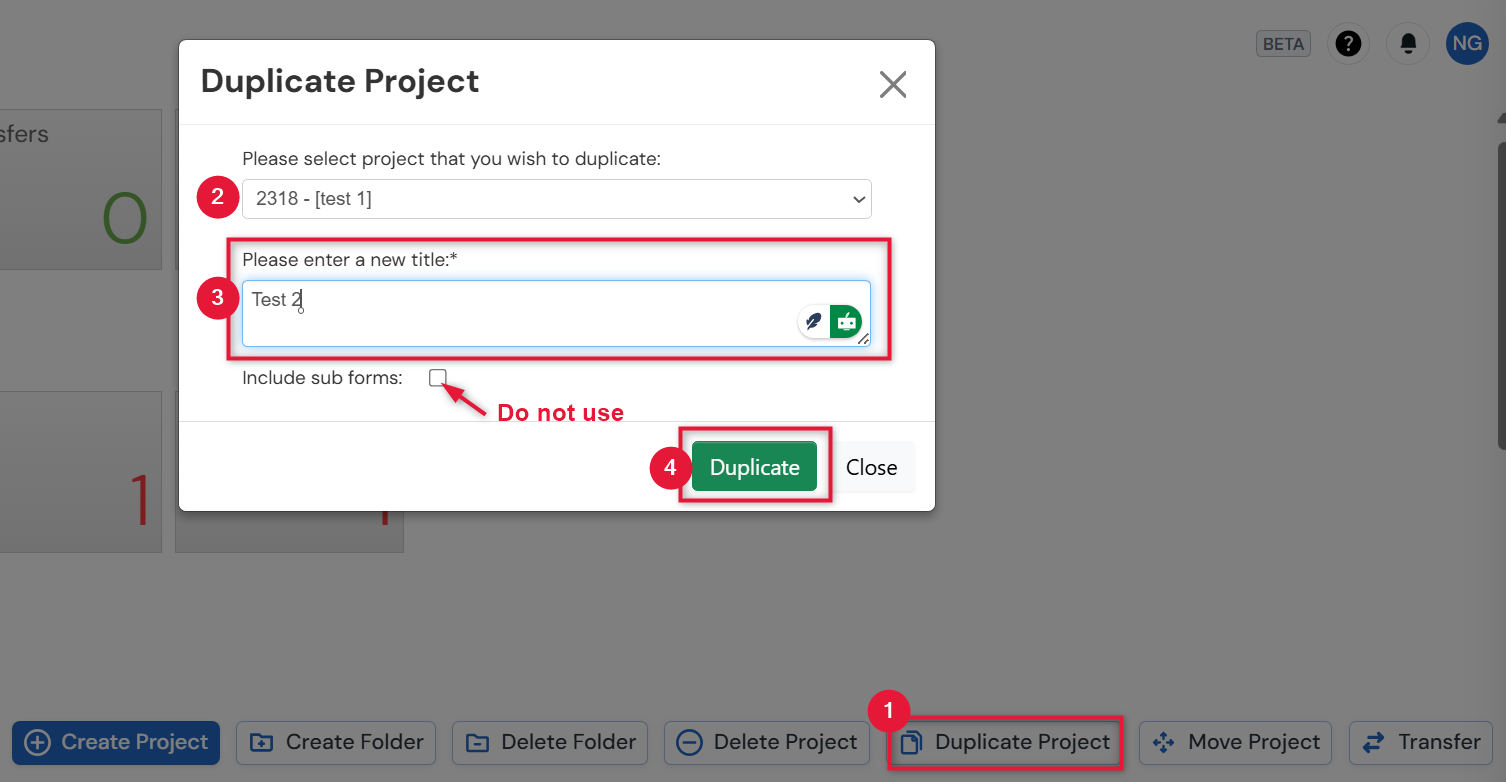
- From your Work Area, click on the Duplicate Project tile
- Select the project to be duplicated from the dropdown menu
-
Enter a new title
- You will need to enter a unique title (you cannot reuse the current title)
- Important: do not duplicate any subforms (renewals, closures, etc.) when you are duplicating an entire project
- Click on the Duplicate button
Duplicating Only Subforms
This is a useful feature if you wish to duplicate only a particular subform, such as an annual renewal or event report. While a duplicated subform is a useful starting point, please always carefully review and adjust all previous responses in line with your current study status.
From your Work Area, first navigate to your Project List and launch the subform you wish to duplicate.
- In the Project Tree at the top of the screen, click once on the particular subform you wish to duplicate (to highlight it)
-
Click on the Duplicate Form button in the actions ribbon
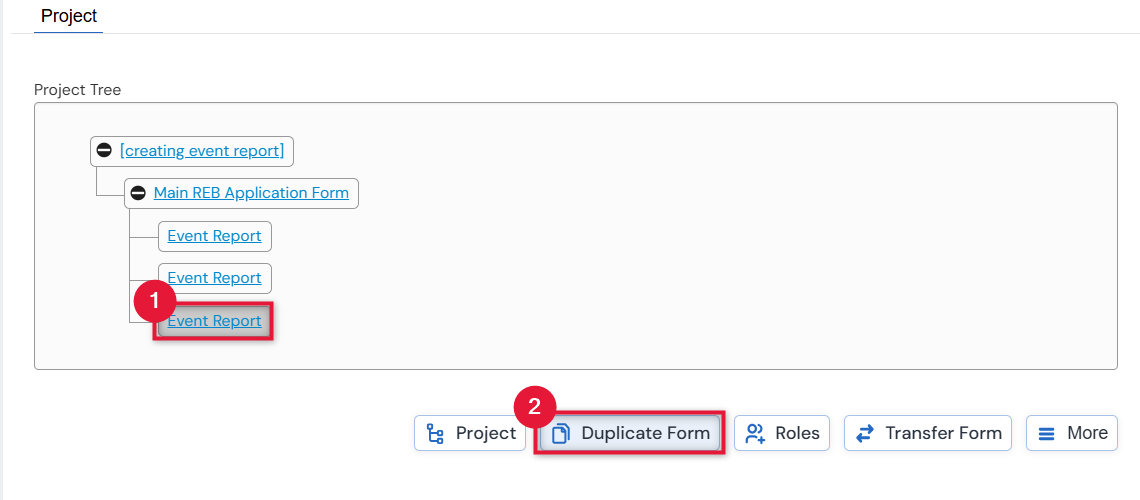
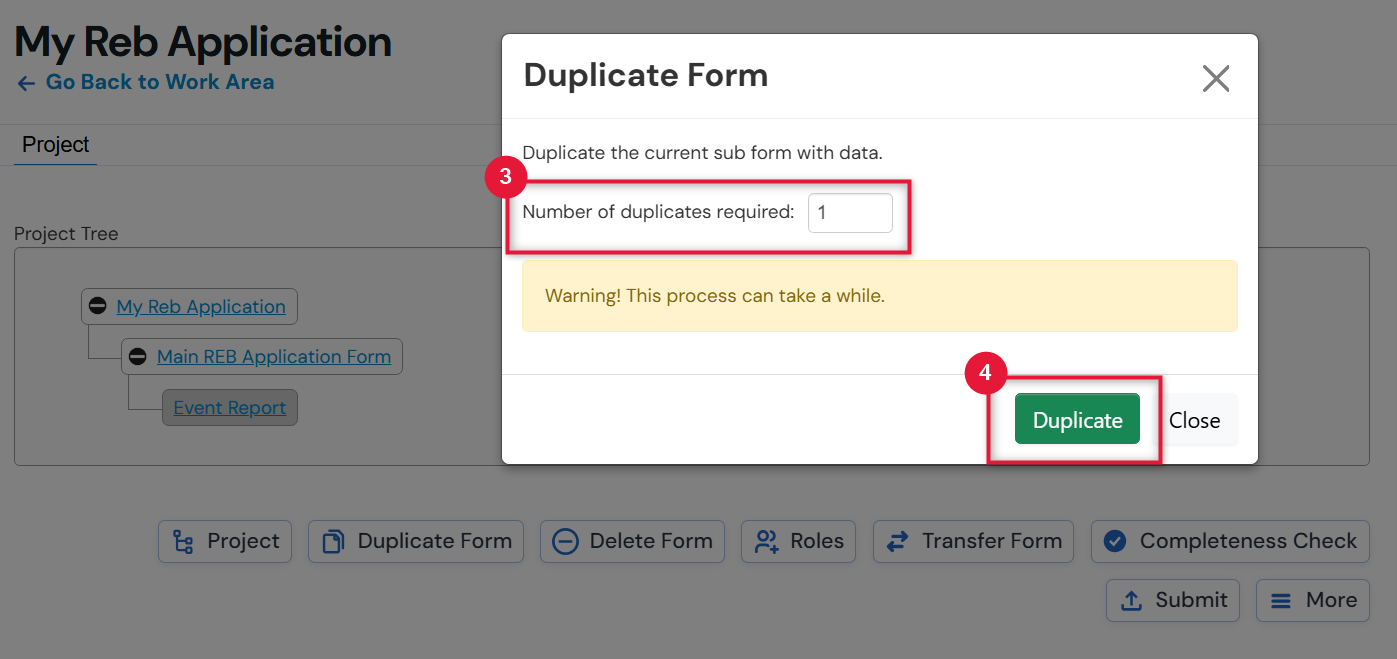
- Select the number of duplications needed
-
Click on the Duplicate button
Transfer Ownership of a Project
Projects can be transferred to other EthOS users as needed. In these cases, ownership of the project, including all subforms, is relinquished from the current owner and transferred to another EthOS user. A transfer removes the project from your project list, and the new owner receives the transferred project in their list. An example use case is when the original form owner is leaving the project and another research member on the team is taking over the study.
Important Notes
- If the requirement to transfer the project is related to a change in the study team of an approved application, you must also submit an Amendment.
- The individual to whom you transfer the project must be eligible to be a Principal Investigator and accept full responsibility for the project. The new PI must also have an active account in EthOS.
To Initiate and Accept a transfer
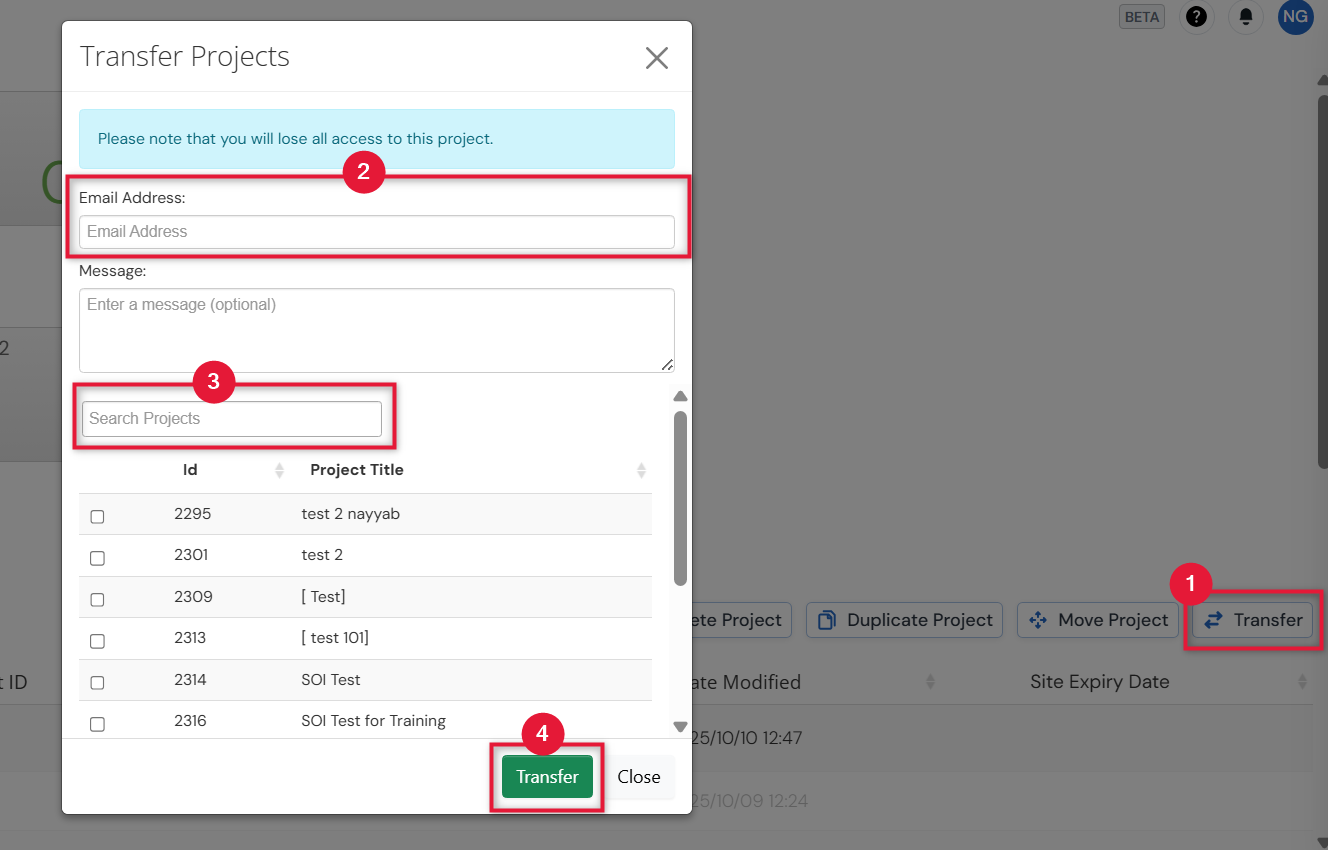
- Click on the Transfer Project button in the actions ribbon
- Use the search bar to begin typing the email address of the new PI. If you do not see a search result, contact the PI and ask them to log in once to activate their account.
- Find the project you wish to transfer or select from the list
-
Click on the Transfer button
-
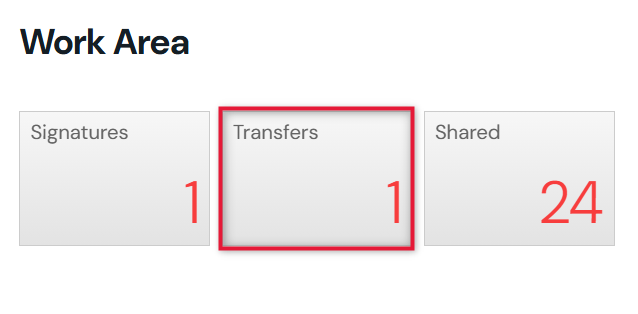
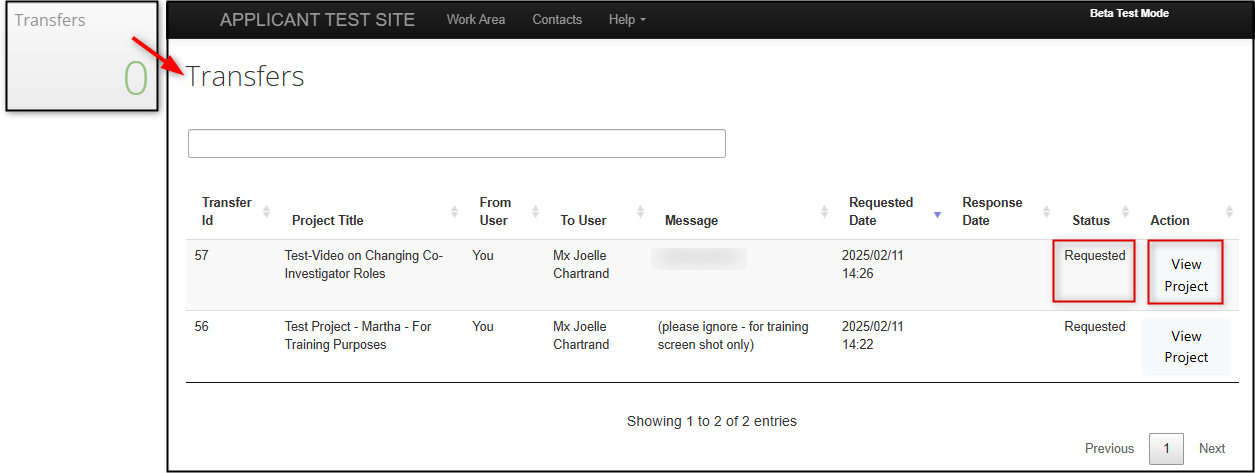
A transfer request email notification is sent to the new recipient. The new recipient sees the Transfer request appear in their Work Area Transfers tile. Click on the Transfer tile and click View Project.
-
When the project opens, the actions ribbon provides the option to Accept or Reject the transfer.

-
Once accepted, the transferred project appears in the new owner's Projects list with a status of Transfer Accepted, and the Transfers tile number is reduced by one (in this case, to zero).

Cancel a Pending Transfer
To cancel a transfer before it has been accepted:
-
From your Work Area, open your Transfers Tile
- Note: if your Transfers tile has a green 0, it just means that none of your transferred projects have been accepted yet
- Review the status to ensure that it does not say Accepted (if so, the transfer cannot be cancelled; it would need to be transferred back to you instead)
- Click View Project
-
From the opened project, navigate to the top of the Project Tree hierarchy and click once on the Project Title (not the Main REB Application Form line)
- Open the Transfers tab
- Click the Cancel button

-
A green banner message confirms that the transfer was cancelled.

Deleting or Withdrawing Projects
Deleting Projects
Projects can be deleted from EthOS only if they have not yet been submitted.
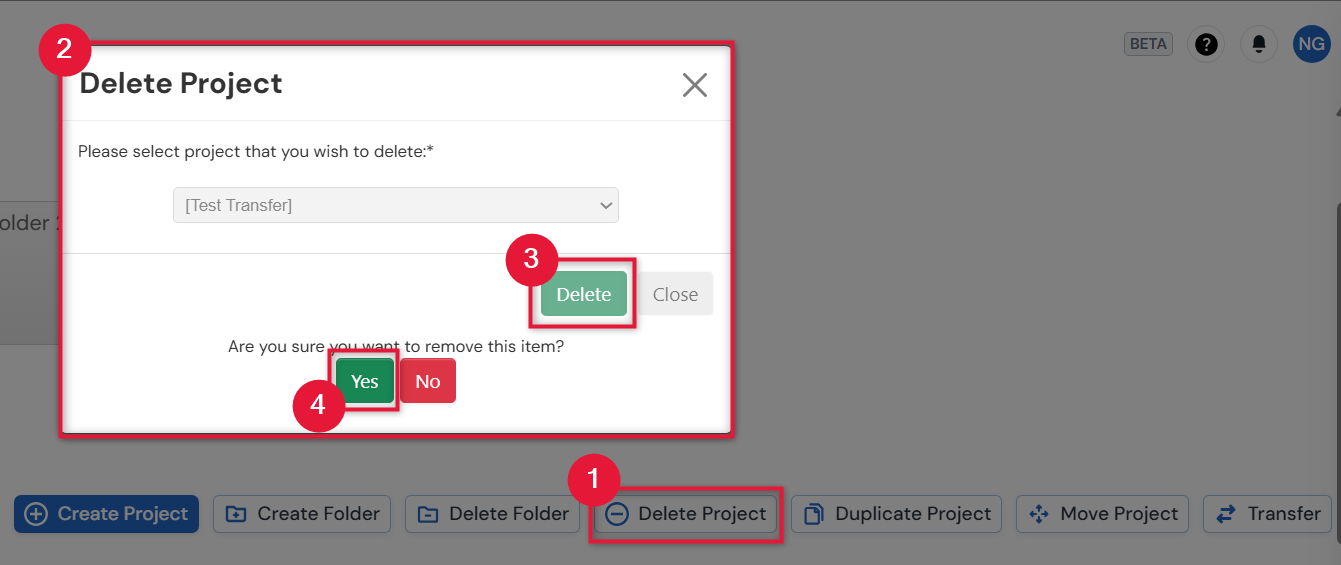
- Click on the Delete Project button in the actions ribbon
- Select the project you would like to delete
- Click on the Delete button
- Confirm Yes
Withdrawing Submitted Projects
Projects can be withdrawn (e.g. submitted in error, or the study will no longer be proceeding) only at certain points in the study. A suggested best practice is to first contact the Research Ethics Office directly from within the project using the Built-In Correspondence feature. This ensures that your request to withdraw the project has visibility and remains within the project file.
From there, the steps to withdraw the application will depend on where the application is in the review cycle. (If you see the Withdraw Application button in the actions ribbon, you will be able to withdraw your application. If not, the Research Ethics office will need to do so on your behalf.)
Note: once a project has been withdrawn, it can still be edited and resubmitted. Alternatively, you can Duplicate the Project and revise from there if and when you need to submit again.
Sharing Forms (Assigning Roles)
You can share an EthOS form with anyone at any time – as long as they have an active EthOS account.
- Note: as a reminder, if you have a UofG / UofGH email address, you automatically have an EthOS account, which is activated on your first EthOS log-in. All other users must first request an external EthOS account.
Shared forms appear in the Shared Tile and the Project List of the collaborator who has been given access.
A Sharing Forms training video is available for this topic in addition to the documented steps below.
Understanding Roles in EthOS
When a new project is created in EthOS, initially only the Project Owner (the person creating the application) will have access. For others to access the application, the Project Owner must assign the desired level of permission using an EthOS role. A role is a pre-configured permission profile that you can grant with one click and know that the user will be able to access everything as intended.
Role-based permissions apply to the main application form, all future form versions (e.g., a resubmitted application or future amendment) and sub-forms (legacy amendment, annual renewal, event report, closure). This means that you only need to assign the role once.
Important: giving someone a role is for access purposes only and is a separate and distinct step from identifying them as a member of the study team, which is a section and step in most EthOS application forms.
Available EthOS Roles
The following roles are available to address the main access scenarios we have encountered since our launch of EthOS. If a different permission profile is required, please contact RAIMSsupport@uoguelph.ca outlining the requirement and rationale.
Each EthOS user should only have one role per application. The role with the broadest access profile will supersede any previously assigned permissions.
| Role Name | Do I Need to Assign this Role? | Description | Permissions |
|---|---|---|---|
| Project Owner (Form Owner) | No |
This role is the highest level of access and is given by default to the person creating the initial application. The Project Owner must be the first person to grant access to others. The Project Owner role can only be reassigned by transferring ownership of the project. |
|
| Principal Investigator (PI) | Yes, unless you are the PI who created the application |
This role must be assigned if the Project Owner (the person creating the application) is not also the PI. The PI role is the next highest access level after the Project Owner. This level of access is required so that the PI can review, edit, and sign the application. |
|
| Co-Investigator (Edit) | Optional |
Assign this role to any others who should have edit access to the application. This role mirrors a PI profile, except without being able to sign an application. |
|
| Read Only | Optional | Assign this role to any others for whom read-only access is sufficient. |
|
Note: prior to mid-August 2025, applicants could also assign specific permissions using the EthOS Share tile. This feature and tile have now been disabled but any pre-existing permissions granted in this manner are still intact.
Steps to Assign an EthOS Role - New Applications
The best practice is to assign a role when you first create your EthOS application. To assign access after the fact (e.g. extending access on a migrated legacy form or sharing with a newly added study-team member), please see Changing a Form’s Previously Assigned Permissions below.
The steps below can be followed for any EthOS application form. If you are creating a main form application, you can also reference the Adding Study Personnel section-specific instructions.
-
Once the form is created, click on the Roles button in the actions ribbon at the top

-
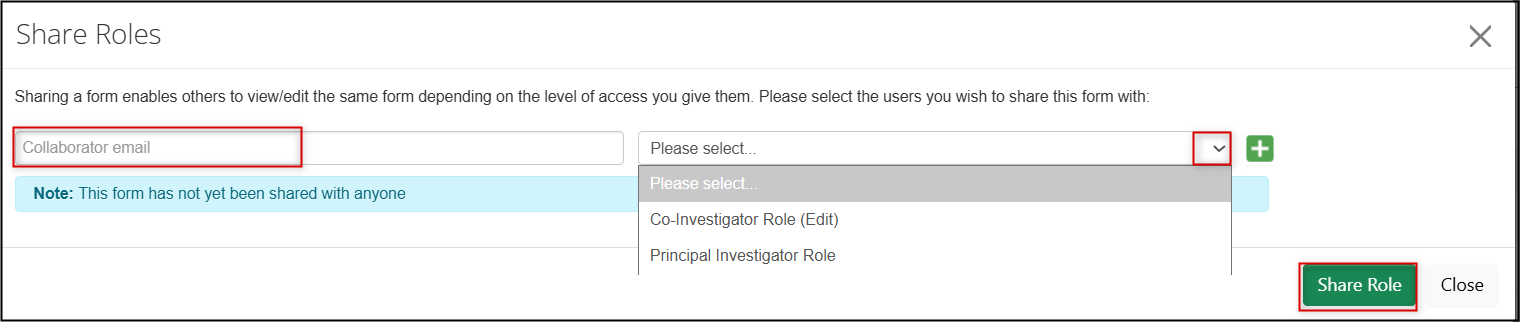
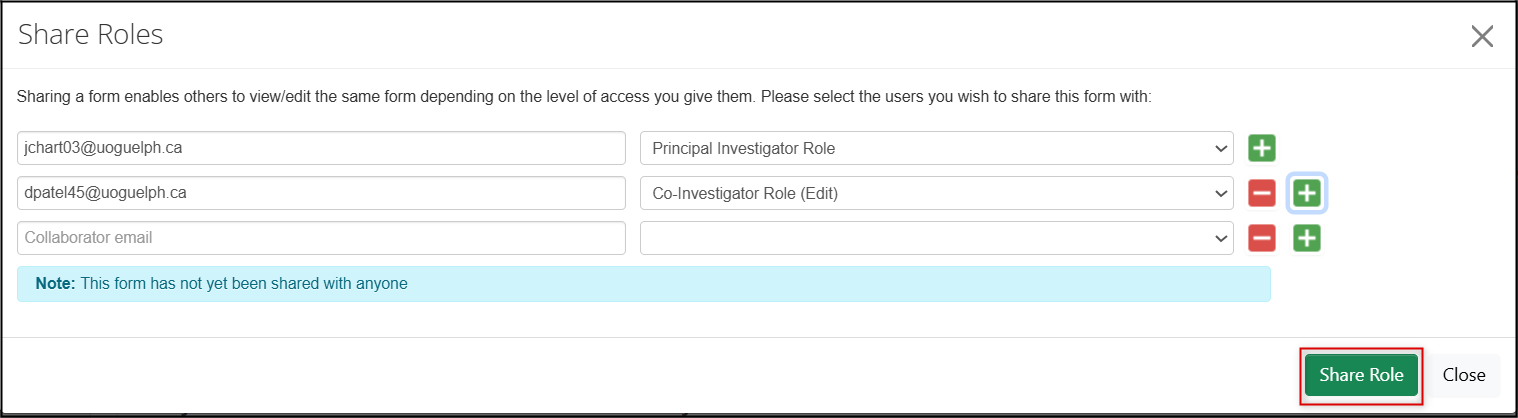
In the Share Roles pop-up window, search for the study team member/collaborator’s email address and choose the appropriate role from the drop-down menu
- If you do not see an expected result, contact the user and ask them to activate their account (U of G/UofGH users just need to log into EthOS with their single sign-on credentials; all other users must first request an external account)
-
Refer to the Available EthOS Roles table earlier in these instructions for a description of each role if needed

-
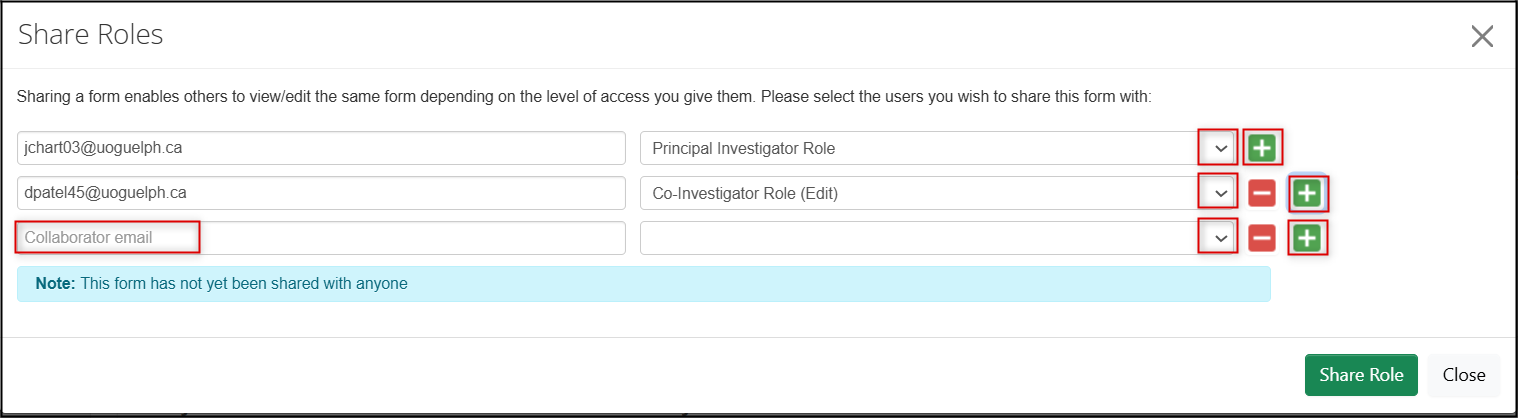
Click on the green + icon for as many additional study team members/collaborators as required, choosing the appropriate role for each
-
Click on the green Share Role button to grant your selected permissions
-
EthOS displays a green banner message saying that the form was shared


-
The study team member/collaborator receives an email and notification letting them know that they have been assigned a role, including a link to the related project
- The project is also available in their Project List and Shared tile
Important reminder: all forms will also require you to list the Principal Investigator, and the Main Form also requires that you list additional study team members/collaborators as part of the application questions. Assigning a role only provides access; you will still need to add the required contact information where prompted in your application form.
Changing Previously Assigned Permissions
You may need to share a form with a new study team member, or change/remove someone’s existing permissions later in the study cycle. The individual permissions within each role cannot be changed, but you can give someone a different role or remove a role that was previously assigned.
- Note: if the requirement to change previously assigned permissions is related to a change in the study team of an approved application, you must also submit an Amendment.
As a reminder, you can only choose a role from the Available EthOS Roles table. If your role-change scenario requires a different combination of permissions, please contact RAIMSsupport@uoguelph.ca.
The steps below can be followed for any EthOS forms.
-
From your EthOS Work Area, go to your Project List and launch the form that requires the change in access
-
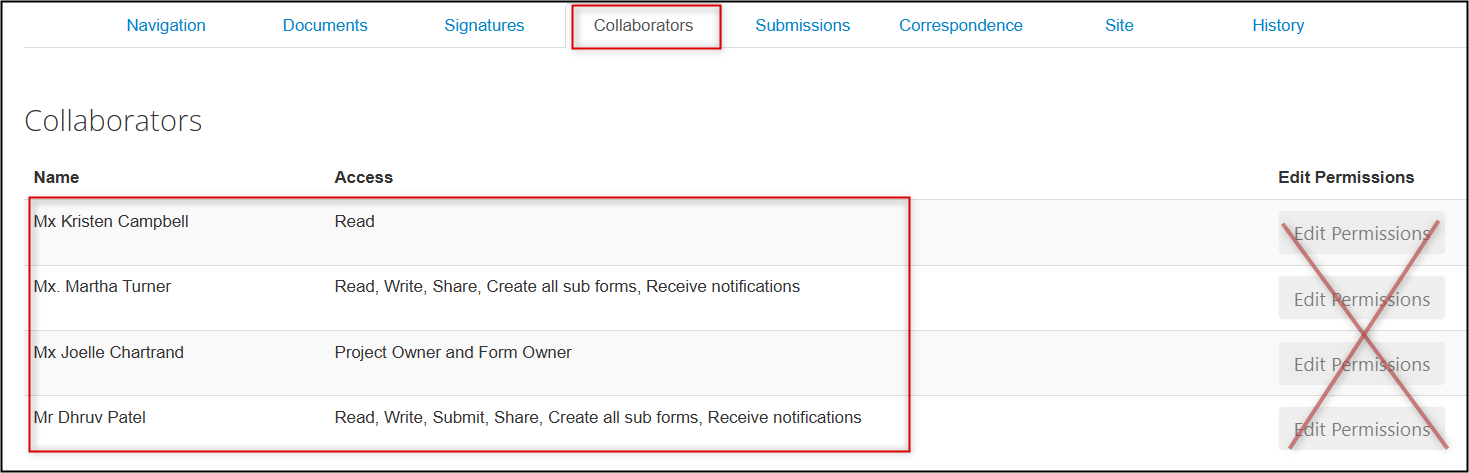
Note: from the first page of the application form, the Collaborators tab (or tile) will display who currently has access and with what permissions, but you cannot edit role-based permissions from this tab
-
-
Click on the Roles button from the action ribbon at the top to open the Share Roles pop-up window
-
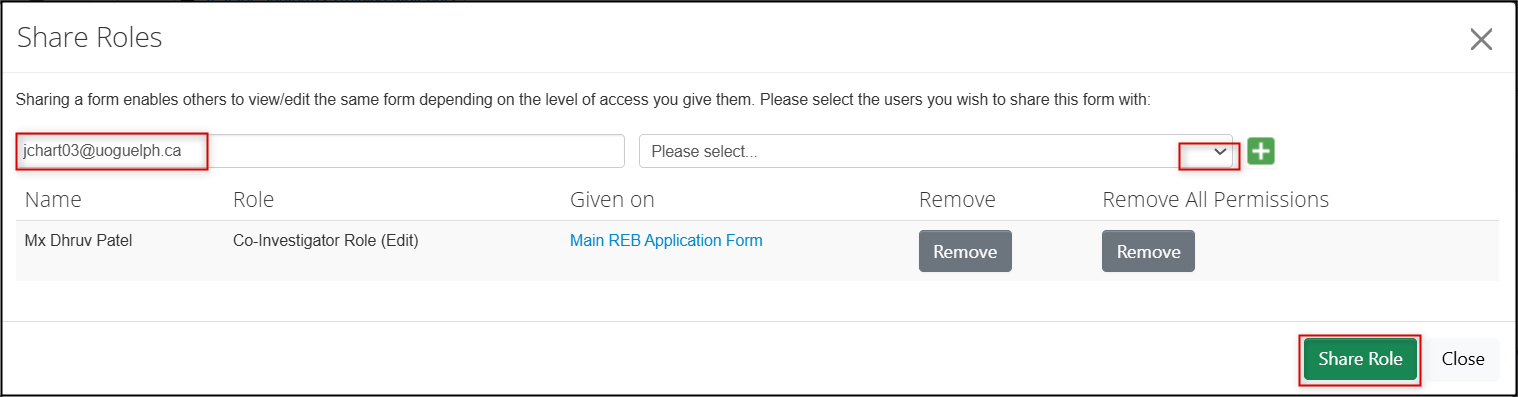
To assign a role to a new researcher, enter their name, choose the role from the drop-down menu, and click on the green Share Role button
-
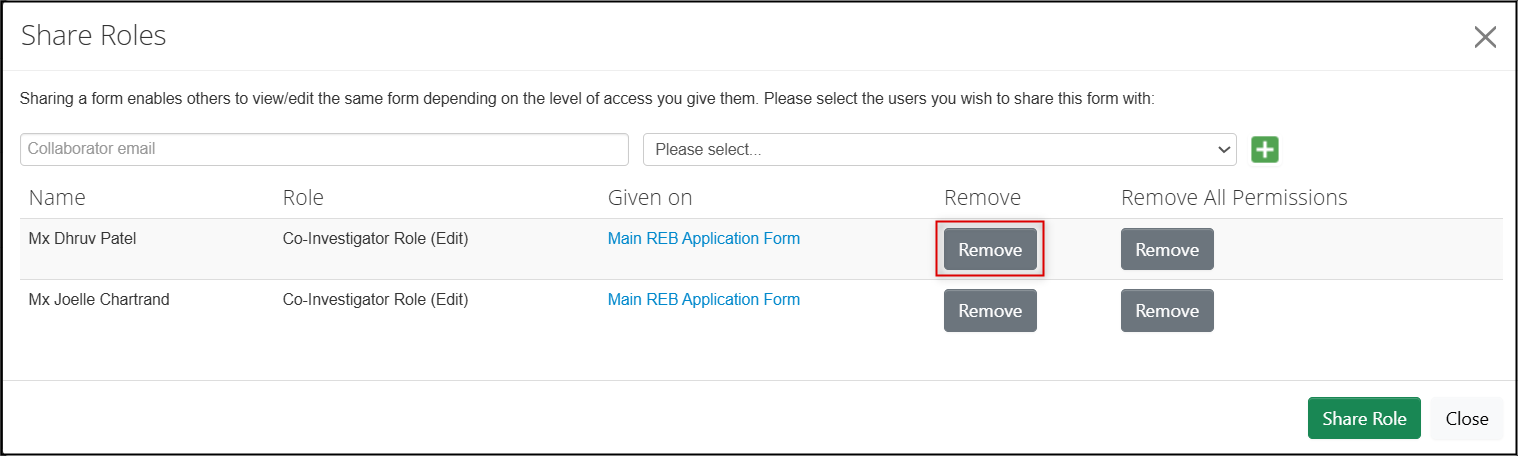
To remove previously assigned permissions, click on the grey Remove permissions button
-
Note: If the user is only listed once, either of the Remove buttons will have the same effect. If the user is listed twice, you can remove all the entries using Remove All Permissions.
-
- To change someone’s role, first remove the old role (see Step 4) and then add the new role (see Step 3).
Principal Investigator Signature
Principal Investigators are required to sign all EthOS applications. Signature requests are sent by email notification and will also appear in your EthOS Signatures tile.
- Launch the application from the email link; review the application and any attached documents
- If something needs to change, click on the Reject icon and return it to the form owner to make any required changes
- Otherwise, click on the Sign icon at which point the application will be automatically submitted
For more information, consult the Principal Investigator Signature step training video.