Introduction
Once your Main REB Application Form is approved, you may need to submit an amendment when there is a change to the approved protocol that affects participants at any stage of the research including, but not limited to, changes to the consent form, the addition of study interventions, changes in study team personnel, or changes to measures to protect privacy and confidentiality.
If you are unsure of whether an amendment is required for your research protocol, contact reb@uoguelph.ca for help and guidance. (Tip: you can also use the Built-in Correspondence feature within the application).
Note: The steps below are for EthOS-generated Main REB Application Forms only. If you need to amend a Legacy Protocol (created using the old MS Word forms), please consult the Legacy Protocol user materials.
Process Overview
Detailed instructions follow, but here is a process overview for an initial and all subsequent amendments.
To amend an approved Main REB Application Form or SOI, you will first ‘unlock’ your approved form. After which:
- Important! Ensure your response in Start Here, Question 1.1 is set to the second option: Addressing REB feedback (modification) or amendment
- In the Amendment Summary section, answer ‘Yes’ and outline summary-level details about the nature of the change(s) you need to make
- Make the changes directly in the unlocked form; EthOS will store both the original and current versions; you and the REB reviewers can Compare to Previous Submission to see what has been changed
- As you change responses, EthOS will automatically check for dependencies and add new required questions to the form (which will need answering before resubmission); previous questions/responses no longer applicable will be removed from this version of the application
-
When amending study documents, upload any new documents (previously not included) with their related question; for changed documents, delete the previous one, upload the latest ‘clean’ version, and also include the corresponding ‘tracked’ version if applicable
- Please note that tracked versions alone are not sufficient
- As with all REB application forms, avoid uploading the same document in different areas of the form
- At the bottom of each page, use the Optional Notes to the REB section only if you need to provide any additional details or context for your changes, otherwise leave blank
-
Have the form signed by the Principal Investigator (or sign, if you are the PI) to automatically submit the amendment.
- Note: the signature step automatically triggers a Completeness Check which may require you to address any outstanding dependent questions (see Step 4)
Reminder: EthOS does not autosave while you are writing responses (in the way that other cloud-based applications do) and will time out after 30 minutes. Click on the Save tile frequently, especially when you are writing detailed responses and/or notes!
As with initial submissions, the amendment application is subject to any modification requests after REB review, prior to approval.
Applicants receive automated notifications from EthOS as the amendment moves through this review process.
- Reminder: Notifications are sent to your EthOS email address and also appear in your Work Area Notifications tile.
Once approved, a new approval certificate is issued for the protocol.
Unlock your Previously Approved Application
- From your EthOS Work Area and Project List, locate the project to be amended
-
In the Actions pane on the left of the screen, click on the Unlock to Amend button (only available for previously approved submissions)
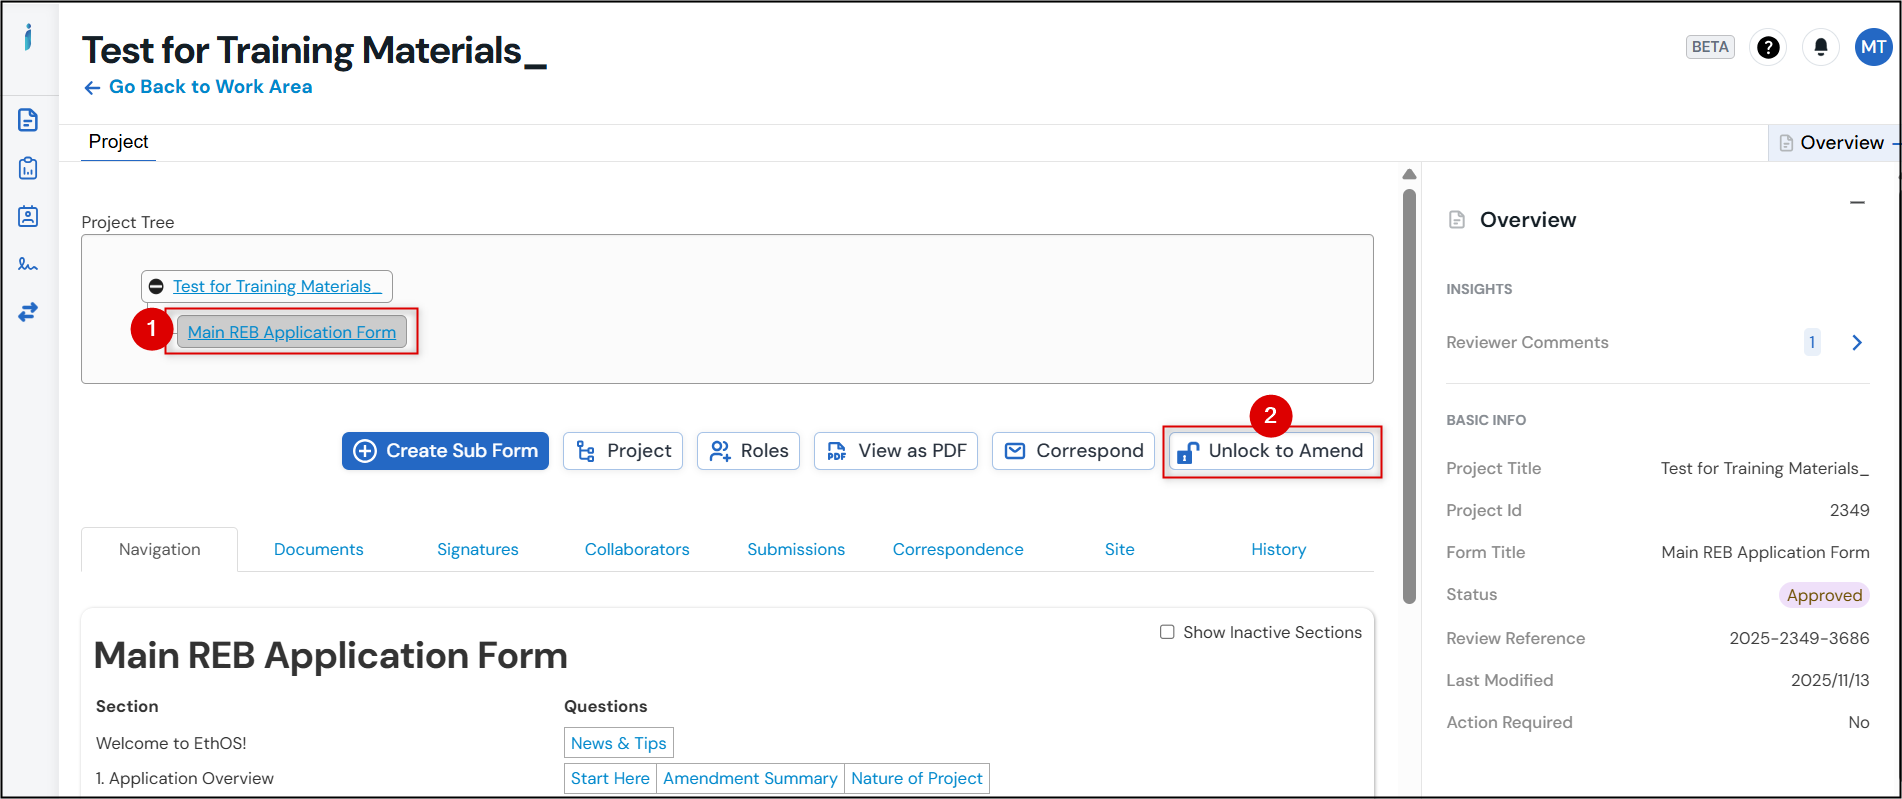
-
The Unlock to Amend pop-up window provides you with summarized amendment instructions (if you unlocked in error, click on the grey Close button)
- You can ignore the Timeline Notes field; you will have an opportunity shortly to explain the amendment
-
Click on the green Unlock to Amend button and answer Yes to confirm
- Important! Depending on your display settings, you may need to drag or resize the pop-up window to see the green Yes/No buttons
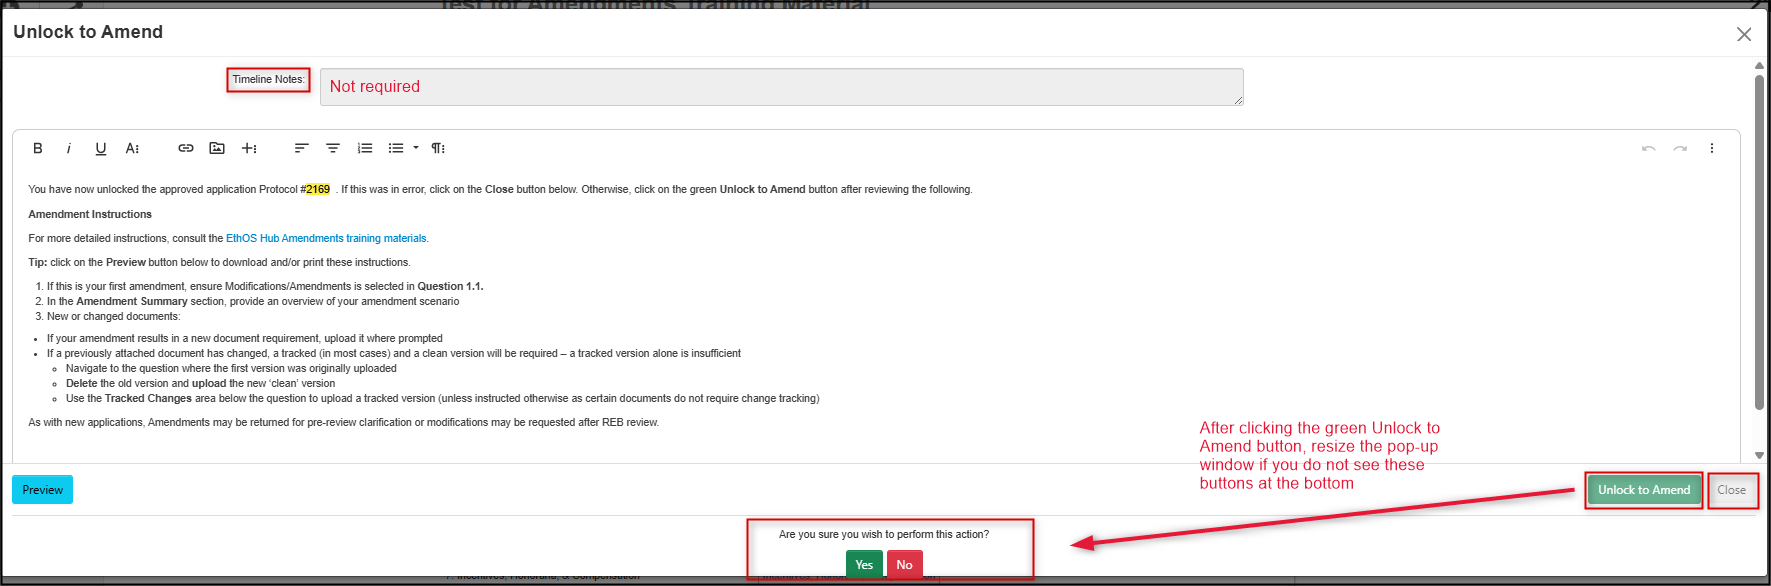
-
EthOS displays a green Successful banner and brings you to the Main REB Application Form initial page
- Note: if you see an Attachment pop-up window, it is just a repeat of the abbreviated instructions; you can download them or just close the window
-
The status of your application will have changed to Initial Amendment (or Subsequent Amendment for all future amendments)

You are now ready to update your previously approved application with your desired amendments.
Create an Amendment Summary
Once the form is unlocked, your next step is to create a short Amendment Summary
-
Important! Your response in Start Here, Application Overview Question 1.1 must be set to the second option: Addressing REB feedback (modification) or amendment

- Notice that abbreviated guidelines for modifications/amendments are displayed when you select the second option; you can find these again any time using the Navigate button and coming back to the Start Here section
-
Answer Yes to the first question on the Amendment Summary page

-
Complete the remainder of the Amendment Summary section to provide a snapshot of what your amendment will involve
- Since many protocols undergo multiple amendment cycles over the course of the study, this page allows for a running ‘at a glance’ view of the scope of each amendment
- Note: you will still need to make the actual changes in the remaining sections of the form; the summary is just for ease of future reference
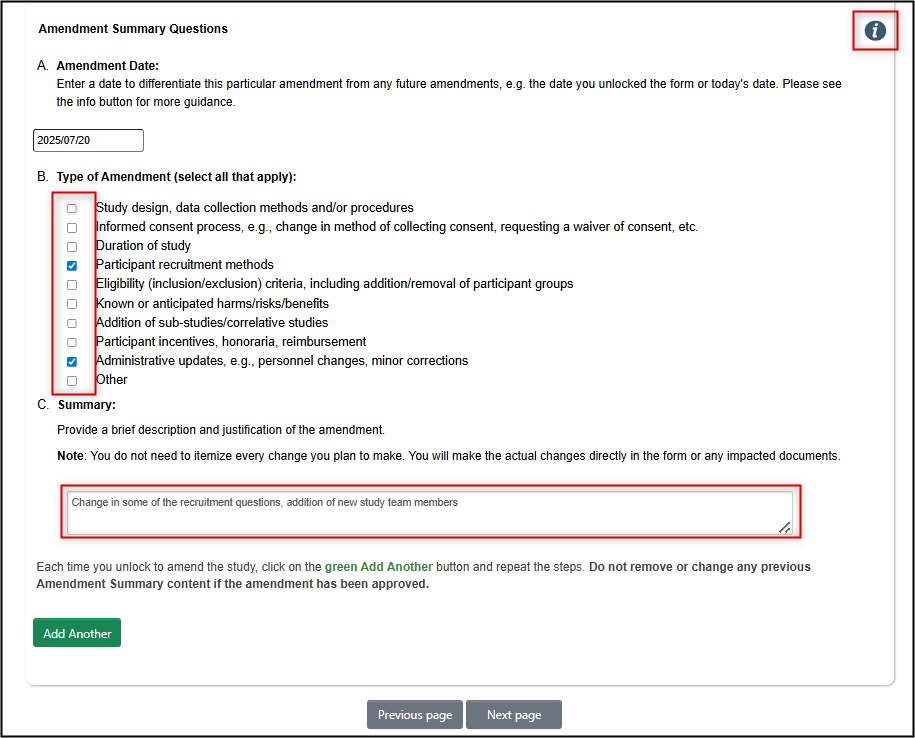
-
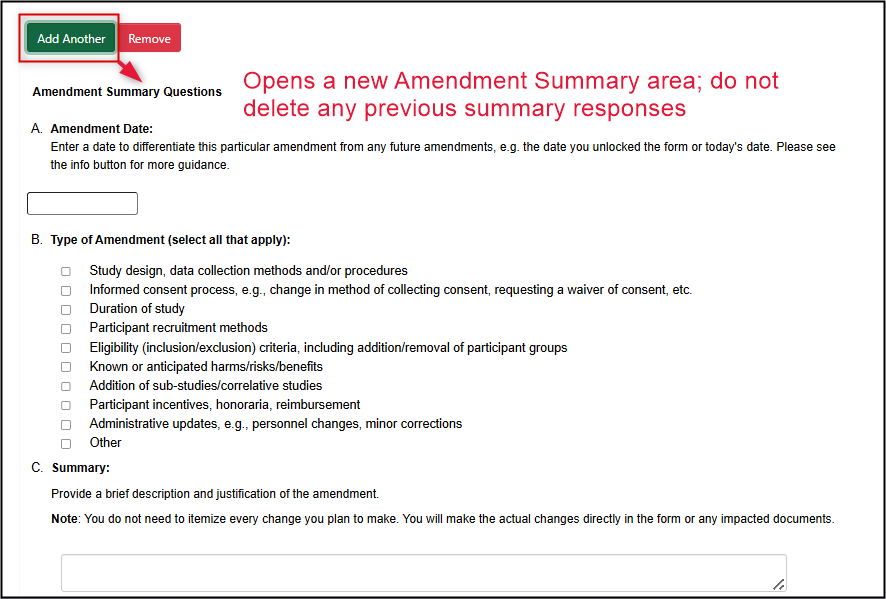
If this is a subsequent amendment application, click on the green Add Another button to add a new Amendment Summary entry area
- Note: do not remove or delete any previous Amendment Summary responses
- When you have completed your Amendment Summary you are now ready to make the changes directly in the unlocked application form
Making Your Amendments in an Unlocked Form
Make your changes directly in the unlocked application form, overwriting or updating previous responses as needed. As you are making your updates, the functions available to you are the same as those during the initial application. See the user materials under Create & Submit an REB Application for a reminder on any of these steps.
Remember that you can use the Previous and Next buttons to move through the application page by page, but Navigate allows you to jump to specific sections of the form which may be quicker in the case of your amendment. Even so, please always complete the sections in their numerical order.
![]()
![]()
There are some additional EthOS features that you will likely want to use when you are amending a previous application, as per below.
Notes to the REB Section
When your response to the Start Here, Application Overview Question 1.1 is set to Addressing REB Feedback (modification) or amendment, the bottom of each page will include a [Page Title]: Notes to the REB (Optional) area.
If you do not see this area, go back to Question 1.1 and change your response.
This area can be used throughout multiple modifications or any future amendment cycles.
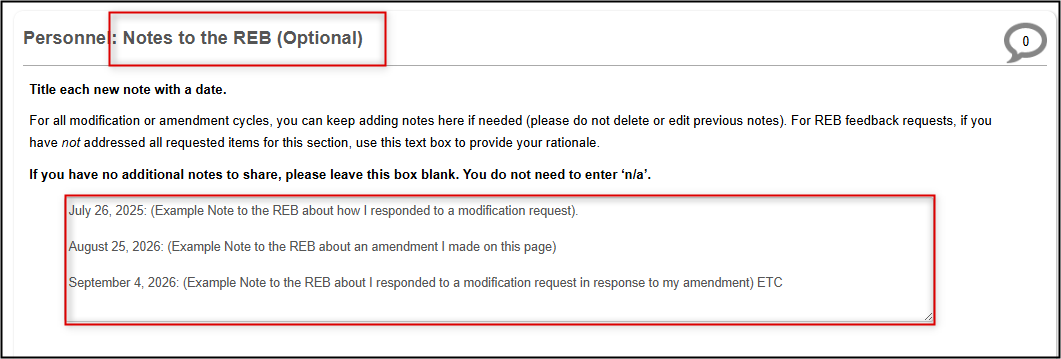
Guidelines for Using the Notes to REB Text Box
When making an amendment, changes should be made directly in the form responses and/or attached documents as required. However, each [Page Title]: Notes to the REB (Optional) text box lets you add extra details about any of these changes or reply to the REB if they only request further explanation or clarification for any amended response.
Guidelines:
- Leave this area blank if you don’t need it; do not enter ‘n/a’
- Since you can append multiple notes throughout an application’s lifecycle, title each new note with a date
- Do not change previous notes or content
- As with all form text boxes, there is no character limit or built-in formatting options (e.g. bolding, bulleted lists); however, lists will copy over with bullets or numbers intact if pasted from Word
Reminder: EthOS does not autosave while you are writing responses (in the way that other cloud-based applications do) and will time out after 30 minutes. Click on the Save tile frequently, especially when you are writing detailed responses and/or notes!
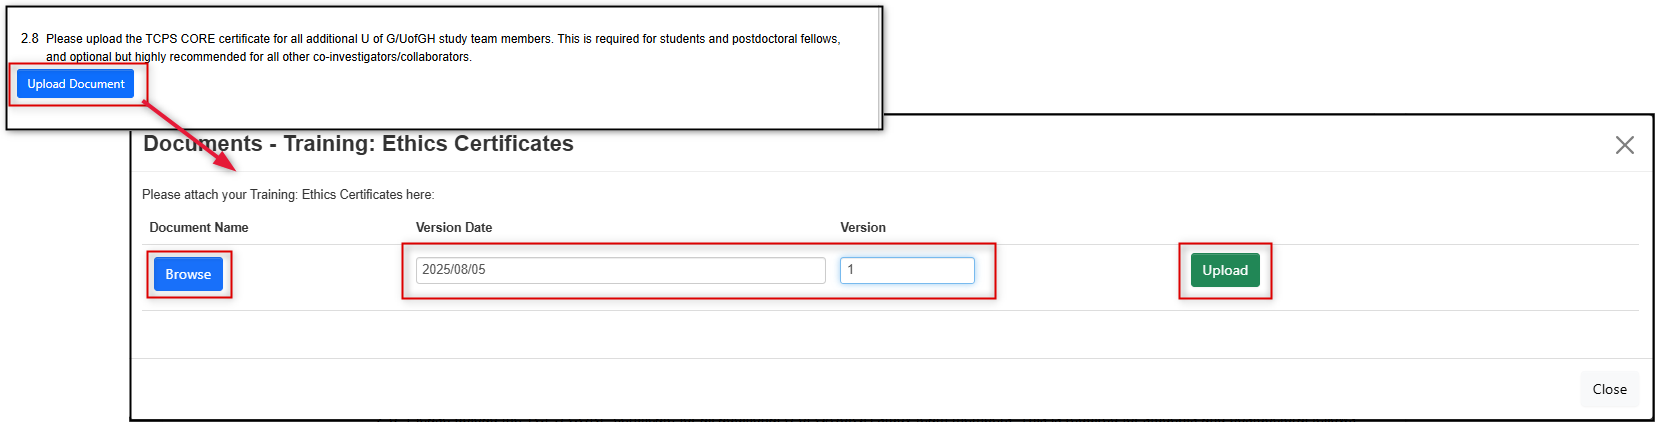
Amending Study Documents
Many amended protocols involve a change to the previously submitted study documents. For example, if you are adding a new survey then you should upload the new survey questionnaire.
Whatever documents you attached to the original application will be visible and downloadable from the Documents tab or their related section/question area.
However, when you are deleting, replacing, or adding new documents, you cannot do so from the application’s Documents tab. Instead, you must navigate to the specific question to which the document applies.
Note: if you have a document to upload that was not mentioned or requested during your form responses, use Question 19.2 which allows the upload of any ‘other documents’.
Document Attachment Guidance
The guiding principle is that your amendment should only ever include the latest version of any study documents.
Please also avoid uploading the same document in different sections of the form.
If you are unsure about any of the document requirements, reach out to reb@uoguelph.ca or send a message to us through the Correspondence button.
New Documents Not Previously Uploaded
-
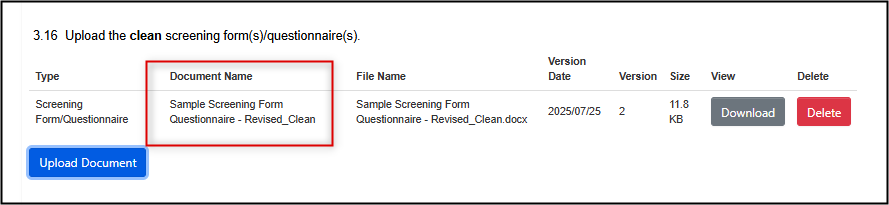
Upload the clean version only with the related question in the form
Previously Uploaded Documents No Longer Required
-
Delete the previous version from the related question in the form
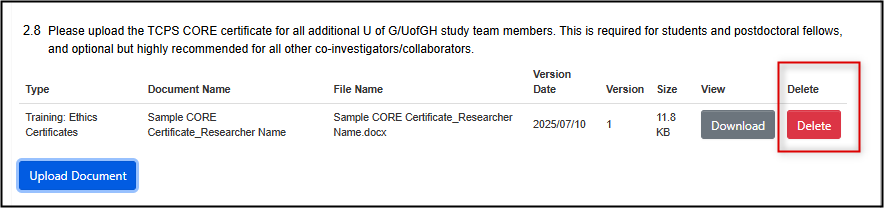
- Note: EthOS will only remove the document from the current version of the application
Previously Uploaded Documents That Have Changed
- Navigate to the question where the previous version was uploaded
-
Delete the previous version from the question
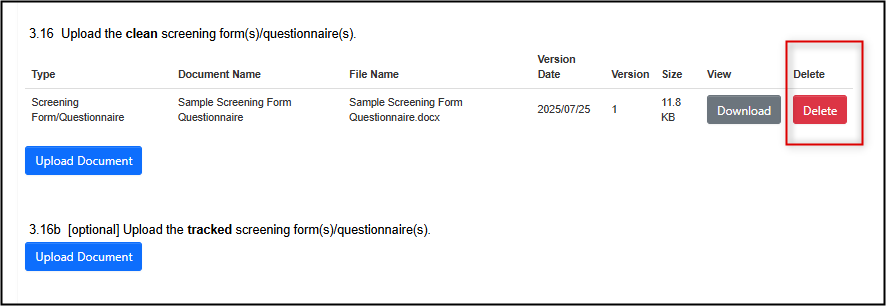
- Note: EthOS will only remove the document from the current submission version of the application form
-
Upload the new, clean, version of the changed document
-
Most, but not all, changed documents require a tracked changes version to be uploaded; if prompted and applicable, upload it in the area below the clean document.
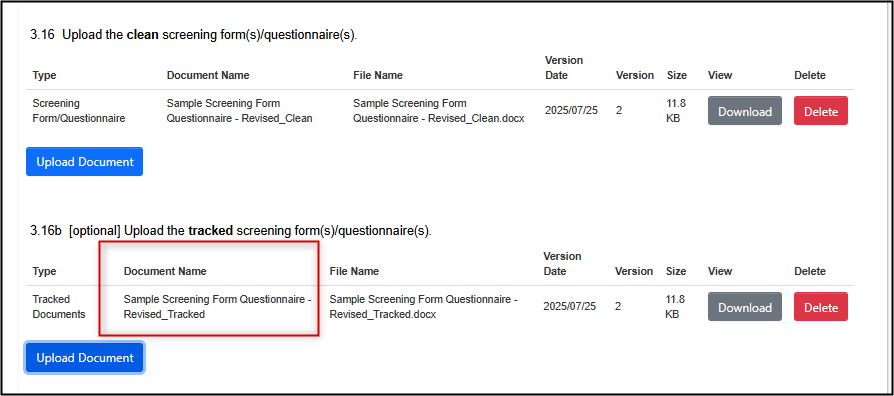
- Note: in these scenarios, be sure to upload both clean and tracked versions; a tracked version alone is insufficient
-
If you do not have a tracked version, please include a note and/or explanation in the Optional Notes to REB area at the bottom of the same page on which the document upload was required
Comparing to a Previous Submission
As you are making your changes, and before you submit them, you may wish to review what you have changed in the form responses and compare the current and previous versions of the application.
Note: This feature allows comparison between current and previous versions on the form responses only. If you change documents, EthOS will highlight the addition (or deletion) as a change in the list of attachments, but it does not highlight changes in the contents of each document. If you need to compare document contents (e.g., differences between two survey questionnaires), please do so outside of EthOS.
To compare versions:
-
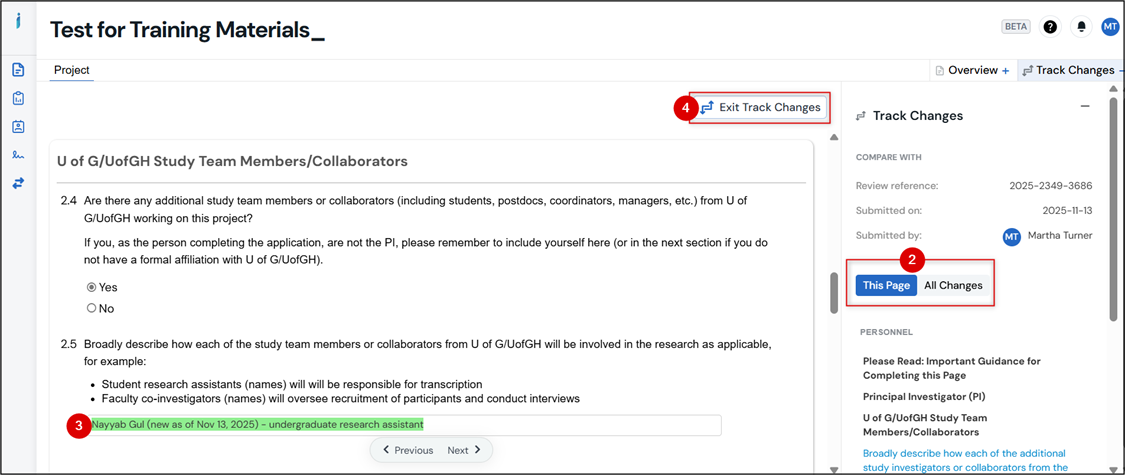
From any page in your application, if changes have been made you can click on the Track Changes button in the actions ribbon
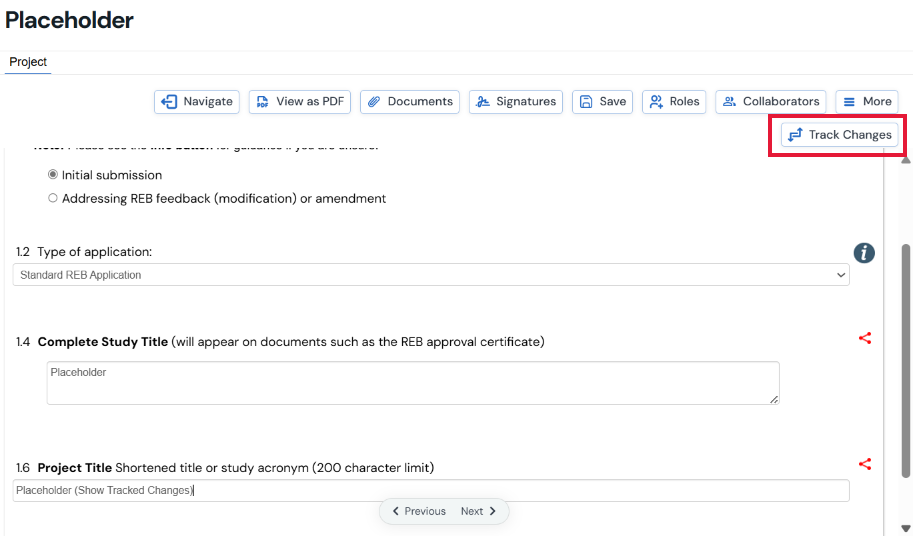
- EthOS displays a panel on the right-hand side of your screen in Track Changes mode; you can choose to see only the changes for the current page or all pages
-
On the page, review the changes:
- Content that has been added is highlighted in green
- Content that has been changed is highlighted in red
- Content that has been deleted is highlighted in red and shown in strikethrough font
-
Click on the Exit Track Changes button to return to your application and continue making edits
Review Your Amended Application Before You Submit
We encourage researchers to review your amended application before triggering the final Signature step. Ensure that you have addressed all the changes you outlined in the Amendment Summary section.
Optional steps to ensure that you have made all the changes in scope for your amendment:
- Use the Compare to Previous Version feature
-
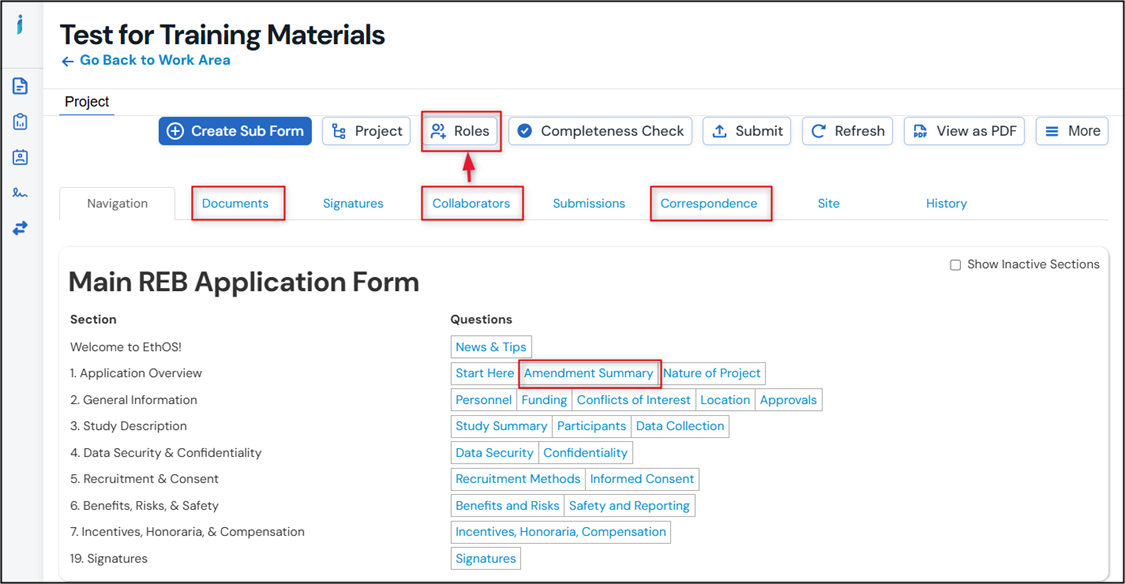
From any page in the application, click on the Navigate button to return to the Main Application Overview page; here you can spot-check areas as needed, e.g.:
- Review the Documents tab to ensure that you have successfully uploaded (or deleted) any changed documentation
-
Review the Collaborators tab to confirm that your study personnel are correct and have the correct permissions
- Note: if necessary, use the Roles button to manage access to any newly added (or removed) study team members/collaborators list (see the Sharing Forms/Assigning Roles materials for more information)
- Review the Correspondence tab to review and previous correspondence with the Ethics Office about this amendment, or to send a new email to the Ethics Office
-
Review the content you wrote in the Amendment Summary section and reconcile it, if necessary, with the changes you ended up making
Sign and Submit an Amended Application
When you have made and reviewed all your desired changes, the PI (if not yourself) will need to sign your amended application before it can be submitted. Request the signature only after confirming that the PI has thoroughly reviewed your amendment and is unlikely to suggest further changes. Should the PI have additional comments, they will need to decline the signature request.
-
First make sure that you are on the Signatures page, not the Signatures button or tab:
-
Request the PI signature, or sign if you are the PI
- Note: this is the same step as your initial submission; see the Signatures and Submitting Applications materials for more information

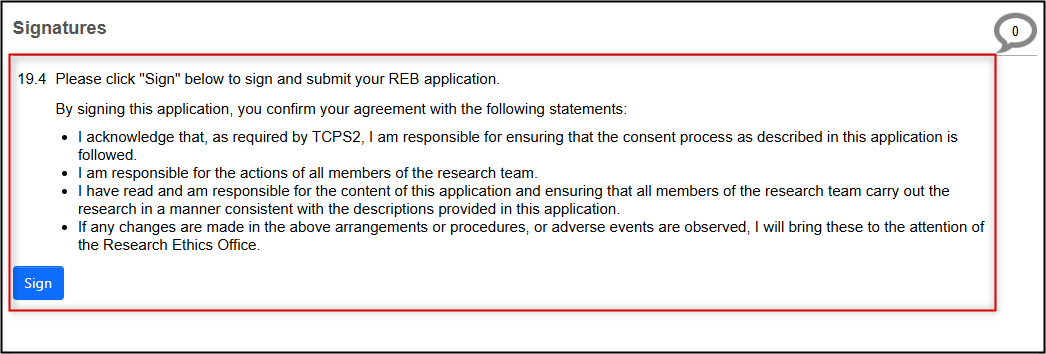
Note: On the Main REB Application Form page, the form’s status will appear as Under Amendment until the PI’s signature triggers the automatic submission to the REB office. Once submitted, you will receive an automated email and notification and the form’s status changes to Amendment Submitted.
You have now completed your amendment.
As with the initial submission, the Ethics Office may request clarification or modifications as your amendment is reviewed. See the user materials under Responding to REB Feedback for guidance on these steps.