[Contents] [Introduction] [Ventral Surface] [Mid-Sagittal Cuts] [Hippocampal Dissection] [Coronal Cuts] [Horizontal Cuts] [Glossary]
We progress through the hippocampal dissection in stages. Each image depicts a new step in the dissection. Again, make even cuts with your razor by using smooth sawing motions. Take your time, and be mindful of your fingers.
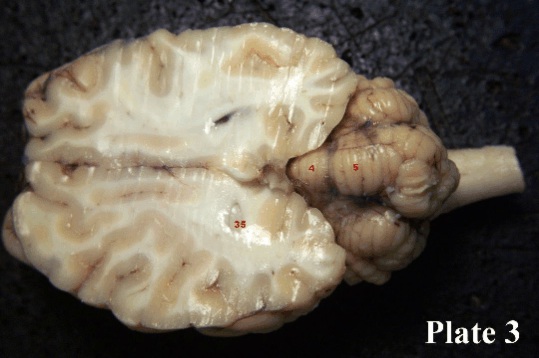
Plate 3: The first plate suggests that we begin our dissection by removing a portion of the dorsal cortex. We can take a good centimetre off of the top before becoming more careful. We then proceed by cautiously shaving thin slices off until we reach the posterior horns of the lateral ventricles. We know we are getting close when the white matter in the posterior part of the cortex spreads out into a large sheet. In Image A, on the right side you see a cut that exposes the ventricle. On the left side we have gone lower and you can just make out the hippocampus (35) peeking through. Behind the cortex, you see the cerebellum, with the anterior lobe (4) and posterior lobe (5) marked.
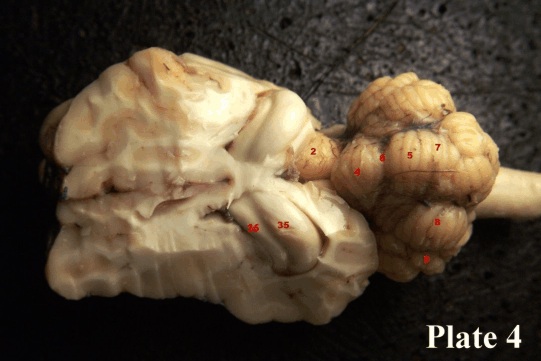
Plate 4: Now we show what the dorsal brain stem looks like when we have carefully removed the cortex around the hippocampus, peeling downward from the point exposed (35) in Image A. Note that the hippocampus is continuous with the cortex on its posterior edge, where is receives cortical input. We now see the main body of the hippocampus (35) and the fimbria (36), which is formed by the fibres that stream out of the hippocampus. Right behind the hippocampus, we have exposed the superior colliculus (2). Behind this lie the cerebellar structures seen in Image A, but we have added a label to the primary fissure (6) that divides the anterior lobe (4) and posterior lobe (5). The midline region of the cerebellum, front to back, is also known as the vermis (7) - literally, “worm” because of its appearance. Laterally to the vermis lies the intermediate zone (8), and the lateral zone (9). This way of dividing up the cerebellum makes as much sense as the anterior/posterior way because the projections of the cerebellar cortex to the cerebellar nuclei follow this longitudinal pattern.
(Fine Print for those who are interested: All output from the cerebellum travels through three nuclei - the medial fastigial nuclei, the intermediate interpositus nuclei and the lateral dentate nuclei. These sit right inside the body of the cerebellum, close to the fourth ventricle).
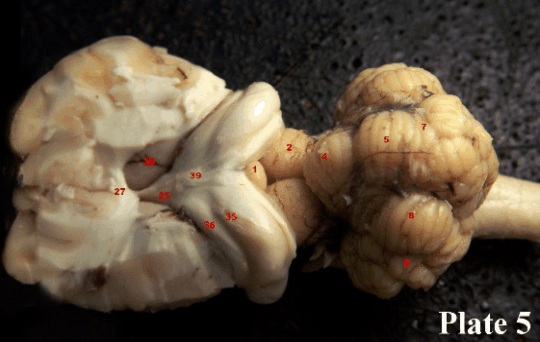
Plate 5: We can use a small-pea sized structure as a central landmark in the midline. This is the pineal gland (1) which secretes the hormone melatonin. Behind lies the superior colliculi (2). Because we have now exposed the cortex and corpus callosum overlying the anterior aspect of the hippocampus, we can see the fornix (37), which is the output tract of the hippocampus, and the septum (25) that lies at the anterior edge of the fornix. Note that the output from the hippocampi from the left and right brain half seems to flow together in the middle. This is deceiving because the output actually stays separate in a clearly defined left and right fornix, as we will see later. There are two other new structures that appear in this image. First, we see a part of the caudate nucleus (28) peeking out. This is a part of the basal ganglia. Second, we see part of the corpus callosum (27), close to the point where it curves down to form the genu of the corpus callosum. Numbers (4), (5), (6), (7), (8), (9), (35), and (36) are still labelled (can you identify these structures?)
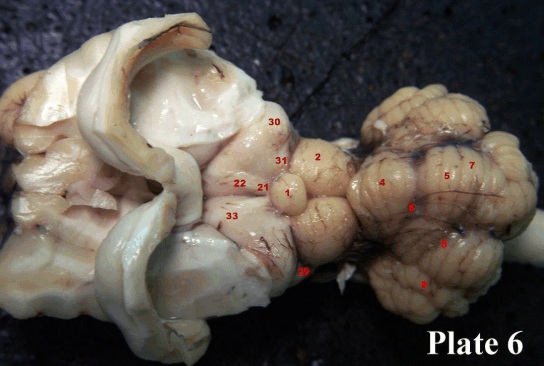
Plate 6: In this image, we have peeled back the hippocampus on both sides, exposing the underlying thalamus (33). There are quite a few structures of interest in this region. We can see a broad fibre band, the stria medullaris (22) curving across the surface of the thalamus. The stria medullaris originates in the anterior region of the thalamus and ends close to the middle, very near the pineal gland (1), in the habenula (21). This image also shows the pulvinar nucleus (31) which lies lateral to the pineal gland. This nucleus receives input from, among other places, part of the visual cortex, and sends fibres to the superior colliculus (2). Also included are the lateral geniculate nucleus (30), which receives fibres from the optic tract and the medial geniculate nucleus (29), which receives input from the ear. Again, numbers (4), (5), (6), (7), (8), and (9) are labelled.
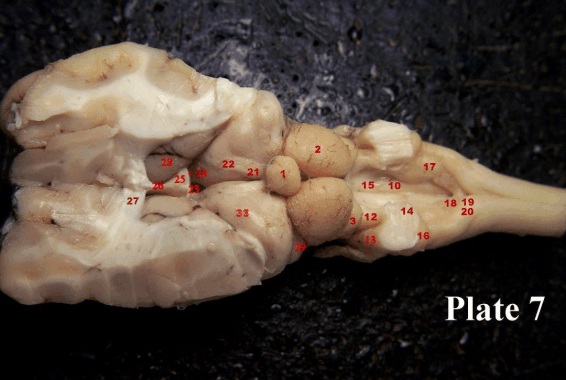
Plate 7: We have now removed the hippocampus and the cerebellum. Anterior to the thalamus, we see the septum (25) and again and the fornix (24) is formed by a band of white fibres that run at the posterior edge of the septum. A bit of the thin dividing membrane that separates the lateral ventricles can be seen anterior to the septum, we encountered it in the mid-sagittal section as the septum pellucidum (26). Again, we see a massive part of the anterior corpus callosum (27). The number (23) denotes the region of the third ventricle. Now we can pay attention the hindbrain. The cerebellum has been removed, and the massive stalks (peduncles) that connect the cerebellum to the rest of the brain have become visible. We can clearly see one of the output paths of the cerebellum, the superior cerebellar peduncle (12) and the middle cerebellar peduncle (13), the most massive one, which carries input to the cerebellum from all over the brain, can also be seen as distinct entity, at least where we have marked it. The peduncle that carries input to the cerebellum from the spinal cord, the inferior cerebellar peduncle (14) is a bit less clear in its definition in this preparation. We have to imagine it as the posterior and more medial part of the combined complex of outputs and inputs into the cerebellum. The superior cerebellar peduncle disappears on its way to the anterior parts of the brain just under the inferior colliculus (3), which seems to be squished under the superior colliculus.
The removal of the cerebellum has also exposed the fourth ventricle (10) into which the bottom part of the cerebellum fits quite snugly. We can now see the facial colliculus (15), which is caused by a bulge from the nucleus of the abducens nerve (VI) and fibres running from the nucleus of the facial nerve (VII). The dorsal cochlear nucleus (16), a major input nucleus from the ear, can be seen posterior to the inferior cerebellar peduncle, as a tidy little bulge. The vestibular nucleus (17), crucial for balance and the maintenance of body posture can also be seen as a bulge medial and slightly behind the inferior cerebellar peduncle.
Toward the very posterior part of the fourth ventricle, we see a small bulging mass, that tends to look slightly gelatinous, lining the end of the ventricle, and forming a triangle, the motor nucleus of the vagus nerve (18). Incidentally, a very tiny opening just at the apex of this triangle leads the spinal fluid down the middle of the spinal cord, and a narrow canal. Dorsal to this we see the switching stations for the incoming information from the very massive spinal tracts that carry information about fine touch discrimination from the lower and upper parts of the body. The fibres from the former tract travel in the fasciculus gracilis and end in the region of the nucleus gracilis (19) while fibres from the latter travel in the fasciculus cuneatus and end in the nucleus cuneatus (20). Numbers (1), (2), (21), (22), (28), (29), (30), (31) and (33) are still labelled (do you remember their names?)
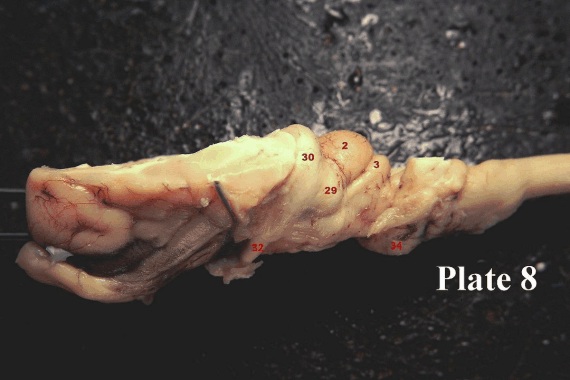
Plate 8: This lateral view of the brain stem is meant to give another look at the medial and lateral thalamic nuclei. You can see the optic tract (32) coming up from the optic chiasm (recall that before the chiasm, we refer to the fibres from the eye as the optic nerve and after the chiasm the fibres from the eye are referred to as optic tract). The fibres stream upward into the lateral geniculate nucleus (30). And now, from this perspective, we can also see the medial geniculate nucleus (29) quite nicely. (2) and (3) show the superior and inferior colliculi in relation to the geniculate bodies, and the pons (34) has also been numbered as a landmark.
| Plate 3: | Plate 7: |
| 4 anterior lobe of the cerebellum | 1 pineal gland |
| 5 posterior lobe of the cerebellum | 2 superior colliculus |
| 35 hippocampus | 3 inferior colliculus |
| 10 fourth ventricle | |
| Plate 4: | 12 superior cerebellar peduncle |
| 2 superior colliculus | 13 middle cerebellar peduncle |
| 4 anterior lobe of the cerebellum | 14 inferior cerebellar peduncle |
| 5 posterior lobe of the cerebellum | 15 facial colliculus |
| 6 primary fissure | 16 cochlear nucleus |
| 7 vermis | 17 vestibular nucleus |
| 8 intermediate zone of the cerebellum | 18 motor nucleus of the vagus nerve |
| 9 lateral zone of the cerebellum | 19 area of the nucleus gracilis |
| 35 hippocampus | 20 area of the nucleus cuneatus |
| 36 fimbria | 21 habenula |
| 22 stria medullaris | |
| Plate 5: | 23 third ventricle |
| 1 pineal gland | 24 columns of the fornix (not in picture) |
| 2 superior colliculus | 25 septum |
| 5 posterior lobe of the cerebellum | 26 septum pellucidum (dividing membrane) |
| 6 primary fissure | 27 corpus callosum |
| 7 vermis | 28 caudate nucleus |
| 8 intermediate zone of the cerebellum | 29 medial geniculate nucleus |
| 9 lateral zone of the cerebellum | 30 lateral geniculate nucleus |
| 25 septum | 31 pulvinar nucleus of the thalamus |
| 27 genu of the corpus callosum | 33 thalamus |
| 28 caudate nucleus | |
| 35 hippocampus | Plate 8: |
| 36 fimbria | 2 superior colliculus |
| 37 fornix | 3 inferior colliculus |
| 29 medial geniculate nucleus | |
| Plate 6: | 30 lateral geniculate nucleus |
| 1 pineal gland | 32 optic tract |
| 2 superior colliculus | 34 pons |
| 4 anterior lobe of cerebellum | |
| 5 posterior lobe of cerebellum | |
| 6 primary fissure | |
| 7 vermis | |
| 8 intermediate zone of cerebellum | |
| 9 lateral zone of cerebellum | |
| 29 medial geniculate nucleus | |
| 30 lateral geniculate nucleus | |
| 31 pulvinar nucleus of the thalamus | |
| 32 optic tract | |
| 33 thalamus | |